

Invitations in Mstnd: track your team's invitations and send them in one go
In this article
The «Invitations» tab in Mstnd shows every invitation your organization has sent to join the system, with the status of each one: pending, accepted or expired. From it you can resend an invitation, copy its link or cancel it. When you need to add several employees together, you use «Bulk invite» to send them their invitations in one go, with one shared role and organizational position.
Quick overview
| Item | Details |
|---|---|
| Module | Users and roles |
| Where it is in the interface | Side menu → «Users and roles» → the «Invitations» tab |
| Direct link | https://app.mstnd.sa/users?tab=invites |
| Goal | Track the invitations you have sent, deal with the late ones, and add several employees in a single step |
| Who it is for | The system administrator, HR officers and whoever prepares employee accounts |
| Video length | Under a minute |
| What you will learn | Reading the invitations list, filtering by status, the invitation actions, and sending and reviewing a bulk invite |
Watch the video
The video shows the invitations list, its filters and its actions, then sends three invitations in one go and shows them appearing in the list.
Why this feature?
Sending an invitation is not the end of the job. Some employees do not see the email, some wait until the link expires, and some invitations go to the wrong address. Without a clear list of invitations and their status, employees stay outside the system without anyone noticing, and then work that was waiting for them stalls.
On the other hand, adding a whole team, such as a new department or a batch of newly hired employees, by inviting each person separately is repetitive work and prone to mistakes in choosing the role or the position.
The «Invitations» tab solves both problems: one list where you follow every invitation until it is accepted, and «Bulk invite», which sends many invitations with the same settings.
| Before | After |
|---|---|
| You do not know who has accepted the invitation and who has not | The «Status» column shows where each invitation stands |
| An expired invitation means starting the process over | «Resend» from the invitation's menu, with one click |
| The employee could not find the email | «Copy link» and send it to them through another channel |
| Inviting ten employees means ten separate operations | «Bulk invite» sends them all at once |
| Employees in the same situation may end up with different roles or positions | One role and one position applied to everyone |
Where to find it
- From the side menu → «Users and roles».
- Choose the «Invitations» tab, the second one, after «Users».
Direct link: https://app.mstnd.sa/users?tab=invites
Invitations reach this list from more than one source:
- The «Invite user» button in this tab or in the Users tab.
- The «Bulk invite» button in this tab.
- The «Invite your team» step during account creation.
Concepts and terms
| Term | Meaning in Mstnd |
|---|---|
| Invitation | An email carrying a link that lets the recipient join your organization with a specific role and position |
| Pending | An invitation that was sent and not yet accepted by the recipient, and that is still valid |
| Accepted | An invitation the recipient accepted, after which they became a user in the organization |
| Expired | An invitation whose validity period ended without it being accepted; the list labels it «Expired» |
| Expires in | The invitation's validity period, which you set when sending it |
| Bulk invite | Sending invitations to several email addresses in one go, with a shared role and position |
| Recipients | The list of addresses the bulk invite will be sent to, which you review before sending |
Step by step
Step 1: View all sent invitations and their status
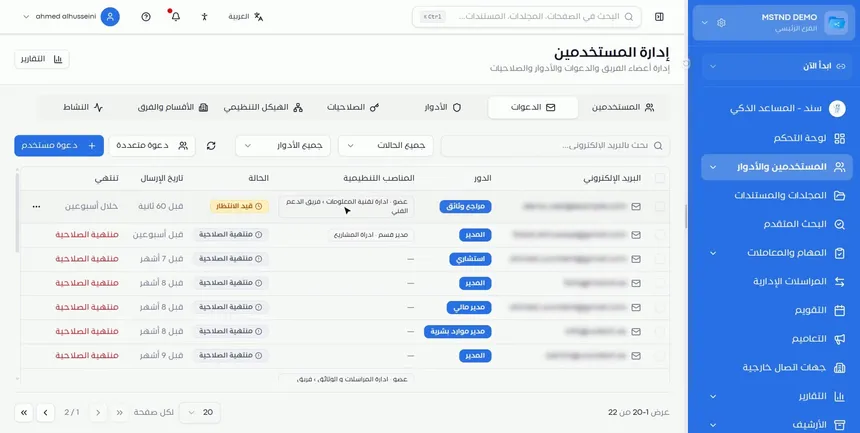
The list shows each invitation in a row, with the following columns:
- Email of the invitee.
- Role they will receive on accepting, such as «Admin» or «Document reviewer».
- Organizational positions: the position type, the section and the team, such as «Member · IT Department › Technical Support Team».
- Status: such as «Pending» or «Expired».
- Date sent: in relative form, such as «2 weeks ago».
- Expires: when the invitation stops being valid, such as «in 2 weeks», or «Expired» if that time has passed.
- The actions menu (the three dots) at the end of the row.
You can search the list from the «Search by email...» field.
Step 2: Filter by status
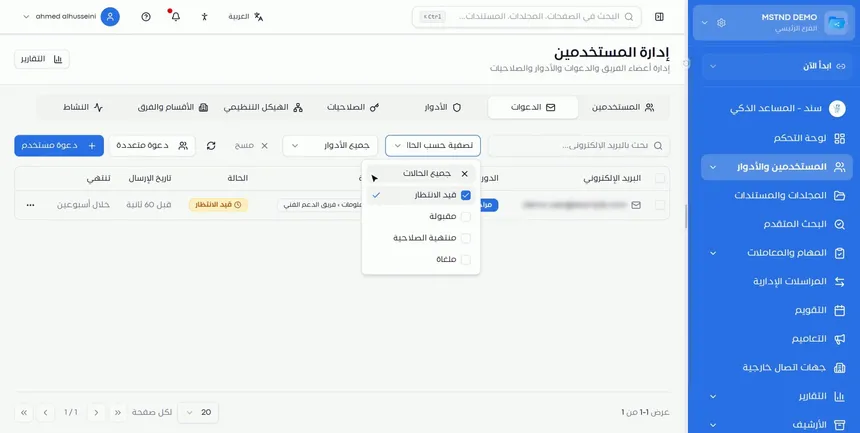
From the «Filter by status» list, choose one of the statuses: Pending, Accepted or Expired. You can also filter by role from «All roles». To remove the filter, click «Clear».
Each status serves a different purpose:
- Pending: to follow up on those who have not accepted yet, and remind them.
- Expired: to find out who needs a resend.
- Accepted: to confirm that a particular batch has finished joining.
Step 3: Resend, copy the link or cancel the invitation
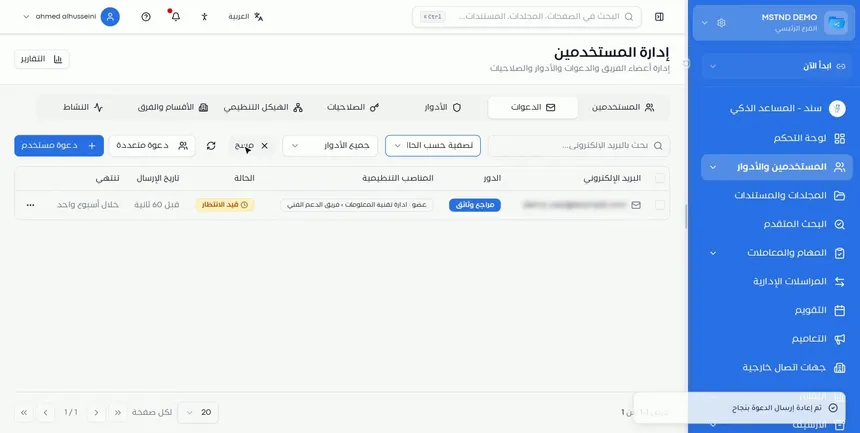
Click the actions menu (the three dots) in the invitation's row to show three options:
- Resend: sends the invitation again to the same email address. A confirmation message appears: «Invitation resent successfully».
- Copy link: copies the invitation link so you can share it with the employee another way.
- Cancel: cancels the invitation, so its link is no longer valid.
Step 4: Use «Bulk invite» for more than one employee
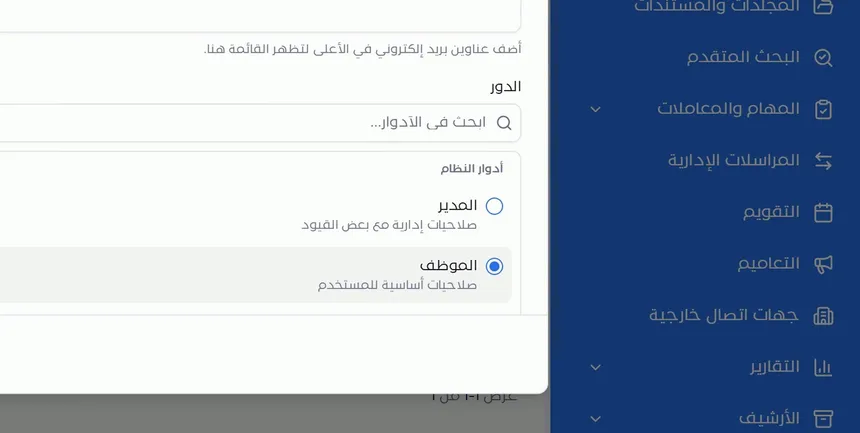
When you need to invite more than one employee, click «Bulk invite». A window opens where you enter several addresses and send the invitations to all of them in one go.
This method suits employees who share the same role and position, such as a batch of new employees in one team.
Step 5: Separate the addresses with a comma or a new line
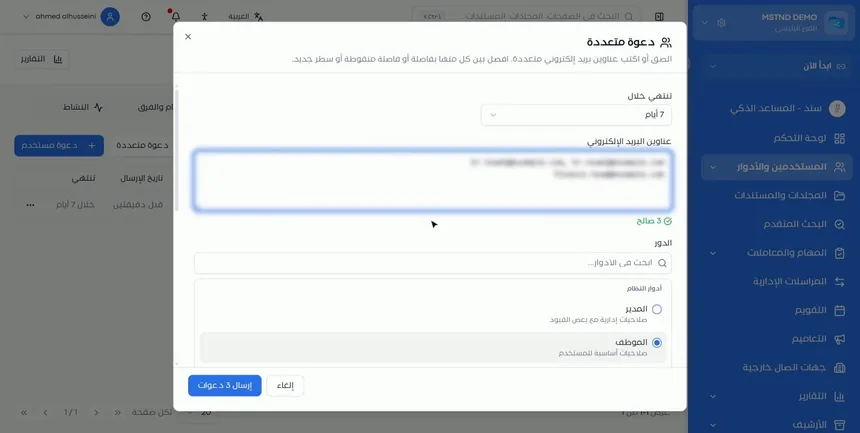
In the «Email addresses» field, paste or type the addresses, and separate them with a comma, a semicolon or a new line. The system checks the addresses immediately and shows the number of valid ones under the field, such as «3 valid».
At the top of the window, set the validity period from «Expires in», such as 7 days.
Step 6: Choose the role and organizational position for everyone
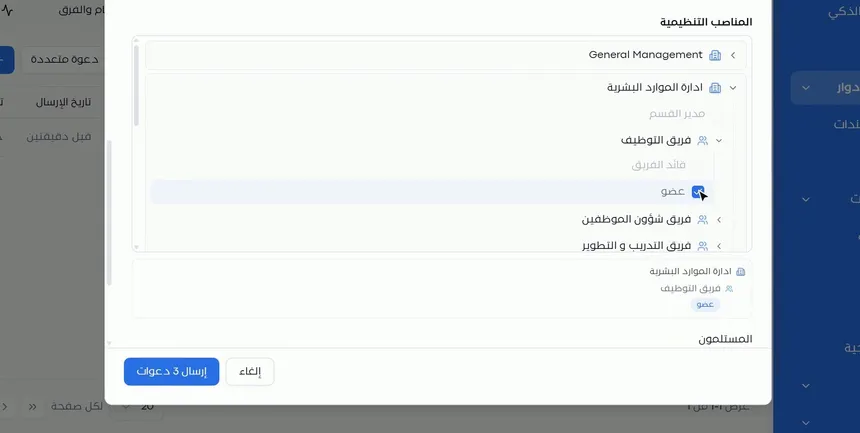
Choose the role once so that it applies to all the invitees, from the system roles or the custom roles. Then set the organizational position from the sections and teams tree: open the section, then the team, and choose the position type, such as «Member». A summary of the chosen position appears under the tree: the section, the team and the position type.
Step 7: Review the recipients, then send
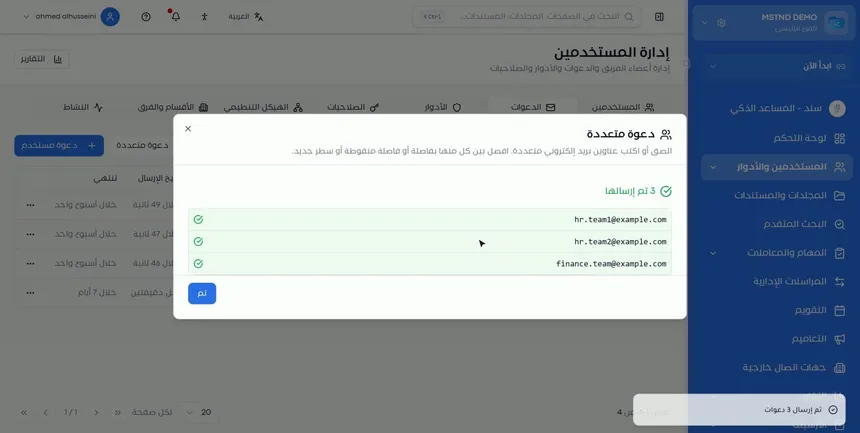
In the «Recipients» section, review the list of addresses before sending and make sure it contains no mistakes. Then click the send button, which shows the number of invitations, such as «Send 3 invitations».
After sending, the window shows the result: the number of invitations sent, and each address with a success mark next to it. Click «Done» to close the window.
Step 8: The invitations appear in the list right away
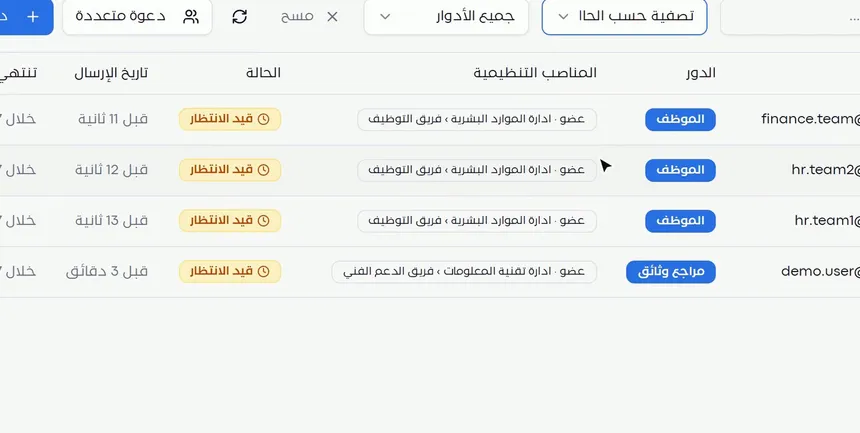
The new invitations appear in the list immediately with the «Pending» status, each with the shared role and position, and a sent date of «a few seconds ago». From here you follow them until the invitees accept them.
Options and their effect
| Option or setting | What it does | When to use it |
|---|---|---|
| «Search by email...» | Finds an invitation by a specific address | When following up on a specific person's invitation |
| «Filter by status» | Shows pending, accepted or expired invitations | To follow up on each status separately |
| «All roles» | Shows invitations by role | To review the invitations for a specific role |
| «Clear» | Removes the filter | To return to the full list |
| Resend | Sends the invitation again | When the email was not received or the invitation has expired |
| Copy link | Copies the invitation link | To send it through another channel |
| Cancel | Cancels the invitation | When it was sent to the wrong person or plans have changed |
| «Invite user» | Sends an individual invitation | For an employee with a particular role or position |
| «Bulk invite» | Sends invitations to several addresses together | For a batch of employees with the same role and position |
| «Expires in» | Sets the invitation's validity period | According to when the employees will join |
| «Recipients» | Shows the addresses before sending | For the final review |
Practical scenarios
Scenario: The HR department of a trading company adds a batch of employees
Situation: Five new employees joined the Recruitment team this week.
What you do in Mstnd:
- Click «Bulk invite» and paste the five addresses.
- Choose a validity period of 7 days.
- Choose the «Employee» role and the «Member» position in the Recruitment team under the HR department.
- Review «Recipients» and click the send button.
Result: Five invitations with the same settings within a minute, all of them shown in the list for follow-up.
Scenario: Following up late invitations in a government entity
Situation: Two weeks after the system was launched, some employees are still outside it.
What you do in Mstnd:
- Filter the list on «Expired» to see which invitations have run out.
- Resend each of them from the actions menu.
- Filter on «Pending» and remind the invitees through their managers.
Result: The employees finish joining without the invitations being created again from scratch.
Scenario: An external consultant at a contracting company did not receive the email
Situation: An engineering consultant was invited with a custom role, but the invitation email did not reach them because of their company's email settings.
What you do in Mstnd:
- Search for the invitation by their email address.
- Choose «Copy link» from the actions menu.
- Send them the link directly through the approved communication channel.
Result: The consultant joins without waiting for the email problem to be solved.
Scenario: An invitation sent by mistake at a school
Situation: An invitation was sent to a former teacher's email instead of the new teacher's.
What you do in Mstnd:
- Search for the invitation by the wrong email address.
- Choose the cancel option from the actions menu.
- Send a new invitation to the correct email address.
Result: The wrong invitation's link is closed, and the new teacher gets their invitation.
How it relates to other features
- Users: once the invitation is accepted, the employee appears in the users list with the specified role and position.
- Roles: the role you choose in the invitation determines the employee's permissions when they join.
- Sections and teams: the positions tree in the invitation is built from the sections and teams created there.
- Creating a new account: invitations sent in the «Invite your team» step appear in this tab.
- Organizational structure: shows where the invitees will sit in the chart after they join.
- Activity: a log that shows the operations carried out in the system and who carried them out.
Tips and best practices
- Prepare the sections and teams before sending invitations, so you choose the right position from the start.
- Use «Bulk invite» for similar groups, and individual invitations for people in leadership positions.
- Choose a validity period that matches the actual joining date: not so short that it expires, and not needlessly long.
- Review «Recipients» before sending: a wrong address means an invitation to someone you did not intend.
- Filter the list on «Pending» once a week during the launch period.
- Cancel any invitation sent by mistake right away, instead of letting it expire.
- Share a copied invitation link only with the person it is meant for.
Warnings and common mistakes
FAQ
How do I invite more than one employee to Mstnd at the same time?
From the «Invitations» tab, click «Bulk invite», paste the addresses separated by a comma, a semicolon or a new line, choose the role and the position, then review the recipients and send.
How do I know whether the employee has accepted the invitation?
From the «Status» column in the «Invitations» tab, or by filtering the list on the «Accepted» status.
What do I do if the invitation has expired?
Click the actions menu in the invitation's row and choose Resend, and a new invitation reaches the same email address.
Can I send the invitation link other than by email?
Yes. Choose «Copy link» from the actions menu, then send it to the employee through the channel that suits you.
Can an invitation be canceled after it has been sent?
Yes. Choose the cancel option from the actions menu in the invitation's row, and its link is no longer valid.
Can I set different roles in a bulk invite?
No. The role and the position apply to all recipients. Send an individual invitation to anyone who needs a different role.
What is the difference between «Invite user» and «Bulk invite»?
«Invite user» is for one person with their own settings, while «Bulk invite» is for several people with a shared role and position.
How do I set the invitation's validity period?
From the «Expires in» list in the invitation window, individual or bulk, before sending.
Summary
- The «Invitations» tab shows every invitation with its role, position, status, date sent and expiry date.
- Filtering by status reveals the pending, accepted or expired invitations.
- The actions menu lets you resend, copy the link or cancel.
- «Bulk invite» sends invitations to several addresses with a shared role and position, with address validation and a review of the recipients.
- New invitations appear in the list immediately, so you can follow them until they are accepted.
Try it free: Create your organization's account in Mstnd
Was this article helpful?
Related articles
 1:03
Managing users in Mstnd: roles, status, positions and invitations
Learn the Mstnd Users page: search and filters, the user profile with effective permissions and positions, changing roles, deactivating, and inviting new staff.
 0:36
Roles in Mstnd: precise permissions for every job role
Learn about roles in Mstnd: core and custom roles, each role's permissions, and creating a role with precisely chosen permissions, then assigning it to users.
 1:06
Sections and teams in Mstnd: organize your work teams clearly
Learn the Mstnd Sections and teams tab: general management and its managers, creating a section, adding its managers, then a team with its lead and members.
 2:15
Creating a new Mstnd account: from your email to setting up your organization
Create your Mstnd organization account: verify email and mobile, add company and sector details, pick a structure template, invite your team, then await review.
 0:29
The organizational structure in Mstnd: your organization as it really is
Learn the organizational structure in Mstnd: an interactive chart to zoom and drag, show or hide member names, with color-coded sections, teams and leads.
 0:23
The activity log in Mstnd: who did what, and when
The Mstnd activity log shows every operation in the system with who did it and when; search by keyword or user name and pick a date range to review events.