

Managing users in Mstnd: roles, status, positions and invitations
In this article
The Users page in Mstnd is where you see all of your organization's employees in the system: each one's role, organizational positions, status and join date. From it you open any user's profile to review their effective permissions and positions, change their role, deactivate them or remove them from the organization. You also invite a new employee from it by email, setting their role and their position in the organizational structure.
Quick overview
| Item | Details |
|---|---|
| Module | Users and roles |
| Where it is in the interface | Side menu → «Users and roles» → «Users» tab |
| Direct link | https://app.mstnd.sa/users?tab=users |
| Goal | Manage employees' accounts, roles, positions and status from one place |
| Who it is for | The organization's owner, the system administrator, and HR and IT officers |
| Video length | About one minute |
| What you will learn | Searching and filtering, reading a user's profile, reviewing effective permissions and positions, deactivating and removing users, and inviting a new user |
Watch the video
The video shows the users list and the search and filter tools, then a complete user profile, and ends with sending an invitation to a new employee.
Why this feature?
In every organization, some employees join and others leave, some move from one department to another, and the responsibilities of others change. If these changes are not reflected quickly in the document management system, two problems appear: a new employee who cannot work because they do not have the permission, or an employee who has left and still has access to sensitive documents.
The Users page solves this by gathering everything about a user in one place: who they are, what their role is, where they sit in the organizational structure and what they can actually do in the system. That makes the decision to change or suspend an account clear and quick.
| Before | After |
|---|---|
| You do not know precisely what an employee can do in the system | The «Permissions» tab shows their effective permissions and the source of each one |
| You search in more than one place to find the employee's department and team | The «Organizational positions» tab shows the section, the team and the position |
| Cutting off the access of an employee who has left takes too long | «Deactivate» or «Remove from organization» directly from their profile |
| Adding a new employee goes through scattered steps | «Invite user» sets the email, the role and the position in one window |
Where to find it
- From the side menu → «Users and roles».
- The «Users» tab opens by default; it is the first of the page's tabs.
Direct link: https://app.mstnd.sa/users?tab=users
The «User management» page has seven tabs: «Users», «Invitations», «Roles», «Permissions», «Organizational structure», «Sections and teams» and «Activity». Each of these tabs has its own guide.
Concepts and terms
| Term | Meaning in Mstnd |
|---|---|
| User | An employee who has an account in your organization on Mstnd |
| Role | A set of permissions assigned to the user; it can be one of the system's basic roles or a custom role that the organization created |
| Status | The account's state, such as «Active»; deactivating makes the user inactive |
| Organizational positions | The user's place in the structure: the section, the team and the position type (such as section manager, team lead or member) |
| Effective permissions | The permissions the user actually has, with their source shown, such as «From role» |
| User ID | A unique code for the account that can be copied; useful for technical support and integrations |
| Invitation validity period | The period during which the invitation link stays valid before it expires |
Step by step
Step 1: Read the users list
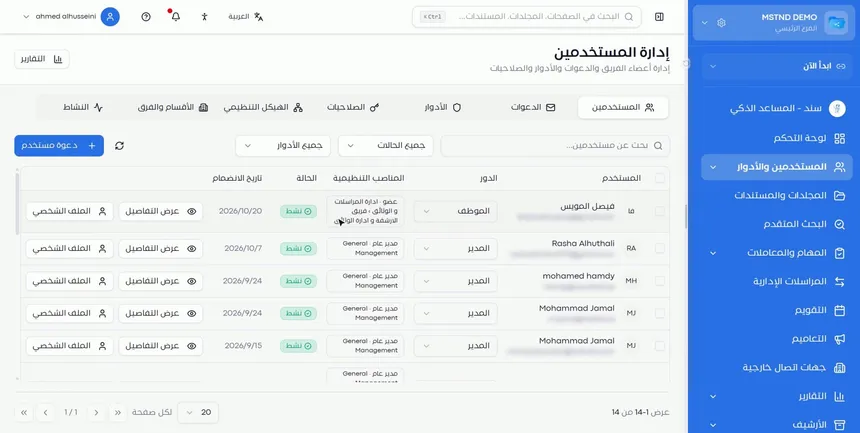
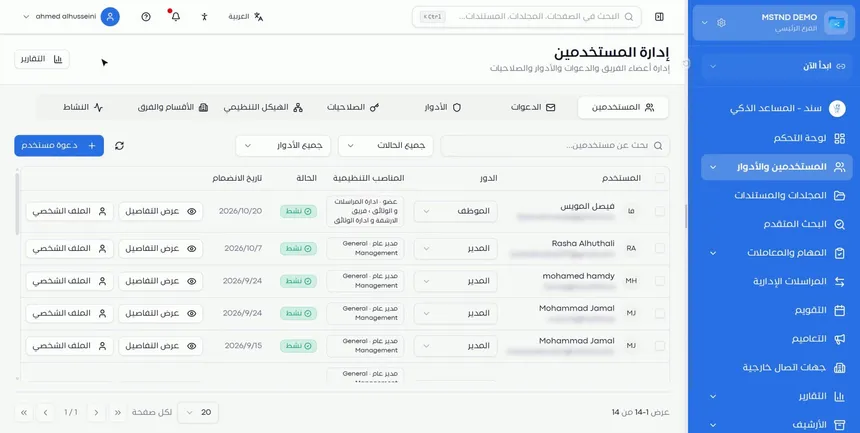
The list shows each employee on a row, with the following columns:
- User: the name and email address.
- Role: such as «Admin» or «Employee», shown as a drop-down list.
- Organizational positions: the section, the team and the position type.
- Status: such as «Active».
- Join date.
- Actions: «View details» and «Profile».
At the bottom of the table you see how many users are shown out of the total, with controls for moving between pages and for choosing the number of rows per page.
Step 2: Search by name or email
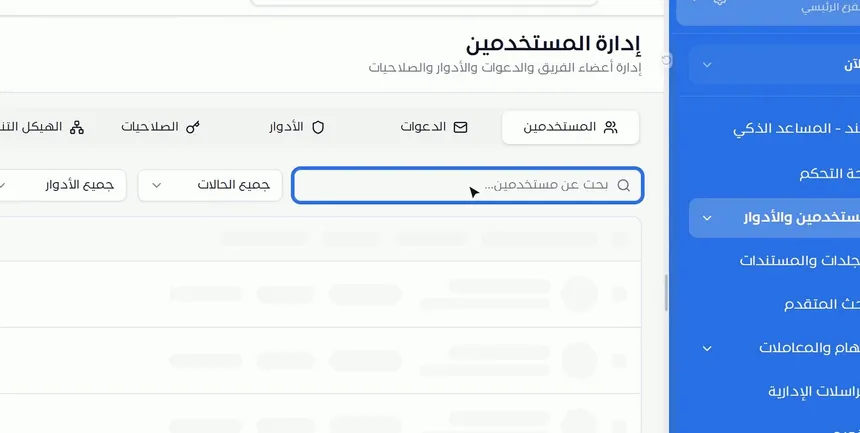
Type part of the employee's name or email address in the «Search users...» field, and the list narrows to the matching results. Searching by email is especially useful when two names in the organization are similar.
Step 3: Filter by status or role
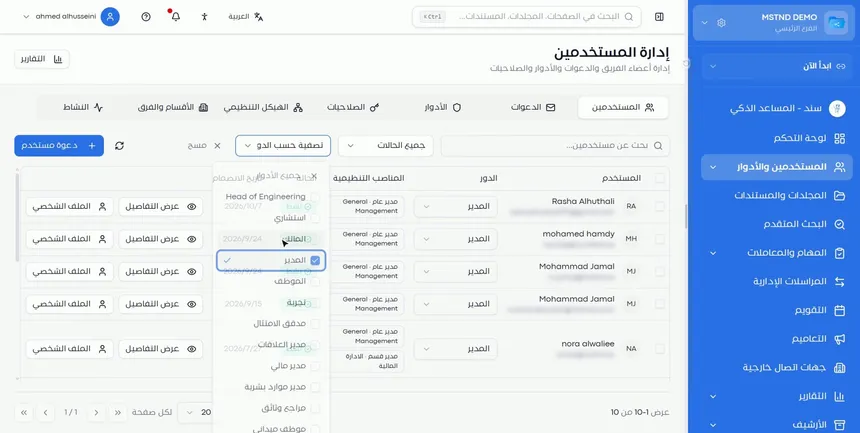
Use the «All statuses» list to show users with a specific status, and the «All roles» list to show the holders of a specific role. You can select more than one role in the same filter, and the basic and custom roles both appear in it. To remove the filter, click «Clear».
Step 4: Open the user's profile from «View details»
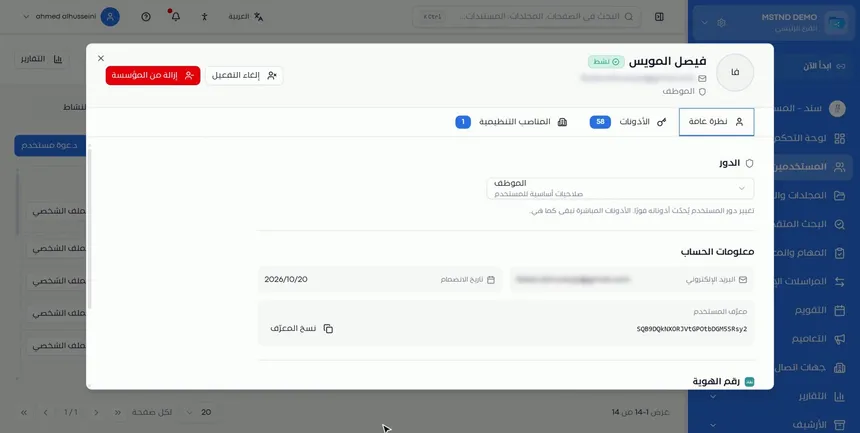
Click «View details» in any user's row, and their full profile opens in a window. In the profile header you see their name, status, email and role, and under it three tabs: «Overview», «Permissions» with their count, and «Organizational positions» with their count.
Step 5: Change the role and review the account information
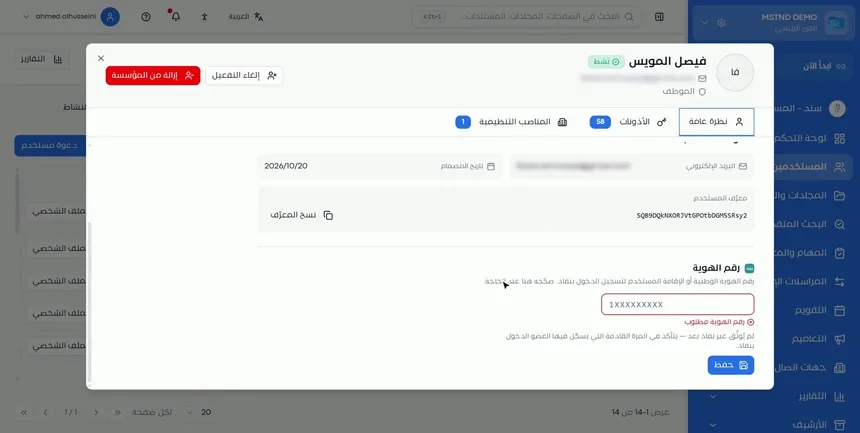
From the user's profile you can change their role; you can also do this directly from the «Role» column in the list. The «Overview» tab shows the account information:
- Email address.
- Join date.
- User ID, with a «Copy ID» button.
- ID number: the national ID or residency number used to sign in with Nafath; you can correct it here when needed and then click «Save».
If the user has not been verified through Nafath yet, a note appears saying that verification will happen the next time they sign in with Nafath.
Step 6: Review the user's effective permissions
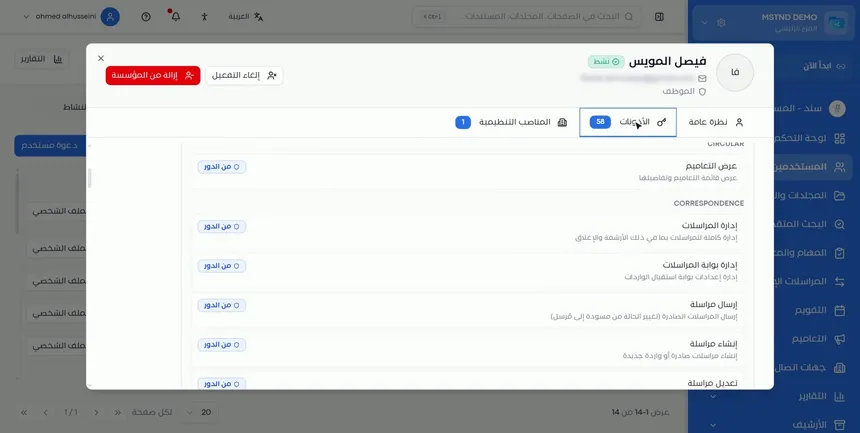
Open the «Permissions» tab to see the effective permissions the user has. The permissions are grouped by category, such as circulars and correspondence. Each permission has its name and description, and next to it a badge showing its source, such as «From role».
This tab answers one question precisely: "Can this employee do this or that?" Instead of guessing from the role's name, you see the actual list.
Step 7: Review the assigned organizational positions
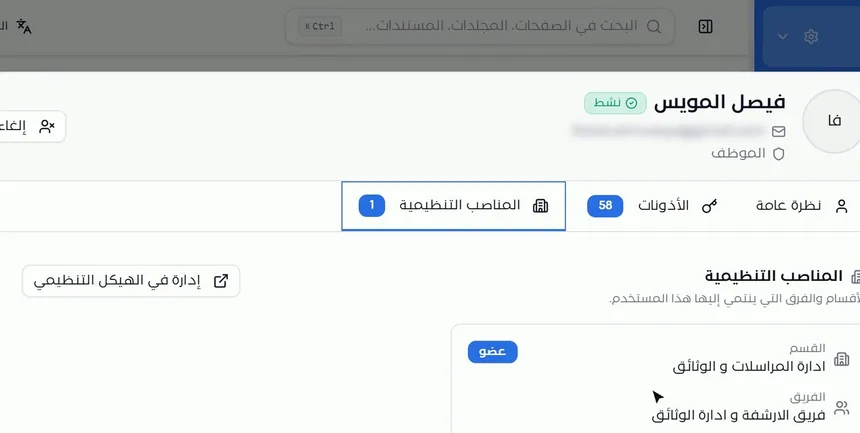
The «Organizational positions» tab shows the sections and teams the user belongs to. Each position has a card showing the section, the team and the position type, such as «Member». A user can hold more than one position.
To edit the positions, click «Manage in organizational structure», and you move to the place where sections and teams are managed.
Step 8: Deactivate the user or remove them from the organization
The header of the user's profile has two buttons:
- «Deactivate»: makes the user's status inactive. Suitable for long leave, a temporary stop or during end-of-service procedures.
- «Remove from organization»: takes the user out of your organization in Mstnd. Suitable when their relationship with the organization has ended for good.
Step 9: Click «Invite user» to add a new employee
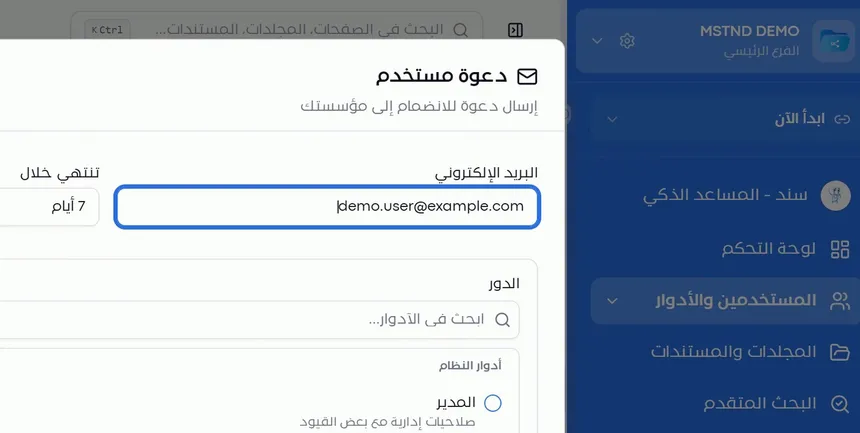
To add a new employee, click «Invite user» at the top of the page. The «Invite user» window opens with the subtitle: Send an invitation to join your organization.
Step 10: Type the email and set how long the invitation is valid
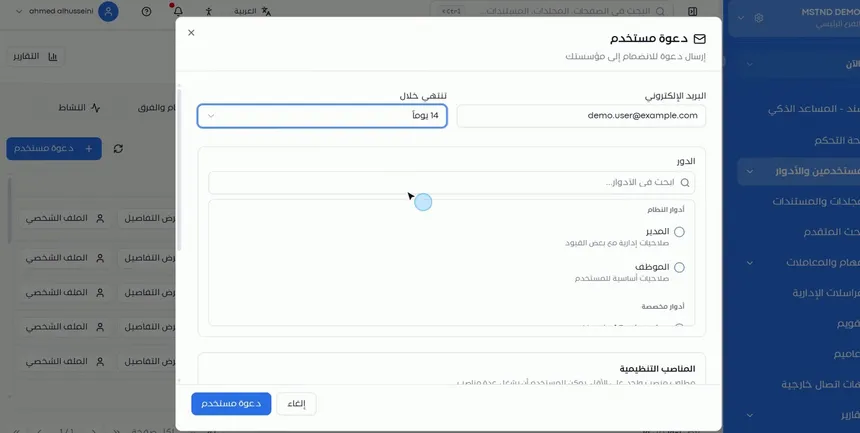
Type the employee's email address, then choose the invitation's validity period from the «Expires in» list, such as 14 days. If this period ends without the invitation being accepted, the invitation expires and has to be sent again.
Choose a period that suits how quickly the employee will respond. An employee who starts work tomorrow needs only a short period, while someone joining in two weeks needs a longer one.
Step 11: Choose the role: basic or custom
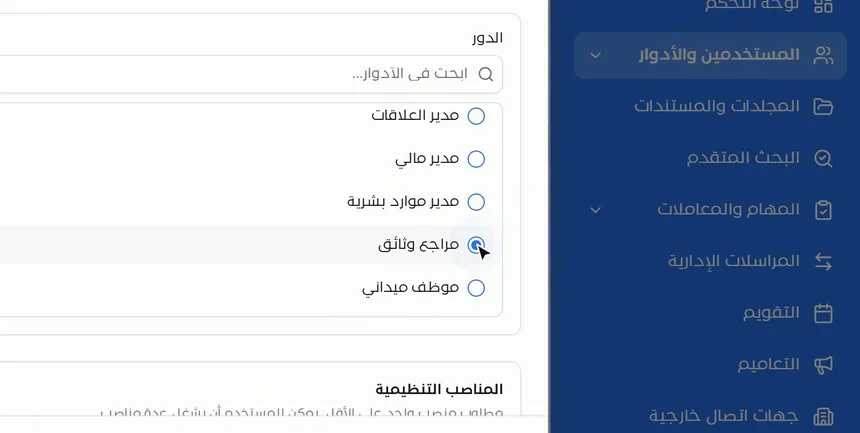
Choose the employee's role. The roles are split into two groups:
- System roles: such as «Admin» (administrative permissions with some restrictions) and «Employee» (basic user permissions).
- Custom roles: roles that your organization created with specific permissions.
You can search the roles from the «Search roles...» field when there are many custom roles.
Step 12: Set their position in the organizational structure
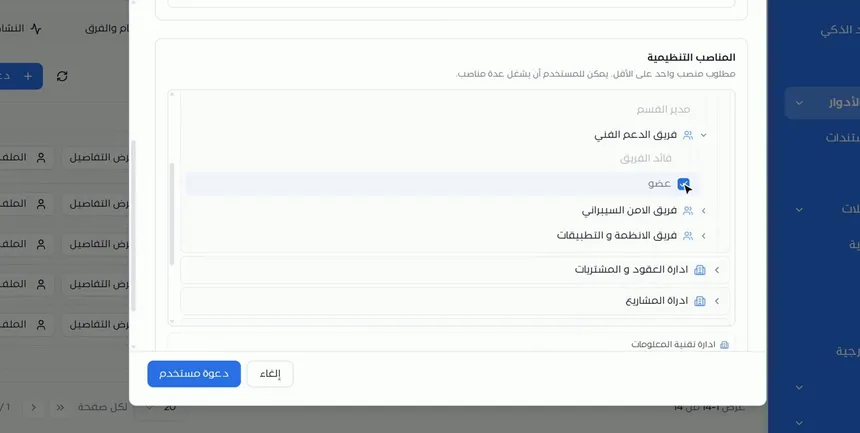
In the «Organizational positions» section, set the employee's place in the structure. The sections appear, with each section's teams under it, and you choose the position type: «Section manager», «Team lead» or «Member» of a specific team.
You must choose at least one position, and a user can hold several positions. For example, an employee may be a member of both the technical support team and the cybersecurity team.
Step 13: Send the invitation
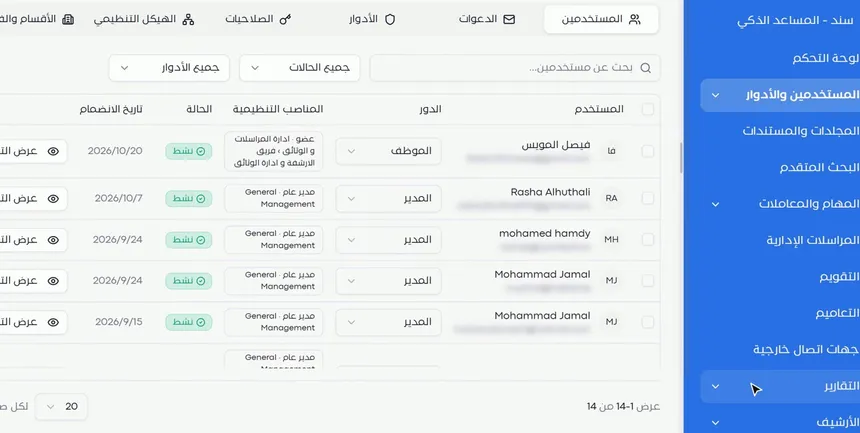
Click «Invite user» at the bottom of the window to send the invitation. The invitation link reaches the employee's inbox, and the invitation appears in the Invitations tab with a pending status until they accept it. Once it is accepted, the employee appears in the users list with the role and the position you set.
Options and their effect
| Option or setting | What it does | When to use it |
|---|---|---|
| «Search users...» | Filters the list by name or email | To get quickly to a specific employee |
| «All statuses» | Shows users with a specific status | To review inactive accounts, for example |
| «All roles» | Shows the holders of one or more roles | To review who holds administrative roles |
| «Clear» | Removes the filter | To return to the full list |
| The «Role» column | Changes the user's role from the list | For a quick change without opening the profile |
| «View details» | Opens the user's full profile | To review the account, the permissions and the positions |
| «Copy ID» | Copies the user ID | When contacting technical support |
| ID number and «Save» | Saves the ID number used to sign in with Nafath | When correcting a wrong ID number |
| The «Permissions» tab | Shows the effective permissions and their source | To check what the user can do |
| «Manage in organizational structure» | Takes you to where positions are managed | To change the user's section or team |
| «Deactivate» | Makes the user inactive | For a temporary or precautionary suspension |
| «Remove from organization» | Takes the user out of the organization | When the relationship has ended for good |
| «Invite user» | Sends an email invitation with a role, a position and a validity period | To add a new employee |
Practical scenarios
Scenario: The HR department of a trading company welcomes a new employee
Situation: A new accountant joins the finance department next week.
What you do in Mstnd:
- Click «Invite user» and type their work email.
- Choose a validity period that suits their start date.
- Choose the «Employee» role, or a custom role for accountants if there is one.
- Set their position as «Member» of the accounting team within the finance department.
- Send the invitation and follow its acceptance from the Invitations tab.
Result: The accountant starts their first day with a ready account, suitable permissions and a clear place in the structure.
Scenario: An employee leaves a government entity
Situation: An employee in the administrative communications department has moved to another entity.
What you do in Mstnd:
- Search for them by name and open «View details».
- Click «Deactivate» right away to stop their access.
- Move their open tasks and transactions to a colleague.
- After making sure that no work is pending, click «Remove from organization».
Result: No access remains for an employee who has left, and the transactions they were handling do not stop.
Scenario: A permissions review in a law firm
Situation: The partner in charge wants to make sure that trainees cannot delete documents.
What you do in Mstnd:
- Filter the list on the trainees' role.
- Open the profile of one of them and go to the «Permissions» tab.
- Review the documents category and check that the delete permission is not there.
- If you find it, edit the role itself from the Roles tab.
Result: A documented check of the effective permissions, not just of the role's name.
Scenario: A nurse moves between sections in a hospital
Situation: A nurse has moved from the Emergency section to the Intensive Care section.
What you do in Mstnd:
- Open her profile and go to the «Organizational positions» tab.
- Click «Manage in organizational structure».
- Remove her from the Emergency team and add her to the Intensive Care team.
Result: She reaches the folders and tasks of her new section, and the system reflects her actual job.
How it relates to other features
- Invitations: every invitation you send from «Invite user» appears there with its status; from there you resend or cancel invitations and send bulk invitations.
- Roles: the role you choose for the user determines their permissions, and that is where you create custom roles.
- Permissions: the reference for every permission in the system; it helps you understand what appears in the user's «Permissions» tab.
- Sections and teams: where the users' organizational positions are managed.
- Activity: a log showing what each user did in the system and when.
- Nafath, the Saudi national single sign-on: the setting for signing in with Nafath, which is linked to the ID number field in the user profile.
Tips and best practices
- Set the organizational position precisely when inviting someone, since it determines the employee's place in the structure and everything linked to it.
- Grant the lowest role that is enough for the employee's work, then expand it when needed.
- Review the holders of the «Admin» role regularly by filtering the list on it.
- Use «Deactivate» first when someone leaves, then «Remove from organization» once their work has been handed over.
- Check the «Permissions» tab before giving an employee a sensitive responsibility.
- Use official work emails in invitations, not personal emails.
- Keep the user ID at hand when contacting technical support, to speed up the handling of your request.
Warnings and common mistakes
FAQ
How do I add a new employee to Mstnd?
From the «Users» tab, click «Invite user», type their email, and set the invitation's validity period, their role and their organizational position. Then send the invitation so that the link reaches their inbox.
How do I change a user's role?
Directly from the «Role» column in the users list, or from the user's profile after clicking «View details».
What is the difference between «Deactivate» and «Remove from organization»?
Deactivating makes the user inactive while they stay in the organization, whereas removing takes them out of the organization. Use the first for a temporary suspension and the second when the relationship has ended.
How do I find out an employee's effective permissions?
Open their profile from «View details» and go to the «Permissions» tab. Their permissions appear grouped by category, with the source of each permission.
Can an employee hold more than one organizational position?
Yes. A user can hold several positions, such as membership in two teams, and must have at least one position.
What is the ID number field in the user profile for?
It is the national ID or residency number used to sign in with Nafath, and you can correct it from the user's profile when needed.
How do I search for a user in Mstnd?
Type part of their name or email in the «Search users...» field. You can combine the search with filtering by status or role.
Can I choose a custom role when inviting a user?
Yes. The invitation window shows the system roles and the custom roles your organization has created.
Summary
- The «Users» tab shows every employee with their role, positions, status and join date.
- Searching by name or email and filtering by status or role get you to any user quickly.
- The user profile gathers the account information, the effective permissions and their source, and the organizational positions.
- «Deactivate» and «Remove from organization» control employees' access when they stop working temporarily or leave.
- «Invite user» adds a new employee with their email, role, position and the invitation's validity period.
Try it free: Create your organization's account in Mstnd
Was this article helpful?
Related articles
 0:47
Invitations in Mstnd: track your team's invitations and send them in one go
Learn the Invitations tab in Mstnd: track each invitation's status, resend, copy the link or cancel, and invite several employees with one role and position.
 0:36
Roles in Mstnd: precise permissions for every job role
Learn about roles in Mstnd: core and custom roles, each role's permissions, and creating a role with precisely chosen permissions, then assigning it to users.
 0:27
Permissions in Mstnd: a complete reference for who sees and who edits
Learn the Permissions tab in Mstnd: every permission by category, with its name, code, description and the roles that include it, and how to search and filter.
 1:06
Sections and teams in Mstnd: organize your work teams clearly
Learn the Mstnd Sections and teams tab: general management and its managers, creating a section, adding its managers, then a team with its lead and members.
 0:23
The activity log in Mstnd: who did what, and when
The Mstnd activity log shows every operation in the system with who did it and when; search by keyword or user name and pick a date range to review events.
 0:57
Nafath in Mstnd: sign-in and signing with a verified identity
Set up Nafath in Mstnd: sign-in verification, tracking the Nafath request balance, registering member ID numbers and choosing which actions require Nafath.