

Roles in Mstnd: precise permissions for every job role
In this article
Roles in Mstnd are how you decide what each user can see and do inside the system. Each role groups a set of permissions, and the role is then assigned to users instead of granting permissions to each person separately. This feature serves the account owner and the system administrators in the organization, and it delivers clear security control that gives each employee only what they need for their work.
Quick overview
| Item | Details |
|---|---|
| Module | Users and roles |
| Where it is in the interface | The side menu «Users and roles» → the «Roles» tab |
| Direct link | https://app.mstnd.sa/users?tab=roles |
| Goal | Organize permissions into ready-made or custom roles that are assigned to users |
| Who it is for | The account owner, the system administrator, the IT manager and the governance and compliance officer |
| Video length | About 36 seconds |
| What you will learn | Reading the role cards, searching and filtering, viewing a role's details, and creating a custom role and choosing its permissions |
Watch the video
In about 36 seconds, the video shows the roles screen and the details of an existing role, then creates a new role from the start until it appears among the custom roles.
Why this feature?
In any organization, employees need different things. An archive clerk needs to upload and archive documents, a quality auditor needs to review and approve them, and the finance manager needs to see specific reports. If everyone is given broad permissions, the risk of leaks and wrong edits grows. If permissions are granted to each person by hand, management becomes exhausting and inconsistent.
Roles solve this problem with a simple principle: define the role once, then assign it to everyone who does that job. When an employee's job changes, you change their role, not their permissions one by one.
| Before roles | With roles in Mstnd |
|---|---|
| Granting permissions to each user separately | Defining the role once and assigning it to a number of users |
| Hard to know who holds a specific permission | Every role shows its number of permissions and its number of users |
| Broad permissions "just in case" | Choosing exactly what the role needs from a categorized list |
| Different permissions for employees doing the same job | One shared role for everyone who does the same job |
Value for the organization: clearer governance, less risk of unauthorized access and easier review during audits. Value for the individual: an interface that shows them what concerns them, without buttons and options they do not need.
Where to find it
- From the side menu, choose «Users and roles».
- The «User management» page appears with its tabs: «Users», «Invitations», «Roles», «Permissions», «Organizational structure», «Sections and teams», «Activity».
- Choose the «Roles» tab.
Direct link: https://app.mstnd.sa/users?tab=roles
You can also reach roles while reviewing permissions in the «Permissions» tab, which reminds you that permissions are granted through roles.
Concepts and terms
| Term | Meaning in Mstnd |
|---|---|
| Role | A set of permissions with a name and a description, assigned to users |
| Core roles | Ready-made roles provided by the system: «Owner», «Admin» and «Employee», marked with a «System» badge |
| Custom roles | Roles your organization creates itself according to its needs |
| Permission | An authorization to carry out a specific operation, such as «View documents» or «Archive documents» |
| Permission code | A fixed technical identifier of the permission, such as document.archive |
| Role code | An identifier shown under the role's name, such as owner or admin |
| Permission category | A group of related permissions, such as «User management», «Documents» or «Folders» |
Step by step
Step 1: Get to know the core and custom roles
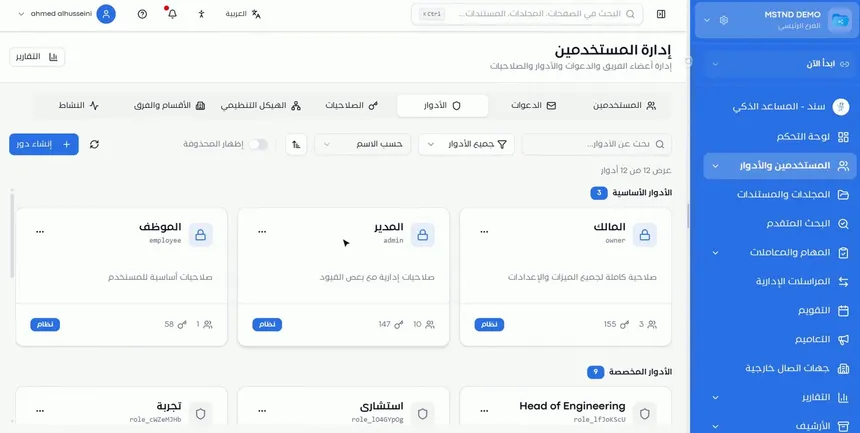
The screen is split into two parts. At the top are the «Core roles», three of them: «Owner», with full access to all features and settings; «Admin», with administrative permissions and some restrictions; and «Employee», with basic user permissions. Below them are the «Custom roles» your organization has created.
Each role card shows the role's name, code and description, then two numbers at the bottom: the number of users assigned to it and the number of permissions it includes. These two numbers give you a quick picture: a role with many permissions and many users deserves a regular review.
Step 2: Search, sort and filter the roles
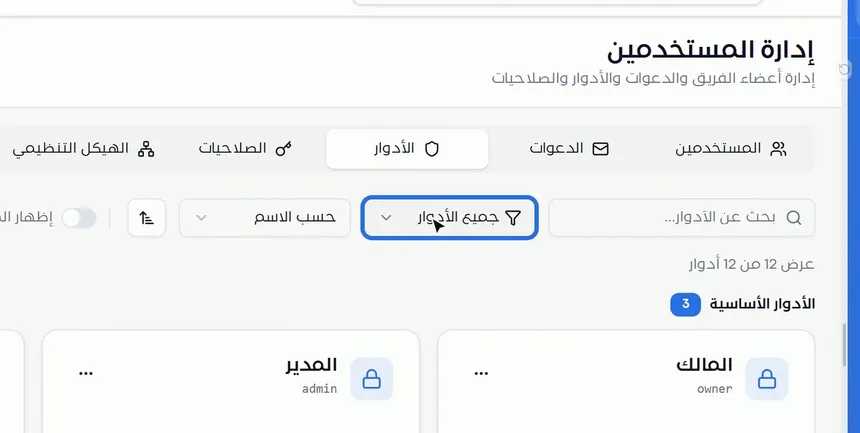
When custom roles multiply, you need tools for quick access. The toolbar offers:
- The «Search roles…» box to search by name.
- The «All roles» filter to narrow the list by role type.
- Sorting «By name», with a button that reverses the sort direction.
- The «Show deleted» switch to show deleted roles when you need to review them.
- The refresh button to reload the list.
Above the cards, the number of roles shown out of the total appears, such as «Showing 12 of 12 roles».
Step 3: Open the role's menu and choose «View details»
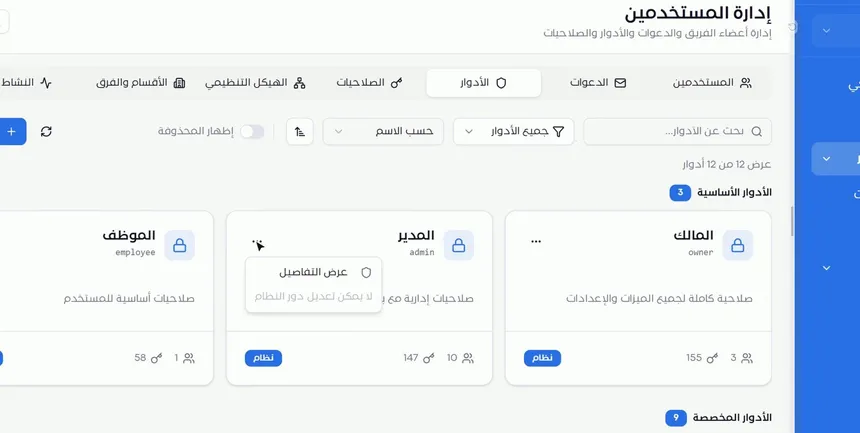
Click the three dots in the corner of the role card, then choose «View details». On the core roles you will notice the message «System role cannot be edited», which means these roles are fixed and can only be viewed.
Step 4: Review the role's permissions by category
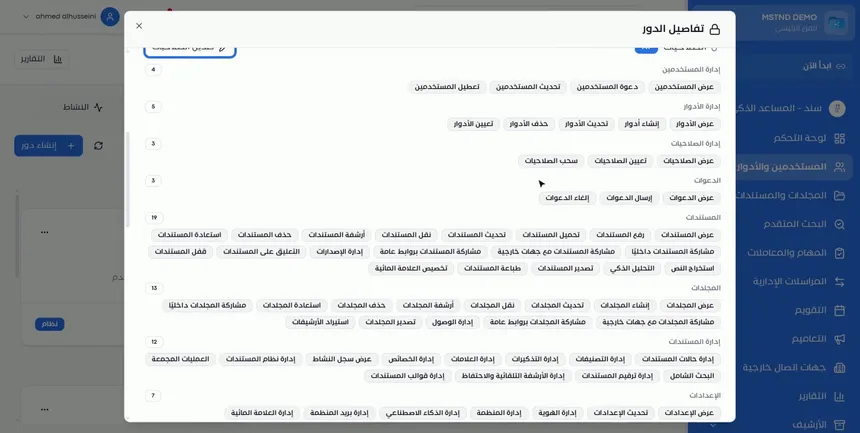
The «Role details» window opens and shows all of the role's permissions grouped in categories, with the number of permissions in each category. Among the categories shown: «User management», «Role management», «Permission management», «Invitations», «Documents», «Folders», «Document management» and «Settings».
This window is your security review tool. Before assigning a role to a new employee, open it and make sure the role does not include sensitive permissions they do not need, such as «Delete documents» or «Manage AI».
Step 5: Create a new role with a name and a description
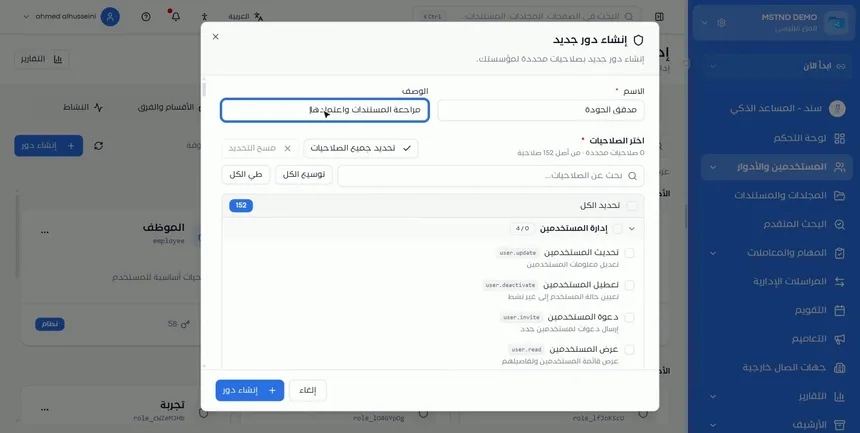
Click «Create role» at the top of the page, and the «Create new role» window opens. Enter:
- Name (required field): a clear name that describes the job, such as «Quality auditor».
- Description: a sentence that explains the purpose, such as «Review and approve documents».
The description is not a formality. When roles have multiplied months from now, the description is what will remind you and your colleagues why this role was created.
Step 6: Search the permissions and choose what the role needs
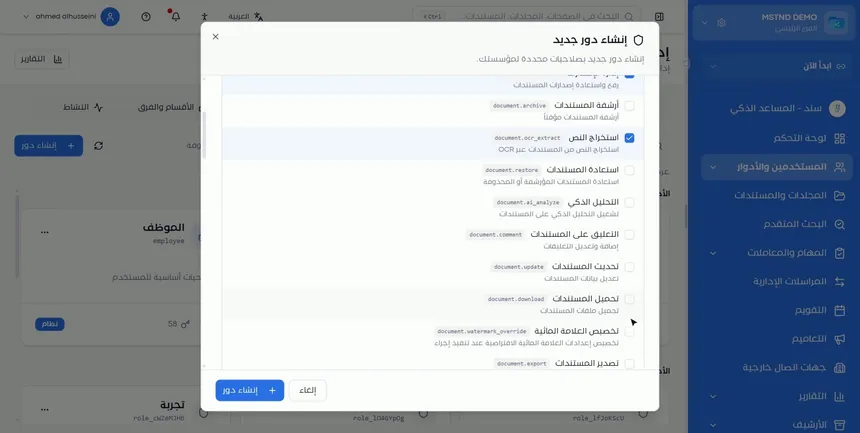
In the «Select permissions» section (required), the permissions appear grouped in categories, each with its name, its code and a short description. The counter at the top shows how many permissions are selected out of the total available. The selection tools available:
- «Search permissions…» to reach a permission by name.
- «Select all permissions» and «Clear selection».
- «Expand all» and «Collapse all» to open or close the categories.
- «Select all» inside the list, and a checkbox for each category to select the whole category.
Step 7: Click «Create role», then assign it to users
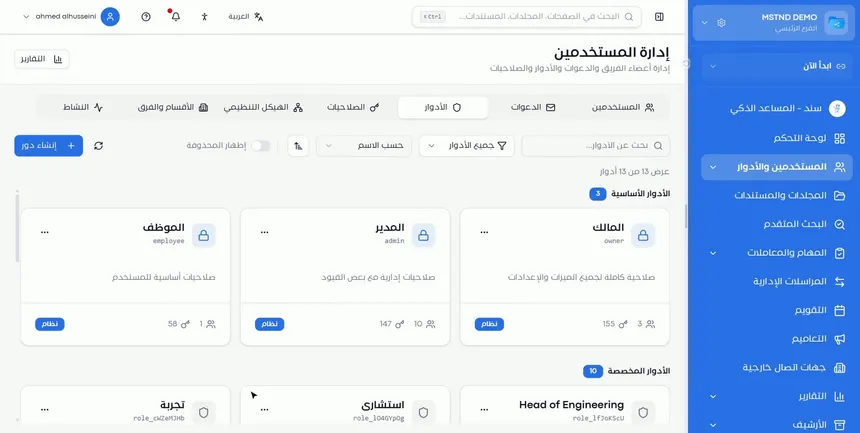
After reviewing your choices, click «Create role». The role is saved and becomes ready to assign. The next step is to assign it to the users concerned, whether existing users from the Users tab or new ones when sending invitations.
Step 8: Check that the role appears among the custom roles
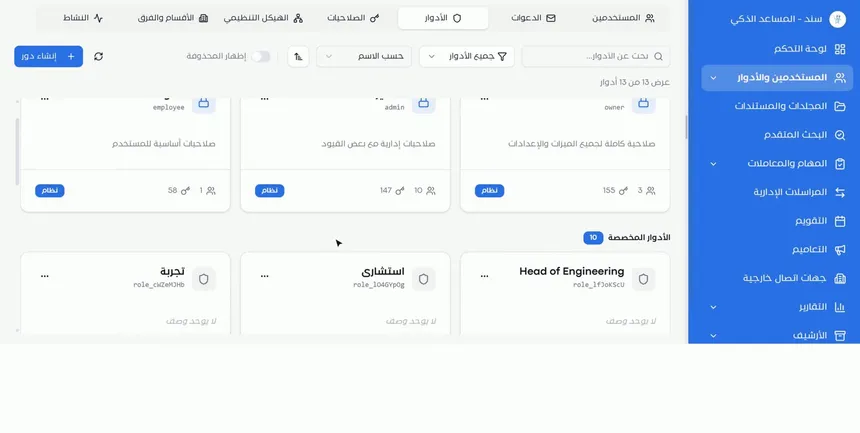
The new role appears in the «Custom roles» section, and the counter goes up next to the section and at the top of the list. In the video's example, the total rose to «Showing 13 of 13 roles». Make sure it appears before you start assigning it.
Options and their effect
| Option or setting | What it does | When to use it |
|---|---|---|
| «Search roles…» | Shows the roles that match the name | When there are many custom roles |
| The «All roles» filter | Narrows the list by role type | To focus on the core or the custom roles |
| Sorting «By name» and reversing it | Changes the order in which the cards are shown | For quicker access or an orderly review |
| «Show deleted» | Shows deleted roles | During a review or an audit |
| «View details» | Opens the role's permissions by category | Before assigning the role or during the regular review |
| «Create role» | Opens the new role window | When there is a job the current roles do not cover |
| «Select all permissions» / «Clear selection» | Selects or clears all permissions in one go | «Clear selection» to start from zero |
| «Expand all» / «Collapse all» | Opens or closes the categories | For a full review or to focus on one category |
| The category checkbox | Selects all the permissions in the category | When the role needs a whole category, such as «Invitations» |
Practical scenarios
Scenario: A government entity separates data entry from approval
Situation: The administrative communications department of a government entity wants data entry staff to upload documents without being able to delete them, and reviewers to handle approval.
What you do in Mstnd:
- Create a role named «Data entry clerk» and select the view, upload and comment permissions.
- Create a role named «Reviewer» and add the review permissions it needs.
- Review each role from «View details» to make sure «Delete documents» is not included.
- Assign each role to its employees.
Result: A clear separation of duties that reduces mistakes and makes accountability easier.
Scenario: A contracting company gives site engineers limited access
Situation: Site engineers need to view drawings and contracts and download them, not manage settings or users.
What you do in Mstnd:
- Create a role named «Site engineer».
- Search for «Download documents», «View documents» and «View folders» and select them.
- Leave the «User management» and «Settings» categories unselected.
- Click «Create role» and assign it to the engineers.
Result: Practical access for site work, without unnecessary administrative permissions.
Scenario: A hospital tightens permissions for medical records
Situation: The medical records section handles sensitive documents, and management wants to reduce the number of people who hold external sharing permissions.
What you do in Mstnd:
- Open «View details» for each custom role and check whether it includes permissions for sharing with external parties.
- Create a custom role for the records staff without external sharing permissions.
- Move the employees to the new role from the «Users» tab.
Result: External sharing is limited to a small number of designated officers.
Scenario: A law firm creates a role for its advisors
Situation: Advisors need to comment on documents and use smart analysis, without managing folders.
What you do in Mstnd:
- Create a role named «Advisor» with a clear description.
- Select «Comment on documents», «Smart analysis» and «Extract text».
- Create the role and assign it to the advisors.
Result: The tools for legal work are available, and the folder structure stays protected.
How it relates to other features
- Permissions: a reference to all of the system's permissions, their codes and descriptions; roles are the only way to grant them.
- Users: this is where you assign the role to existing users and review their effective permissions.
- Invitations: when you invite a new employee you set their role, so they start work with the right permissions from day one.
- Sections and teams: the role defines what the user can do, and the section and team define their place in the organization.
- Organizational structure: shows each person's place visually, and completes the governance picture together with roles.
- Activity: records the operations carried out in the system, so you can check that permissions are used as planned.
Tips and best practices
- Name roles after the work, not after people: «Quality auditor», not «A specific employee's role».
- Write a description for every custom role: roles without a description become unclear over time.
- Start with the minimum permissions and add more when needed.
- Limit the «Owner» role to a very small number of people.
- Regularly review roles with a high number of permissions from «View details».
- Do not create a new role for every small exception: many similar roles make management harder.
- After creating a sensitive role, follow how it is used in Activity during the first days.
Warnings and common mistakes
FAQ
What is the difference between a role and a permission in Mstnd?
A permission allows one specific operation, such as «Archive documents». A role is a set of permissions with a name and a description that is assigned to users in one go.
What are the core roles in Mstnd?
Three system roles: «Owner», with full access to all features and settings; «Admin», with administrative permissions and some restrictions; and «Employee», with basic user permissions.
Can the «Admin» or «Employee» role be edited?
No. The message «System role cannot be edited» appears in the menu of these roles. You can view their details, and create a custom role to replace them as you need.
How do I create a custom role in Mstnd?
From the «Roles» tab, click «Create role», enter the name and the description, then choose the permissions from the categorized list and click «Create role».
How do I know the permissions of a specific role?
Open the three-dot menu on the role's card and choose «View details»: all its permissions appear grouped in categories, with the count for each category.
How do I know the number of users in each role?
Two numbers appear at the bottom of every role card: the number of users assigned to it and the number of permissions it includes.
Is creating the role enough for the employee to get the permissions?
No. After creating the role, you must assign it to users from the «Users» tab or when sending the invitation.
Can I see deleted roles?
Yes. Turn on the «Show deleted» switch in the toolbar to show them in the list.
Summary
- Roles group permissions and are assigned to users, which simplifies access management in the organization.
- There are three fixed core roles, and you can create custom roles without needing to edit them.
- «View details» reveals the permissions of any role by category, and it is your security review tool.
- When creating a role: a clear name, a useful description and the fewest permissions needed.
- A role takes no effect until it is assigned to users.
Try it free: Create your organization's account in Mstnd
Was this article helpful?
Related articles
 0:27
Permissions in Mstnd: a complete reference for who sees and who edits
Learn the Permissions tab in Mstnd: every permission by category, with its name, code, description and the roles that include it, and how to search and filter.
 1:03
Managing users in Mstnd: roles, status, positions and invitations
Learn the Mstnd Users page: search and filters, the user profile with effective permissions and positions, changing roles, deactivating, and inviting new staff.
 0:47
Invitations in Mstnd: track your team's invitations and send them in one go
Learn the Invitations tab in Mstnd: track each invitation's status, resend, copy the link or cancel, and invite several employees with one role and position.
 1:06
Sections and teams in Mstnd: organize your work teams clearly
Learn the Mstnd Sections and teams tab: general management and its managers, creating a section, adding its managers, then a team with its lead and members.
 0:23
The activity log in Mstnd: who did what, and when
The Mstnd activity log shows every operation in the system with who did it and when; search by keyword or user name and pick a date range to review events.
 0:29
The organizational structure in Mstnd: your organization as it really is
Learn the organizational structure in Mstnd: an interactive chart to zoom and drag, show or hide member names, with color-coded sections, teams and leads.