

The activity log in Mstnd: who did what, and when
In this article
The activity log in Mstnd is a chronological list of every operation performed in the system. For each operation it shows who performed it, its type, its description and when it happened. It helps system administrators, managers and compliance officers review what has happened inside the organization, and it lets you search by keyword or by user name and set a specific time period. Its goal is to make every action in the organization traceable and accountable.
Quick overview
| Item | Details |
|---|---|
| Module | Users and roles |
| Where it is in the interface | The side menu «Users and roles» → the «User management» page → the «Activity» tab |
| Direct link | https://app.mstnd.sa/users?tab=activity |
| Goal | Record every operation in the system with who performed it and when, and make it possible to review and search them |
| Who it is for | System administrators, department managers, and compliance, internal audit and information security officers |
| Video length | About 23 seconds |
| What you will learn | Reading the log entries, searching by keyword or user name, setting the time period, refreshing the list and resetting the filters |
Watch the video
In under half a minute, the video shows the «Activity» tab, then the search and date-filter tools, and finally refreshing the list and resetting the filters.
Why this feature?
In any organization that deals with documents and permissions, the same kinds of questions keep coming up: who created this role? When was the invitation sent to this employee? Who changed this setting? Without a single log, the answer depends on memory or on asking colleagues one by one, and there may be no answer at all.
The activity log solves this problem by recording every operation the moment it happens. Nobody needs to remember what they did, and no operation can pass without leaving a trace. This is the foundation of governance in any document management system: knowing "who did what, and when".
| Before the activity log | With the activity log |
|---|---|
| You ask the team to find out who made a particular change | You see the performer's name, the operation's description and its time on one line |
| There is no documented evidence when people disagree about what happened | The log is a neutral reference that settles the question |
| Reviewing a specific period's activity means gathering information from several people | You set the «From» → «To» period and only its activity appears |
| You cannot tell what an employee did from what the system carried out automatically | The log shows whether the performer was a user or «System» |
Value for the organization: it supports internal audit and compliance requirements, reduces the risk of undetected errors, and provides a clear trail when investigating any incident.
Value for the individual: it protects employees themselves. If someone is asked about an operation they did not perform, the log shows that. If they carried out an operation correctly, the log proves when it happened and its details.
Where to find it
- From the side menu, choose «Users and roles».
- The «User management» page opens with its tabs: «Users», «Invitations», «Roles», «Permissions», «Organizational structure», «Sections and teams» and «Activity».
- Choose the «Activity» tab.
Direct link: https://app.mstnd.sa/users?tab=activity
Concepts and terms
| Term | Meaning in Mstnd |
|---|---|
| Activity log | A chronological list of all the operations performed in the system, newest first |
| Activity entry | One line in the log that represents one operation: the performer, the operation type, its description and its time |
| Performer | The user who carried out the operation, or «System» if the operation was automatic |
| Operation type badge | A small tag next to the performer's name that shows the type of operation, such as created, sent, resent or assigned |
| Relative time | The time of the operation shown relative to the current moment, such as «3 minutes ago» |
| Time period | A «From» → «To» date range that limits the log to the operations that took place within it |
| Reset filters | Clearing the search and the time period and returning to the full view of the log |
Step by step
Step 1: Open the activity log and read its entries
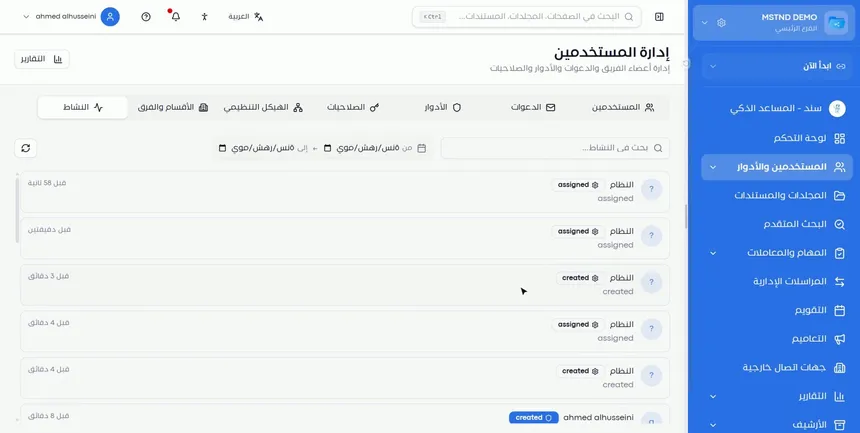
When you open the «Activity» tab, a list of operations appears, ordered from newest to oldest. Each entry consists of:
- Performer: the name of the user who carried out the operation, or «System» if the operation was automatic.
- Operation type badge: such as created for a creation and assigned for an assignment.
- Description: a sentence that explains exactly what happened, such as «The role "Quality Auditor" was created».
- Time: shown in relative form, such as «58 seconds ago» or «8 minutes ago».
Telling users' operations apart from «System» operations matters. Some operations happen automatically as a result of an earlier setting, such as an automatic assignment within a workflow. When you review the log, you need to know whether an action was a human decision or the result of an automated rule.
Step 2: Search by keyword or by user name
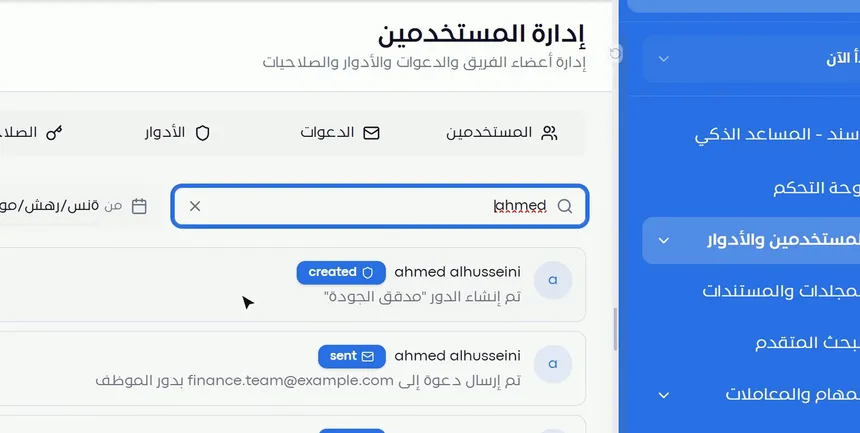
At the top of the log is the «Search activity» field. Type in it:
- A user name to show only the operations that user performed.
- A word from the operation's description, such as a role name, an email address or a department name, to find the operations related to it.
Searching by user name is useful when you review a specific employee's work, such as checking what the new system administrator did in their first week. Searching by keyword is useful when you start from the item rather than the person, for example when you ask "what happened to that role?".
To clear the search, use the × mark inside the field.
Step 3: Set the time period «From» → «To»
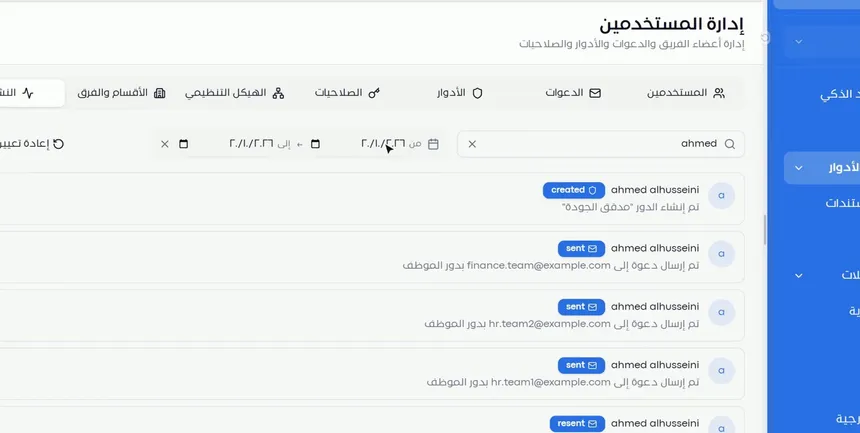
Next to the search field is a time period picker with two fields: «From» and «To». Choose the start date and the end date, and the log is limited to the operations that took place between them.
You can combine the search with the time period. For example, type a user name and select last week, and only that user's operations from that week appear. The screenshot shows this combination: results for a single user that include creating the «Quality Auditor» role, sending invitations to email addresses with the «Employee» role, and resending an invitation.
Step 4: Refresh the list or reset the filters
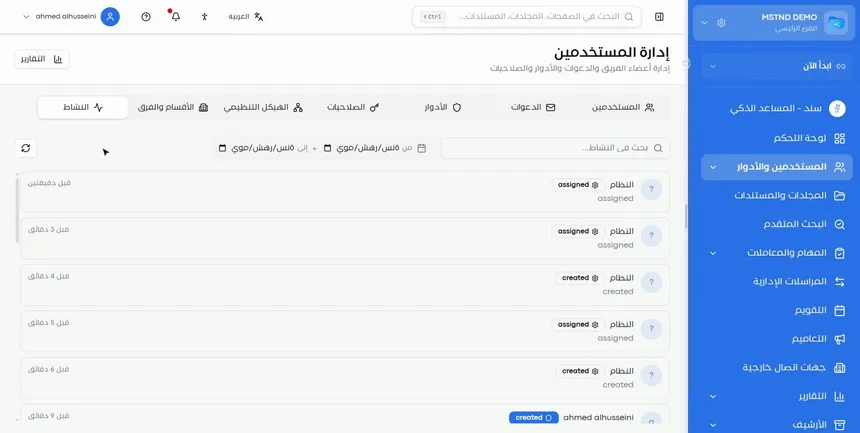
At the end of the toolbar there are two buttons:
- Refresh: reloads the log to show the latest operations that took place after you opened the page, while keeping the current filters.
- «Reset»: clears the search and the time period together and takes you back to the full view.
Use refresh when you are waiting for a particular operation, such as confirming that an invitation you just sent has been recorded. Use «Reset» when you have finished a specific investigation and want to return to the overall picture.
Options and their effect
| Option or setting | What it does | When to use it |
|---|---|---|
| The «Search activity» field with a user name | Shows only a specific user's operations | Reviewing the work of a specific employee or administrator |
| The search field with a keyword | Shows the operations whose description contains that word | Tracking what happened to a particular item, such as a role or an email address |
| × inside the search field | Clears the search text | Changing the search criterion |
| «From» | Sets the start of the time period | Limiting the review to a known period |
| «To» | Sets the end of the time period | Closing the period at a specific date |
| Refresh | Reloads the log with the latest operations | Following an operation that has just taken place |
| «Reset» | Clears all the filters and shows the full log | After finishing a specific search |
Practical scenarios
Scenario: The IT department of a government entity prepares for an internal audit
Situation: The internal audit team asks for a statement of the changes made to roles and invitations during the last quarter.
What you do in Mstnd:
- Open «Users and roles» → the «Activity» tab.
- Set the period «From» the start of the quarter «To» its end.
- Search for a word such as "role" to show the role-creation operations.
- Repeat the search with the word "invitation" to show the invitations that were sent.
- Click «Reset» when you are done.
Result: A clear statement of the changes, who made them and when, without gathering information manually from the team.
Scenario: A trading company checks a new system administrator's work
Situation: A new system administrator has joined and been given the task of inviting a new branch's employees and assigning their roles, and the manager wants to verify the work.
What you do in Mstnd:
- Type the new administrator's name in the search field.
- Set the period to their first week.
- Review the «sent» operations for the invitations, and check the roles mentioned in the descriptions.
- Note any «resent» operations, which indicate invitations that were not accepted the first time.
Result: The manager knows what has been done and what needs follow-up, and spots early any invitation that was sent with the wrong role.
Scenario: A hospital investigates an unexpected change
Situation: A section head noticed that a new role had appeared in the system without their knowledge, and wants to know who created it and when.
What you do in Mstnd:
- Search for the role's name in the search field.
- Read the creation entry: the performer and the time.
- Widen the search to the performer's name on the same day to find out what they did afterwards.
Result: A documented answer within minutes, which lets you contact the performer directly instead of guessing.
Scenario: A law firm proves when an administrative action took place
Situation: An internal disagreement over whether a trainee lawyer's invitation was sent before or after they started work.
What you do in Mstnd:
- Search for their email address in the search field.
- Set the period around their start date.
- Review the «sent» entry and its time, and any later «resent».
Result: The log settles the question with a documented time instead of relying on memory.
How it relates to other features
- Users: adding users and editing their details appear in the activity log, and both tabs are on the same page.
- Invitations: every invitation that is sent or resent is recorded in the log with the email address and the role, so you can follow from here what was sent and when.
- Roles: creating custom roles appears in the log with the role's name and its creator, and it is the first thing to review after any change in permissions.
- Permissions: permissions define who can carry out operations, and the log shows who actually carried them out.
- Organizational structure: changes to departments and positions affect access and folders, and reviewing the log afterwards confirms that they are complete.
- Versions and operations log: the operations log on the document page tracks a single document's history in detail, while the activity log gives the picture at the system level.
- Dashboard: its «Document activity» section shows document operations for the last seven days, and the activity log is the more comprehensive reference.
Tips and best practices
- Set a fixed schedule for reviewing the log, weekly or monthly depending on the size of your organization, and do not wait for a problem to happen.
- Start any investigation with the narrowest possible time period, then widen it gradually. This reduces the number of entries and gets you to what you need faster.
- Combine a search by user name with the time period to review one person's work during a specific period, instead of browsing the whole log.
- Search by email address to trace a new employee's invitation from sending to resending.
- Pay attention to operations attributed to «System». If unexpected automatic operations appear, review the workflow settings or the rules that may have caused them.
- Click «Reset» after every search so that you are not surprised later by a log that looks incomplete.
- Restrict access to the «Activity» tab to the people who really need it, through Roles and Permissions, because the log reveals sensitive administrative details.
Warnings and common mistakes
FAQ
What is the activity log in Mstnd?
It is a chronological list of all the operations performed in the system, showing for each operation its performer, type, description and time. You will find it under «Users and roles» → the «Activity» tab.
How do I find out who carried out a particular operation in the system?
Open the «Activity» tab and search for a word from the operation's description, such as the role name or the email address. The entry shows the performer's name and the time of the operation.
Can I view the activity of just one employee?
Yes. Type the user's name in the «Search activity» field and the log is limited to their operations. You can add a time period to narrow it down further.
How do I review activity during a specific period?
Use the «From» and «To» fields next to the search field to set the start and end dates, and the log shows only the operations that took place between them.
What does it mean when «System» appears as the performer of an operation?
It means the operation was carried out automatically, without direct intervention from a user, such as creation or assignment operations that result from earlier settings or rules.
What is the difference between the activity log and a document's operations log?
The activity log covers operations across the whole system, such as roles and invitations. The operations log on the document page shows the history of one specific document.
How do I return to the full log after a search?
Click «Reset», and the search and the time period are cleared together and the log returns to the full view.
Why does an operation I carried out moments ago not appear?
Because the list does not update automatically after the page is opened. Click the refresh button to load the latest operations.
Summary
- The activity log answers the question "who did what, and when" for every operation in the system.
- Each entry shows the performer, the operation type badge, the description and the time, and distinguishes between a user and «System».
- Searching by keyword or by user name takes you straight to the operations you need.
- The «From» → «To» time period limits the review to a specific span, and it can be combined with the search.
- Refresh brings in the latest operations, and «Reset» takes you back to the full view.
Try it free: Create your organization's account in Mstnd
Was this article helpful?
Related articles
 1:03
Managing users in Mstnd: roles, status, positions and invitations
Learn the Mstnd Users page: search and filters, the user profile with effective permissions and positions, changing roles, deactivating, and inviting new staff.
 0:47
Invitations in Mstnd: track your team's invitations and send them in one go
Learn the Invitations tab in Mstnd: track each invitation's status, resend, copy the link or cancel, and invite several employees with one role and position.
 0:36
Roles in Mstnd: precise permissions for every job role
Learn about roles in Mstnd: core and custom roles, each role's permissions, and creating a role with precisely chosen permissions, then assigning it to users.
 0:27
Permissions in Mstnd: a complete reference for who sees and who edits
Learn the Permissions tab in Mstnd: every permission by category, with its name, code, description and the roles that include it, and how to search and filter.
 0:38
Versions and the operations log in Mstnd: a complete history for every document
Mstnd versions and the operations log: save edits as a new version and keep the old one, view, download or translate any copy, and track who did what and when.
 1:57
The Mstnd Dashboard: everything waiting for you on one screen
Learn the Mstnd Dashboard: the «Waiting for you today» cards, the Action agenda, workflows, Sanad recommendations, team activity and how to plan your day.