

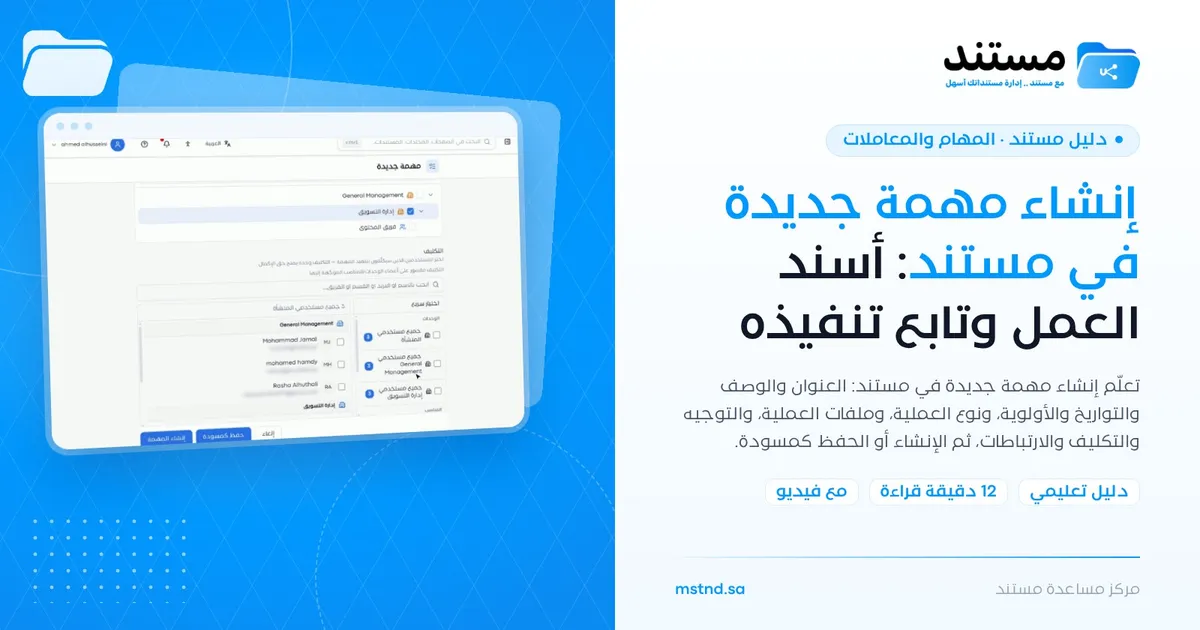
Creating a new task in Mstnd: assign the work and follow its progress
In this article
The «New task» page in Mstnd is where you create a task and assign it to the person who will carry it out. On it you set the task's title and description, the start, due and reminder dates, the priority, the required operation type and the files it is carried out on, then you route it to a department, team or position, assign specific employees, and link it to the related documents, transactions and correspondence. Once created, the task gets a system number and reaches the assignee immediately.
Quick overview
| Item | Details |
|---|---|
| Module | Tasks and workflows |
| Where it is in the interface | The «New task» button on the «Tasks» page |
| Direct link | https://app.mstnd.sa/tasks/new |
| Goal | Create a clearly defined task, assign it and follow it up inside the system |
| Who it is for | Managers, team leads, work coordinators and anyone who assigns work to others |
| Video length | About one minute |
| What you will learn | Writing the title and description, setting the dates and priority, choosing the operation type, attaching files, routing and assignment, links, and creating the task or saving it as a draft |
Watch the video
In about a minute, the video shows a complete task being created, from the title field until the system number appears and the task reaches the assignee.
Why this feature?
Many tasks are assigned with a sentence in a meeting or a short message: "review the contract", "prepare the letter". It is not clear what exactly is required, or by when, or on which file, or who is responsible if the task is addressed to a whole department. The result is work that falls behind or gets done differently from what was required.
The «New task» page turns assignment into an organized form. Every task has a title and a description, a deadline, a specific operation type, attached files, a party it is routed to, assigned employees and links to its context. And it is recorded in the system with a number that can be tracked.
| Before the feature | With the feature |
|---|---|
| Verbal assignment or a brief message | A task with a clear title and description |
| No set deadline, or a deadline that gets forgotten | A start date, a due date and a reminder |
| The required file is somewhere else | The file is attached in «Operation files» |
| Responsibility is unclear | Routing to a department, team or position, and employees assigned by name |
| The task's context is unknown | Links to documents, transactions, correspondence and contacts |
| It is hard to ask about the task later | A unique system number for every task |
Value for the organization: clear accountability and measurable work. Value for the individual: the assignee knows exactly what is required of them, and the person who assigned the task knows where the work stands.
Where to find it
- From the side menu, open «Tasks and workflows».
- Choose «Tasks».
- Click the «New task» button at the top of the page.
Direct link: https://app.mstnd.sa/tasks/new
Concepts and terms
| Term | Meaning in Mstnd |
|---|---|
| Start date | The date on which work on the task begins; it is a required field |
| Due date | The final deadline for completing the task |
| Reminder date | A date on which the people concerned are reminded of the task before it is due |
| Operation type | The work the task carries out, such as review, approval, signature, stamping, creation, archiving or correspondence. Each task carries out only one operation |
| Operation files | The files the operation is carried out on, attached from the system or created as a new file |
| Routing | Setting the department, team or position the task is directed to |
| Assignment | Choosing the employees who will carry out the task. Only assignment gives the right to complete it |
| Links | Connections between the task and other items in the system: documents, folders, tasks, workflows, correspondence, circulars and external contacts |
Step by step
Step 1: Write a clear title and a description for the task
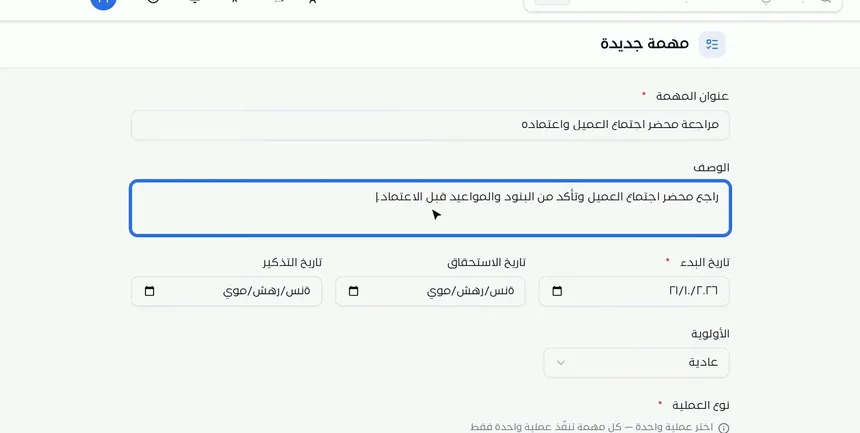
Start with the title. Keep it short and describe the work with a clear verb, such as "Review and approve the client meeting minutes". Then write in the description exactly what is required, such as: "Review the client meeting minutes and check the items and dates before approval".
The title is what the assignee sees in their task list, so if it is clear they know what is required without opening the task. The description answers the questions the assignee might ask later, saving both of you the time spent on queries.
Step 2: Set the dates and the priority
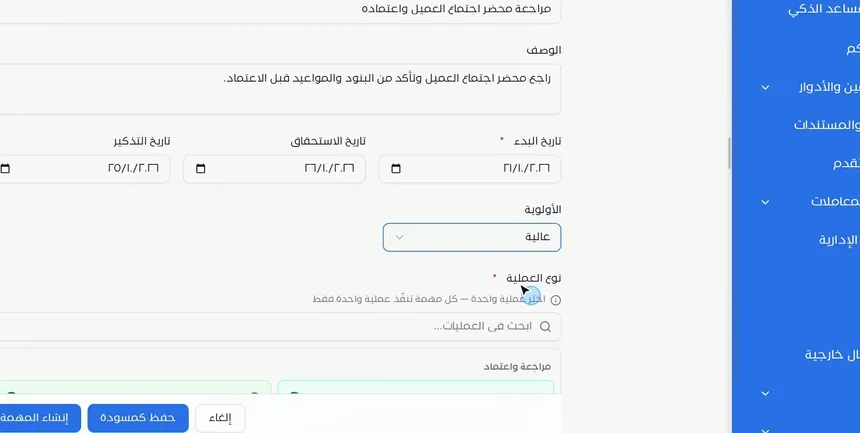
Set three dates:
- Start date: when the work begins; it is a required field.
- Due date: the final deadline.
- Reminder date: when the people concerned are reminded of the task before it is due.
Then choose the priority from the list, such as «High».
Choose a reminder date far enough before the due date to get the work done, not on the same day. And use the «High» priority for work that is truly urgent, because overusing it makes it lose its meaning for the team.
Step 3: Choose the operation type
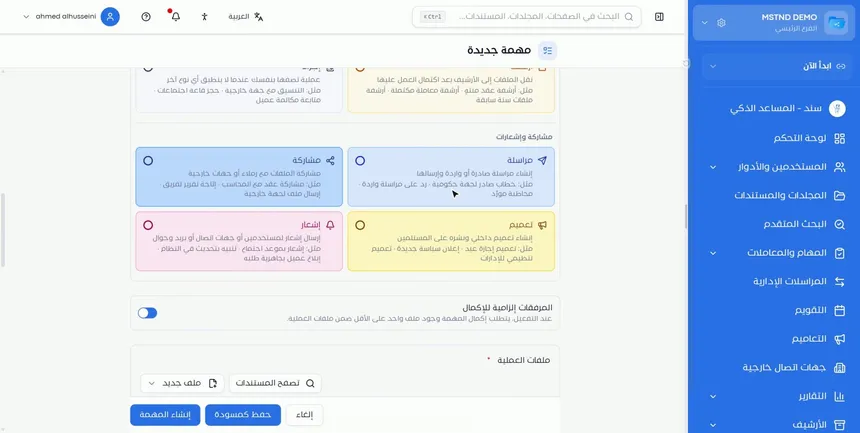
The operation type is a required field that sets the nature of the work the task carries out. The basic rule: each task carries out only one operation. Operations appear in groups, and you can search them from the «Search operations» field. Among the available types:
- Review and Approval.
- Signature and Stamp.
- Creation.
- Archiving: such as moving files to the archive after the work on them is complete.
- Correspondence: such as creating outgoing or incoming correspondence.
- Sharing: such as sharing files with colleagues or external parties.
- Circular: such as creating an internal circular and publishing it.
- Notification: such as sending a notification to users or contacts.
- Action: for an operation you describe yourself when no other type applies.
Each type has a short description and examples on the same card, to help you make the right choice.
Step 4: Attach the operation files
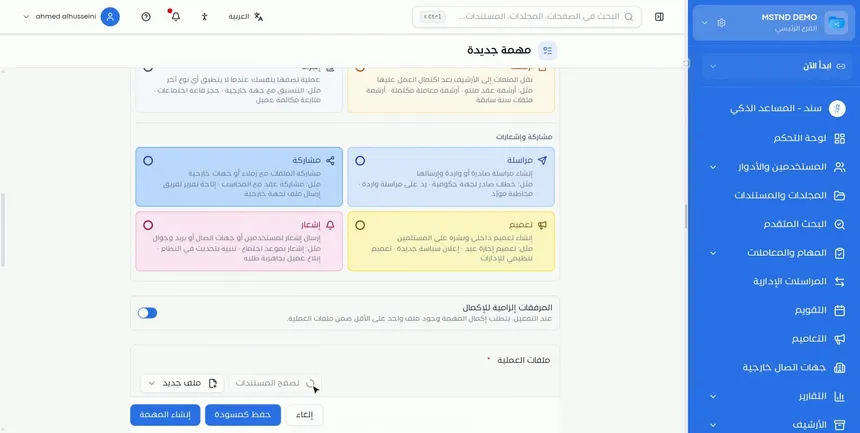
In the «Operation files» section, select the file the operation will be carried out on. You have two options:
- «Browse documents»: to choose a document that already exists in the system.
- «New file»: to create a new file directly.
Above this section you will find the «Attachments required to complete» option. When it is turned on, the task cannot be completed unless there is at least one file among the operation files.
Attaching the file inside the task means the assignee finds it in front of them when they open the task, so they do not have to look for it or risk working on the wrong version.
Step 5: Route the task to a department, team or position
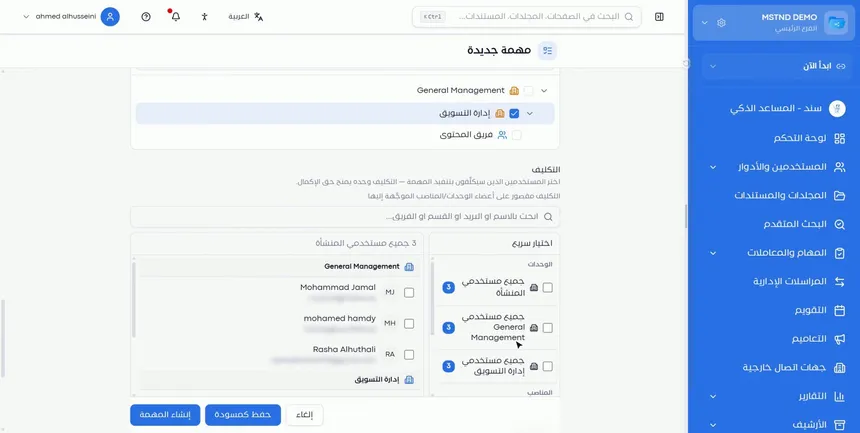
In the «Routing» section, choose the party the task is directed to: a department, a team or a position. The parties appear according to your organization's organizational structure, so you select, for example, «Marketing department» or «Content team».
Routing sets the party responsible for the task. This affects the next stage, because assignment is limited to members of the units and positions the task is routed to.
Step 6: Assign employees to carry it out
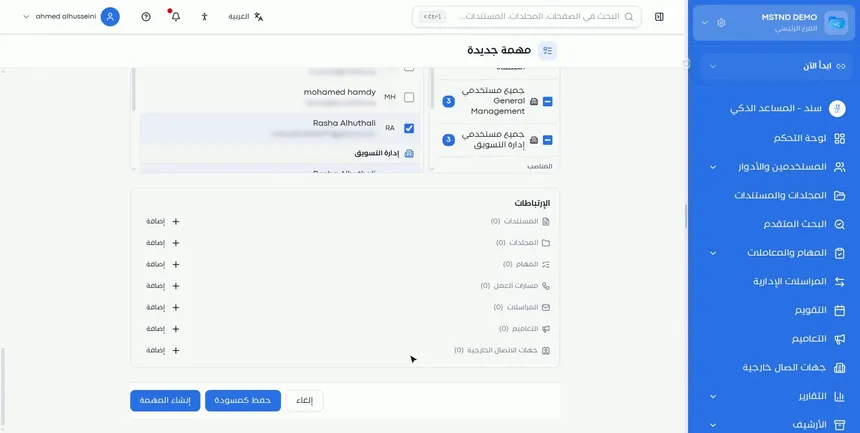
In the «Assignment» section, choose the employee or employees who will carry out the task. You can:
- Search by name, email, section or team.
- Use «Quick select» to select all the users of a particular unit or position at once.
- Choose specific individuals from the list of users.
Remember two things that the system points out in this section: only assignment gives the right to complete the task, and assignment is limited to members of the units and positions the task was routed to.
Step 7: Add links
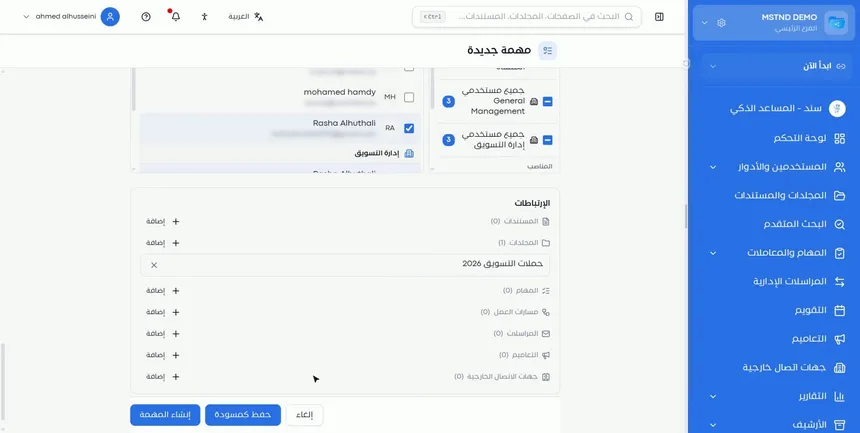
In the «Links» section, you link the task to other items in the system, using the «Add» button next to each type:
- Documents.
- Folders.
- Tasks.
- Workflows.
- Correspondence.
- Circulars.
- External contacts.
Links give the task its context. A task to review a supplier's offer, for example, can be linked to the project folder, to the incoming correspondence from the supplier and to the supplier's contact profile. The assignee then finds everything needed to understand the task in one place.
Step 8: Create the task or save it as a draft
At the bottom of the form there are three buttons:
- «Create task»: creates the task and sends it to the assignees.
- «Save as draft»: saves what you entered without sending it, so you can finish it later.
- «Cancel»: leaves without saving.
Choose «Save as draft» when a piece of information is missing, such as the assignee's name or the final file. You will find the draft later in the «Drafts» scope on the Tasks page.
Step 9: Confirm that the task was created and delivered
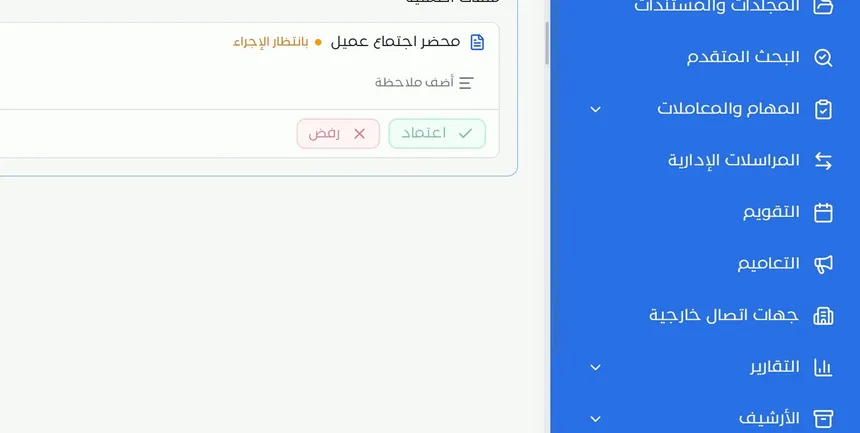
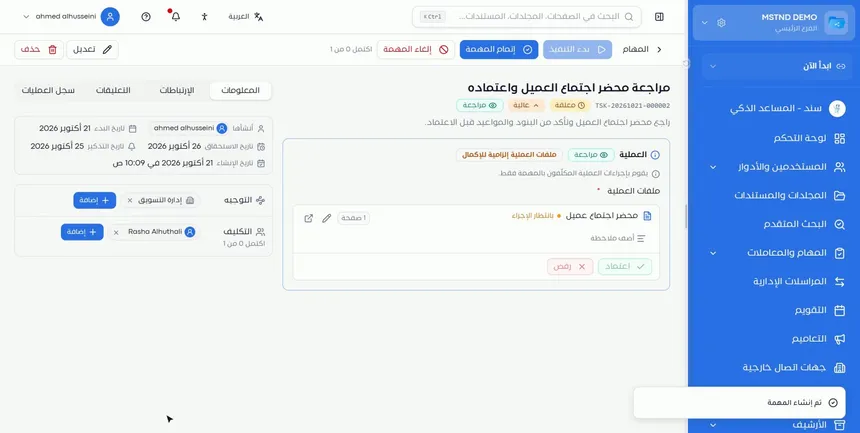
After you click «Create task», the task is created with a system number and reaches the assignee immediately. On the task page, the operation file appears with the «Awaiting action» status, along with the actions that match the operation type, such as «Approve» and «Reject» in an approval task, and the «Add a note» option.
From here, the assignee's role in carrying out the task begins, and so does your role in following it up from the Tasks page.
Options and their effect
| Option or setting | What it does | When to use it |
|---|---|---|
| Title and description | Define clearly what is required | Always, worded to start with a verb |
| Start date | Sets when the work begins (required) | Always |
| Due date | Sets the final deadline | For every task that has a completion deadline |
| Reminder date | Reminds the people concerned before the due date | For tasks that need time to prepare |
| Priority | Sets how important the task is | «High» only for what is truly urgent |
| Operation type | Sets the required work (required) | Always, one operation per task |
| «Browse documents» | Attaches an existing document | When the file is in the system |
| «New file» | Creates a new file for the operation | When the task requires creating a document |
| «Attachments required to complete» | Prevents completion without at least one file | When the file is a condition for completing the task |
| Routing | Sets the department, team or position | To set the responsible party |
| Assignment and «Quick select» | Set who carries out the task, individuals or a whole unit | To set who has the right to complete it |
| Links | Link the task to other items | To give the task its context |
| «Create task» | Creates the task and sends it | When the data is complete |
| «Save as draft» | Saves without sending | When a piece of information is missing |
| «Cancel» | Leaves without saving | When you decide not to create the task |
Practical scenarios
Scenario: The administrative communications department of a government entity
Situation: An incoming letter from another entity requires an official reply within a week.
What you do in Mstnd:
- Create a task titled "Prepare the reply to the entity's letter".
- Set the due date a week away, and the reminder two days before it.
- Choose the operation type «Correspondence».
- Route the task to the relevant department, and assign the responsible employee.
- Link the task to the incoming correspondence from «Links».
Result: An organized reply on time, with the full context in front of the employee.
Scenario: The projects department of a contracting company
Situation: A new structural drawing needs the approval of the responsible engineer before execution.
What you do in Mstnd:
- Create a task with the operation type «Approval» and the «High» priority.
- Attach the drawing from «Browse documents», and turn on «Attachments required to complete».
- Route the task to the engineering team, and assign the responsible engineer.
- Link it to the project folder.
Result: A documented approval of the correct drawing, within the project's context.
Scenario: The HR department of a hospital
Situation: New employees' contracts need to be signed before their start date.
What you do in Mstnd:
- Create a task with the operation type «Signature».
- Attach the contracts in «Operation files».
- Set the due date before the start date, with an early reminder.
- Route the task to the competent department and assign the people concerned.
Result: Contracts signed before the start date, without manual follow-up.
Scenario: The marketing department of a trading company
Situation: The minutes of a meeting with a client need to be reviewed and approved before they are sent.
What you do in Mstnd:
- Create the task "Review and approve the client meeting minutes" with the «High» priority.
- Attach the minutes in «Operation files».
- Route the task to the marketing department, and assign the responsible reviewer.
- Link it to the client's campaigns folder.
Result: The assignee finds the minutes in front of them with the «Approve» and «Reject» buttons, and completes the task on time.
How it relates to other features
- Tasks: the page where you start creating a task, follow it up after it is created and find your drafts.
- Carrying out a task: what the assignee sees when opening the task, and the actions they carry out on the operation files.
- Organizational structure: the source of the departments and positions that appear in «Routing».
- Sections and teams: defines the teams and their members, so it affects who appears in «Assignment».
- Starting a workflow on a document: the right alternative when the work requires several consecutive operations.
- External contacts: you can link the task to an external party from «Links».
Tips and best practices
- Start the title with a clear verb, such as "Review", "Approve" or "Prepare".
- Write the completion criterion in the description so the assignee knows when the task is finished.
- Set the reminder date far enough before the due date to leave time for the work.
- Stick to one operation per task, and use a workflow for multi-step work.
- Turn on «Attachments required to complete» when the file is the core of the task.
- Route the task to the right party first, then assign individuals, because assignment is limited to its members.
- Add the relevant links to reduce the assignee's questions.
- Use «Save as draft» instead of creating an incomplete task.
Warnings and common mistakes
FAQ
How do I create a new task in Mstnd?
Open «Tasks» and click «New task», then enter the title, description, dates, priority, operation type and files, route the task and assign the people who will carry it out, then click «Create task».
Can a task include more than one operation?
No. Each task carries out only one operation. For multi-step work, create several tasks or use a workflow.
What is the difference between routing and assignment?
Routing sets the department, team or position the task is directed to, while assignment sets the employees who carry it out, and only assignment gives the right to complete it.
Why does a particular employee not appear in the assignment list?
Because assignment is limited to members of the units and positions the task was routed to. Check the routing first.
Can I save a task and finish it later?
Yes. Click «Save as draft», and you will find it later in the «Drafts» scope on the Tasks page.
What does the «Attachments required to complete» option mean?
When it is turned on, completing the task requires at least one file among the operation files.
How do I link a task to a correspondence or a transaction?
In the «Links» section, click «Add» next to the type you need, such as correspondence or workflows.
What happens after the task is created?
The task gets a unique system number and reaches the assignees immediately, and the operation file appears with the «Awaiting action» status.
Summary
- «New task» turns assignment into a clear form with a title, a description, deadlines and a priority.
- Each task has one operation type, and operation files that can be made required for completion.
- Routing sets the party, and assignment sets the people who carry out the task and gives them the right to complete it.
- Links place the task in its context with documents, transactions, correspondence and contacts.
- After creation, the task gets a system number and reaches the assignee immediately, or it stays a draft until it is complete.
Try it free: Create your organization's account in Mstnd
Was this article helpful?
Related articles
 0:56
The Tasks page in Mstnd: your tasks and your team's in one place
Mstnd's Tasks page lists your and your team's tasks with system number, operation, status, priority, assignees and due date, plus scopes, filters and a report.
 0:57
Carrying out a task in Mstnd: from «Start» to «Complete task»
Learn the Mstnd task page: view its data and routing, start work, preview the operation file, approve or reject it with a note, then complete and log the task.
 0:29
The organizational structure in Mstnd: your organization as it really is
Learn the organizational structure in Mstnd: an interactive chart to zoom and drag, show or hide member names, with color-coded sections, teams and leads.
 1:06
Sections and teams in Mstnd: organize your work teams clearly
Learn the Mstnd Sections and teams tab: general management and its managers, creating a section, adding its managers, then a team with its lead and members.
 1:14
Starting a workflow on a document in Mstnd: launch the approval from the document
Learn to start a workflow from a Mstnd document: pick a template, set priority and due date, assign steps and launch the transaction with the document attached.
 0:56
External contacts in Mstnd: your clients and suppliers in one directory
Learn Mstnd external contacts: a client and supplier directory with search and filters, and how to add a new contact with its basic, contact and business data.