

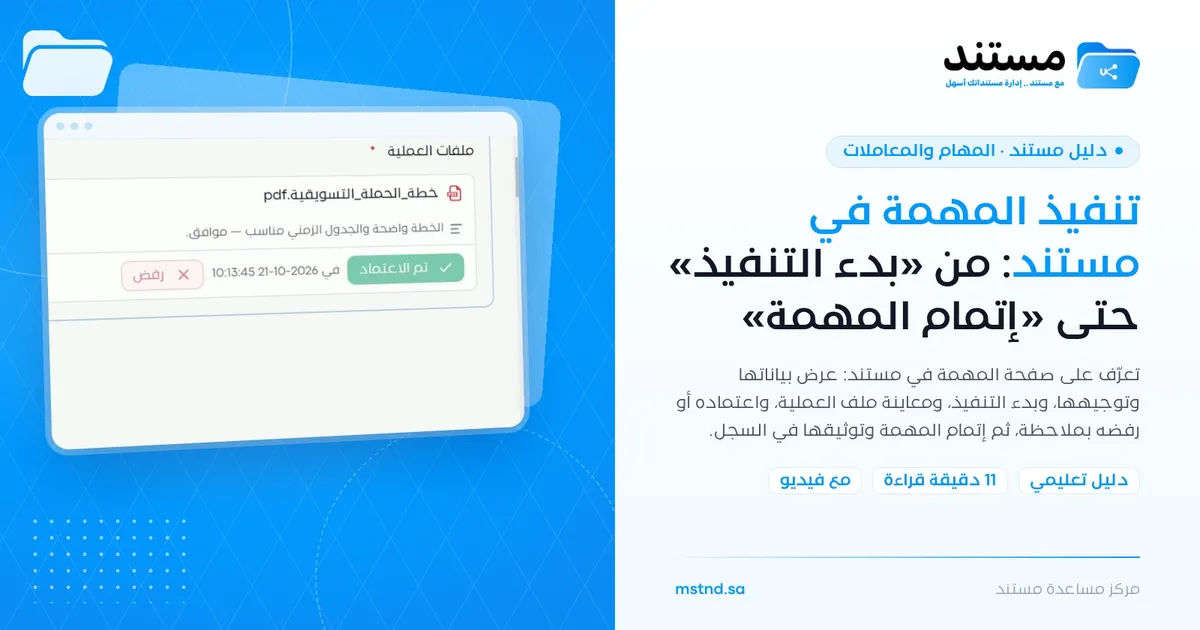
Carrying out a task in Mstnd: from «Start» to «Complete task»
In this article
The task page in Mstnd is where you actually get the work assigned to you done: you see the task's details, its dates and who it is assigned to, then you start the work, preview the operation file without leaving the page, approve or reject it with a written note, and finally complete the task. Every move you make is recorded automatically with the time and the user name, so the organization keeps a documented trail of every decision.
Quick overview
| Item | Details |
|---|---|
| Module | Tasks and workflows |
| Where it is in the interface | Opens when you click any task on the «Tasks» page, the action button on the Dashboard, or a step inside a transaction |
| Direct link | https://app.mstnd.sa/tasks/<id> |
| Goal | Carry out the task assigned to you from start to completion on one page, with every action documented |
| Who it is for | Every employee who is assigned tasks, reviewers and approvers, and managers who follow their teams' progress |
| Video length | Under a minute (57 seconds) |
| What you will learn | Reading the task header and its side details, starting the work, previewing the operation file, approving or rejecting with a note, using comments and the operations log, and completing the task |
Watch the video
In under a minute, the video shows the full life cycle of a review task: from opening it while it is «Pending», to starting it, approving its file, and then completing it so that it becomes «Completed» with a positive result.
Why this feature?
In many organizations, a task reaches the employee by email, the file to be reviewed sits in a separate attachment, the notes are written in a reply, and the final decision is communicated verbally or in a chat. The result is that the information is spread over more than one place, and nobody knows exactly when the work started, who approved, or on what basis.
The task page in Mstnd brings all of these elements together: the description of what is required, the file, the note, the decision, the discussion and the log. Carrying out the task becomes a single process with a clear start and end, and the decision stays tied to the file it was made on.
| Before the task page | With the task page in Mstnd |
|---|---|
| The file is in an email attachment, and the task is somewhere else | The operation file is shown inside the task, and you preview it without leaving |
| Nobody knows when the employee actually started the work | The «Start» button changes the status to «In progress» and records the time |
| Notes are scattered across messages | The note is written on the file itself before approving or rejecting |
| The decision is communicated verbally | The «Approve» or «Reject» decision appears on the file with an exact date and time |
| It is hard to know who did what | The «Operations log» documents every move with the time and the user name |
Value for the organization: a complete audit trail for every decision, precise knowledge of the stages of completion, and less reliance on verbal follow-up.
Value for the individual: one clear place to get the work done, without looking for the file or trying to remember the instructions.
Where to find it
You can reach the task page from more than one place:
- From the Tasks page: side menu → «Tasks and workflows» → «Tasks» → click the task.
- From the Dashboard: the action button on the task item in the «Action agenda», such as «Start».
- From the transaction details: when you open a step in a transaction, the current task and its assignee appear.
Direct link format: https://app.mstnd.sa/tasks/<id>
Concepts and terms
| Term | Meaning in Mstnd |
|---|---|
| Task number | A unique task identifier that starts with TSK followed by the date and a sequence number; it is used to search for the task and refer to it |
| Status | The task's current state, such as «Pending» before the work starts, «In progress» after it starts and «Completed» when it is finished |
| Operation type | The nature of the work required in the task, such as «Review», «Approval» or «Signature» |
| Operation files | The files the operation is carried out on; they may be «required for completion», in which case the task cannot be completed without handling them |
| Routing | The department or organizational unit the task was routed to |
| Assignment | The people assigned to carry out the task, with an «X of Y completed» indicator |
| Operations log | A tab that shows every change made to the task with the time and the user name |
| Result | The outcome of the task when it is completed, such as «Positive» when the file is approved |
Step by step
Step 1: Read the task header
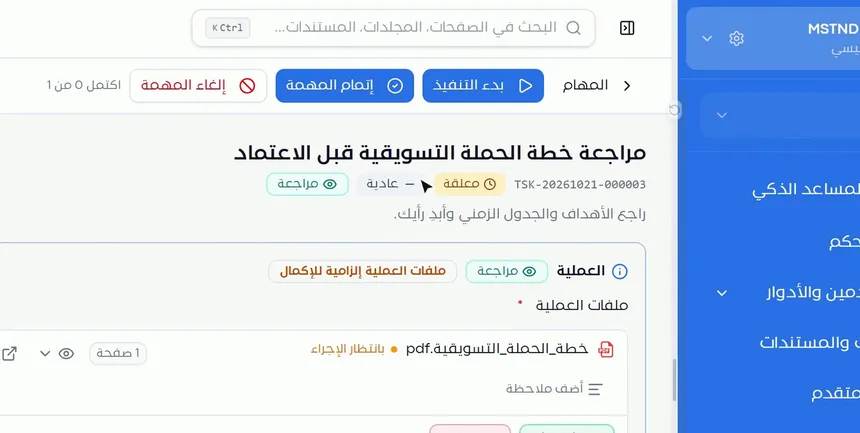
When you open the task, its title appears at the top, and under it a row of key information:
- Number: such as TSK-20261021-000003.
- Status: such as «Pending», meaning the work has not started yet.
- Priority: such as «Normal».
- Operation type: such as «Review».
Below that is a short description of what is required of you, such as "Review the goals and the timeline and share your opinion". Read the description first: it holds the instructions written by the task's creator or carried over from the workflow step.
In the top bar you will find the main action buttons, «Start», «Complete task» and «Cancel task», and the «0 of 1 completed» indicator, which shows how many of the assignees have finished the task.
Step 2: Review the dates, routing and assignment
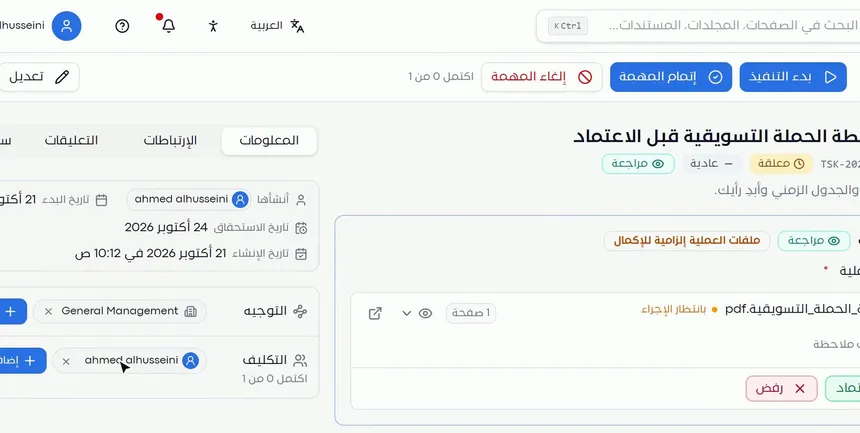
On the side is the «Info» tab, which shows:
- Created by: the user who created the task.
- Start date, due date and creation date.
- Routing: the department the task was routed to.
- Assignment: the people assigned to carry it out, with an indicator under them showing how many of them have completed it.
Pay attention to the due date before anything else: it decides whether the task will appear as overdue on the Dashboard. If the task is assigned to more than one person, the completion indicator tells you how far your colleagues have progressed in it.
Step 3: Click «Start»
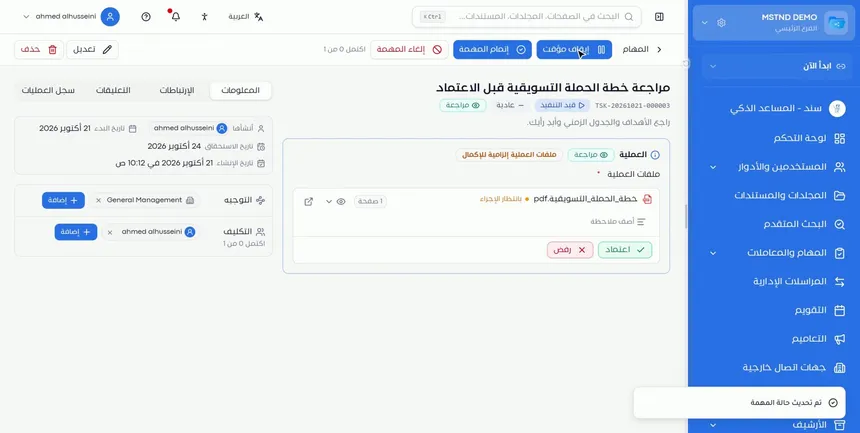
When you are ready to work, click «Start». The task's status changes from «Pending» to «In progress».
This step is not a formality. It tells the task's creator and its followers that the work has actually started, and it records the start time in the «Operations log». The difference between a «Pending» task and an «In progress» task matters to the manager who is following up: nobody has touched the first, while a specific person is working on the second.
Step 4: Preview the operation file from inside the task
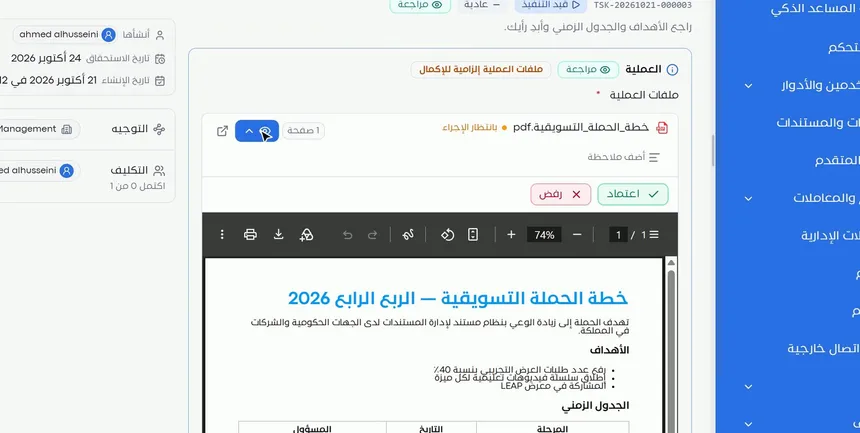
The «Operation» section shows the «Operation files». Each file has its name, its status, such as «Awaiting action», and its number of pages. Next to it are icons:
- Preview (the eye): to view the file directly inside the task.
- Open in a separate page: to open the file in the full document viewer.
Previewing in place saves you from moving between screens. You read the file, then return to the decision in the same place.
Step 5: Add your note, then choose «Approve» or «Reject»
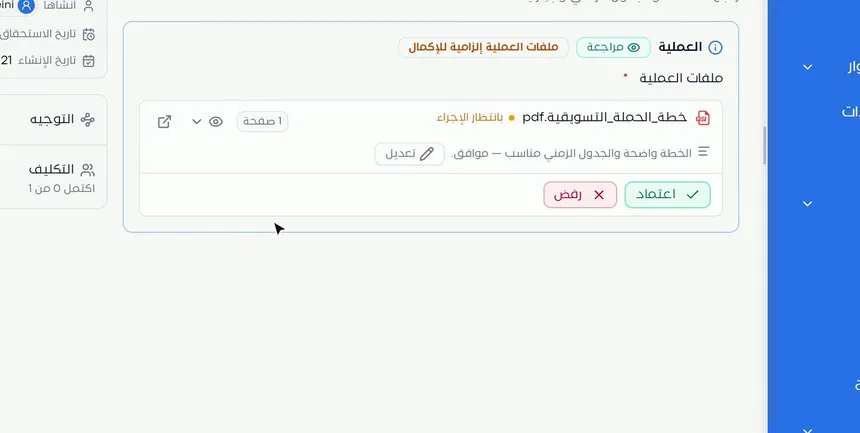
After the review, write your note in the «Add a note» field under the file. For example: "The plan is clear and the timeline is suitable, agreed." Then choose:
- «Approve» if the file is acceptable.
- «Reject» if it needs changes.
You can edit the note with the «Edit» button next to it before you make the decision.
In practice the note is not optional, even if the system lets you skip it. An approval without a comment tells nobody what you reviewed, and a rejection without a reason leaves the file's owner guessing what is required. Write a short, specific note in both cases.
Step 6: Check the approval and communicate through «Comments»
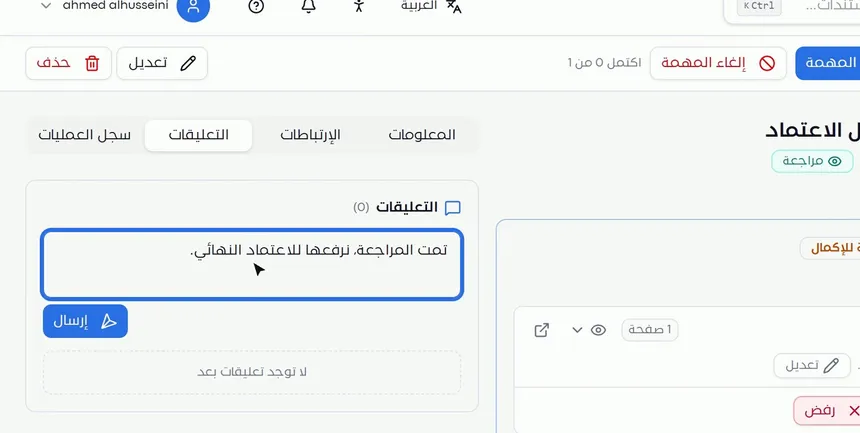
After the approval, an «Approved» badge appears on the file together with the date and time, down to the second. This timestamp is what people refer back to later when they ask: "When was the plan approved?"
If you need to discuss the task with the team, open the «Comments» tab. The discussion there stays tied to the task itself, so it does not get lost in outside chats, and everyone who opens the task later can read it.
Step 7: Review the «Operations log»
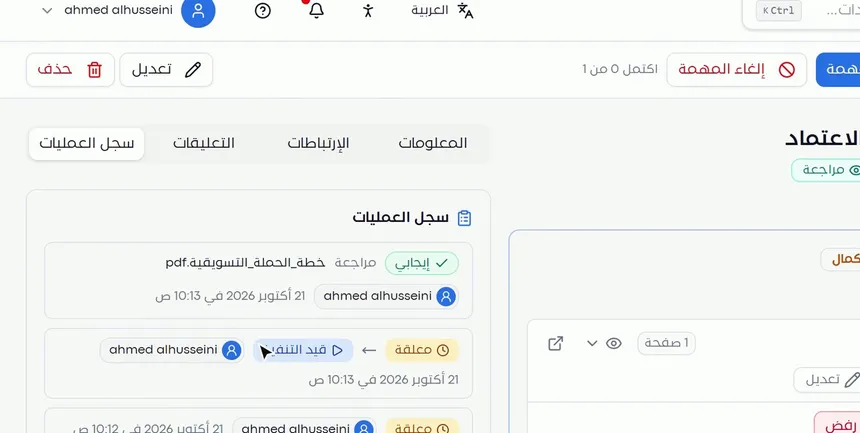
In the «Operations log» tab you see every move on the task in chronological order, and for each move:
- Its type, such as a «Review» of a specific file with the result «Positive».
- The status change, such as «Pending» → «In progress».
- The name of the user who made it.
- The date and time.
This log is the task's audit trail. Nobody needs to ask you what you did and when: the answer is documented here.
Step 8: Click «Complete task»
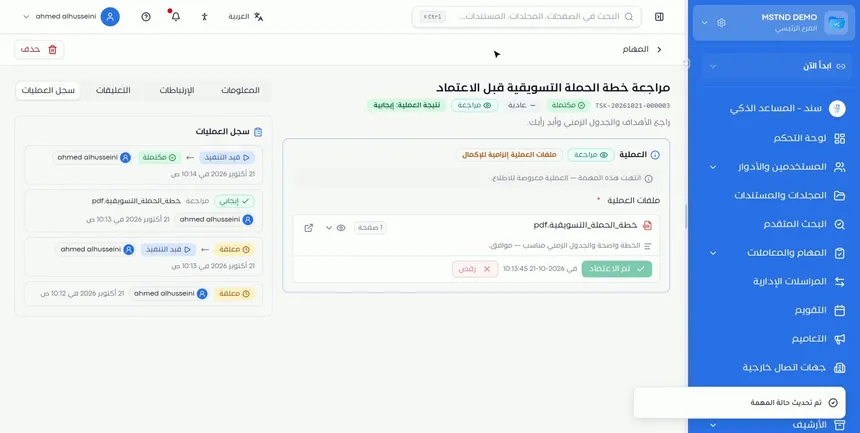
When you have finished the required work, click «Complete task» in the top bar. This button closes the task on your side and updates the «X of Y completed» indicator.
The difference between «Approve» on a file and «Complete task» is essential: approval is a decision on one specific file, while completion declares that the whole task is finished. A task may contain more than one file, so do not complete it before you have handled them all.
Step 9: Confirm that the task is completed and check its result
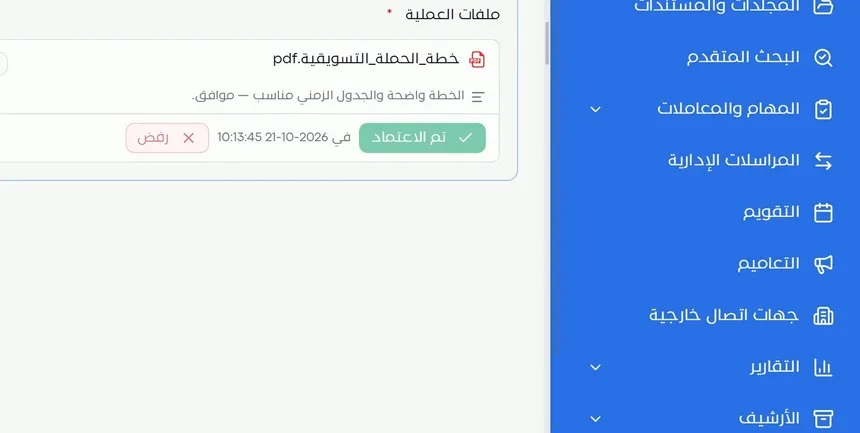
The task changes to «Completed» with a positive result, and the file stays on display with your note, the «Approved» badge and its date. The completion is added to the «Operations log», which completes the record of the task's journey from its creation to its closure.
If the task is part of a workflow transaction, its result is what decides the next step in the path: a positive result moves the transaction forward, and a negative one may send it back to an earlier step, depending on how the template is designed.
Options and their effect
| Option or setting | What it does | When to use it |
|---|---|---|
| «Start» | Changes the status from «Pending» to «In progress» and records the start time | When you actually begin working on the task |
| Previewing the operation file | Shows the file inside the task | To review the file quickly without leaving the page |
| Opening the file in a separate page | Opens the file in the document viewer | When you need a long read or the viewer's tools |
| «Add a note» | Attaches a written note to the file | Before every approval or rejection decision |
| «Approve» | Records that the file is accepted, with the date and time | When the file meets the requirements |
| «Reject» | Records that the file is not accepted | When the file needs changes, with a note that explains why |
| The «Comments» tab | A discussion with the team tied to the task | To ask a question or clarify a point before or after the decision |
| The «Operations log» tab | Shows every move with the time and the user name | To check what happened on the task and when |
| «Complete task» | Closes the task and updates the completion indicator | After finishing the work and handling all the operation files |
| «Cancel task» | Cancels the task | When the task is no longer needed at all, not to finish it |
Practical scenarios
Scenario: Reviewing a campaign plan in a trading company
Situation: The marketing department has prepared a seasonal campaign plan, and the sales manager is asked to review it and give an opinion before its final approval.
What you do in Mstnd:
- Open the task from the «Tasks» card on the Dashboard.
- Read the description and the due date, then click «Start».
- Preview the plan file from inside the task.
- Write your note on the file and click «Approve».
- Click «Complete task».
Result: The plan moves to the next approval step, and the marketing team knows your opinion and the time you approved it without any extra message.
Scenario: Auditing a payment claim in a contracting company
Situation: The project engineer is assigned to review a subcontractor's progress payment claim before it is referred to the finance department, and finds items that need correcting.
What you do in Mstnd:
- Open the task and click «Start».
- Preview the payment claim file and identify the non-compliant items.
- Write a precise note that lists the items to be corrected, then click «Reject».
- Use «Comments» to clarify any point for the person who prepared the claim.
- Complete the task.
Result: The person who prepared the claim knows exactly what to change, and the reason for the rejection stays documented in the log for any later review.
Scenario: Approving an internal policy in a hospital
Situation: A draft infection control policy needs to be reviewed by the head of the nursing section as part of an approval path that passes through several sections.
What you do in Mstnd:
- Open the task from the transaction step in «Transaction details».
- Start the work and preview the policy file.
- Discuss the wording of a clause with a colleague through «Comments».
- Write your note and approve the file, then complete the task.
Result: The transaction moves to the next step automatically, and the quality section can refer to the «Operations log» to prove that every section reviewed the policy.
Scenario: Reviewing a contract in a law firm
Situation: A lawyer is assigned to review a draft contract for a client, and the task is assigned to them and to another colleague.
What you do in Mstnd:
- Open the task and notice the «0 of 2 completed» indicator at the top.
- Start the work, review the contract and write your notes on it.
- Approve or reject the file, then complete the task on your side.
- Watch the indicator to see whether your colleague has finished their part.
Result: The supervising partner sees who has completed and who has not, and each lawyer's opinion is clearly recorded on the file.
How it relates to other features
- Tasks: the page that shows all your tasks; from it you open any task to carry it out.
- New task: this is where the priority, the deadline, the operation type and the files that later appear on the execution page are set.
- Dashboard: the «Start» button in the Action agenda takes you straight to this page.
- Transaction details: every step in a transaction creates a task, and the result of carrying it out decides the transaction's path.
- Building a workflow template: the instructions written for each step in the template become the task description you read here.
- Document viewer: when you open the operation file in a separate page, you move to the document viewer with all its tools.
Tips and best practices
- Click «Start» as soon as you actually begin the work, not when you finish. This gives the people following the task an accurate picture of where things stand.
- Read the full task description before opening the file: it tells you what to look for.
- Write a specific note with every decision: "The plan is clear and the timeline is suitable" is better than "OK".
- When you reject, state exactly what needs to change so that the file is corrected on the first attempt.
- Use «Comments» for discussion, and keep the note on the file for the decision and its reasons only.
- Review the «Operations log» before completing to make sure every action was recorded as you expect.
- Do not click «Complete task» before handling all the operation files, especially when they are required for completion.
Warnings and common mistakes
FAQ
How do I start carrying out a task in Mstnd?
Open the task from the «Tasks» page or from the Dashboard, then click «Start» at the top of the page. Its status changes from «Pending» to «In progress», and the start time is recorded.
Can I preview the file without leaving the task?
Yes. In the «Operation files» section, click the preview icon to view the file inside the task, or open it in a separate page if you need the full document viewer.
How do I reject a file and explain why?
Write the reason in the «Add a note» field under the file, then click «Reject». The note stays tied to the file and is visible to everyone who opens the task.
What is the difference between «Approve» and «Complete task»?
«Approve» is a decision on a specific operation file, while «Complete task» closes the whole task once you have finished the required work. You usually need both, in that order.
Where do I see when the file was approved and who approved it?
The approval date and time appear next to the «Approved» badge on the file, and you will find the full details, including the user name, in the «Operations log» tab.
How do I communicate with my team about a specific task?
Use the «Comments» tab on the task page. The discussion stays tied to the task, and everyone who opens it can read it.
What does «0 of 1 completed» at the top of the task mean?
It is an indicator that shows how many assignees have completed the task out of everyone assigned to it. It updates automatically whenever one of them completes their part.
Is everything I do in the task recorded?
Yes. The «Operations log» shows every move on the task, such as status changes and file reviews with their results, along with the time and the user name.
Summary
- The task page brings the description, the file, the decision, the discussion and the log together in one place.
- «Start» announces that the work has begun and changes the status to «In progress».
- You preview the operation file inside the task, write your note, then choose «Approve» or «Reject».
- «Comments» are for discussion, and the «Operations log» is for documentation with the time and the user name.
- «Complete task» closes the task with its result, and in transactions that result decides the next step.
Try it free: Create your organization's account in Mstnd
Was this article helpful?
Related articles
 0:56
The Tasks page in Mstnd: your tasks and your team's in one place
Mstnd's Tasks page lists your and your team's tasks with system number, operation, status, priority, assignees and due date, plus scopes, filters and a report.
 1:03
Creating a new task in Mstnd: assign the work and follow its progress
Learn to create a new task in Mstnd: title, description, dates, priority, operation type, files, routing, assignment and links, then create or save as a draft.
 0:48
Transaction details in Mstnd: know where your transaction stands and who is handling it
Learn the Mstnd transaction details page: progress, current step, workflow steps, the path diagram and branches, comments, files and log, pausing or cancelling.
 0:41
Transactions in Mstnd: follow every workflow from one screen
Learn the Mstnd Transactions page: see every workflow with its number, status, priority and progress, use scope and filters, export it and start a new workflow.
 0:51
The document viewer in Mstnd: view any document without downloading it
Learn the Mstnd document viewer: view a file in the system without downloading it, zoom or go full screen, and use the actions bar and side panel in one place.
 1:57
The Mstnd Dashboard: everything waiting for you on one screen
Learn the Mstnd Dashboard: the «Waiting for you today» cards, the Action agenda, workflows, Sanad recommendations, team activity and how to plan your day.