

Starting a workflow on a document in Mstnd: launch the approval from the document
In this article
The «Start workflow» feature on the Mstnd document page lets you launch an approval or review cycle directly on the open document, without moving to another page. You choose the workflow template, set the priority and the due date, and assign the person responsible for each step; the transaction then goes immediately to the assignee of the first step, with the document attached to it automatically. This feature helps anyone who prepares documents that need review and approval from more than one party.
Quick overview
| Item | Details |
|---|---|
| Module | Document page |
| Where it is in the interface | Document page → action bar → «Start workflow» |
| Direct link | https://app.mstnd.sa/file/<document ID> |
| Goal | Launch a transaction from a ready-made workflow template on the current document, with the assignees of each step set |
| Who it is for | Document preparers, project coordinators, department managers, and anyone who needs a multi-stage approval |
| Video length | About 1 minute and 14 seconds |
| What you will learn | Choosing the template, editing the name and description, setting the priority and due date, managing workflow files, reviewing assignments, and launching and following the transaction |
Watch the video
In about a minute and a quarter, the video shows how to launch a «Marketing campaign approval» cycle on a campaign plan, from choosing the template until the transaction page appears with its steps and its diagram.
Why this feature?
When you finish preparing a document that needs approval, a long journey usually begins. You email it to the reviewer, wait for their reply, then send it to the approver, then follow up with each of them yourself. And nobody knows what stage the document has reached, or who is holding it up.
A workflow in Mstnd turns this journey into a path with defined steps. Each step has an operation type, a responsible person and a deadline. Launching it from the document page means you do not need to copy or attach the document by hand: the document in front of you is attached automatically and goes through the steps in order.
| Before workflows | With starting a workflow from the document |
|---|---|
| You email the document to each reviewer and approver in turn | You choose a ready-made template, and the steps run in order automatically |
| You attach the document by hand to every message | The current document is attached automatically as a workflow file |
| You do not know where the document has stopped | The transaction page shows the current step and the progress |
| Each reviewer learns their role through calls or messages | Each step reaches its assignee as a task with its instructions |
| There is no clear date for completion | The priority and due date are set from the start |
Value for the organization: standardized procedures that follow the approved templates, transparency about the status of every transaction, and a complete record of what happened.
Value for the individual: launching the approval in a minute from the same place where you prepared the document, and following it up without phone calls.
Where to find it
- Open the document you want to launch the workflow on.
- In the action bar at the top of the document page, click «Start workflow».
- The «Start workflow run» window opens, with the subtitle «Create a new workflow run from a template».
Direct link: https://app.mstnd.sa/file/<document ID>
Concepts and terms
| Term | Meaning in Mstnd |
|---|---|
| Workflow template | A ready-made template that defines the steps of a procedure in order, the operation type of each step and its deadline |
| Transaction (workflow run) | A running instance of the template, launched on a specific document; it has a reference number and a follow-up page |
| Operation type | What the step asks for: «Creation», «Review», «Approval», «Circular», «Archiving» and others |
| Workflow files | The documents attached to the transaction; the outputs of each step join them automatically |
| «Review assignments» | A section that shows all the steps of the template, so you can set the routing and the assignment of each step before starting |
| Routing | The organizational unit the step is routed to, such as a department or a team |
| Assignment | The employee or employees responsible for carrying out the step, from within the unit it is routed to |
| «Required — set by the workflow initiator» | A step the template left without a fixed assignee, which you must set when starting |
| «Modified for this run» | A mark meaning you set the step's assignment for this transaction only, without changing the template |
Step by step
Step 1: Click «Start workflow» in the action bar
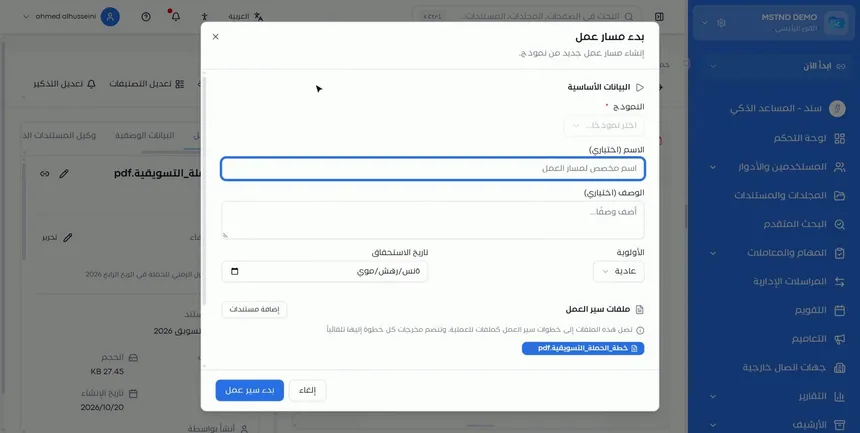
Open the document that is ready for review or approval, then click «Start workflow» in the action bar. The «Start workflow run» window opens, and its first section is «Basic information».
Before you click, make sure the document is in a form fit for review, because the document will reach every assignee exactly as it is now.
Step 2: Choose the right workflow template
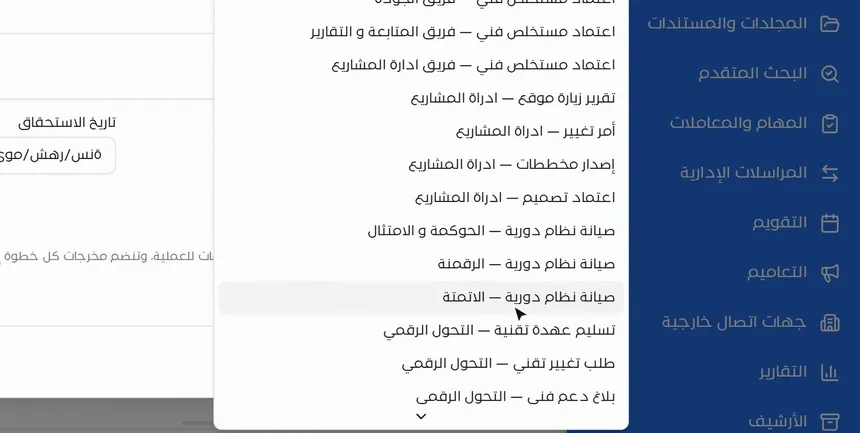
From the «Template» field, which is mandatory, choose the workflow template that suits the document. In the video, the «Marketing campaign approval» template was chosen.
The template determines everything that happens next: the number of steps, their order and the operation type of each step. So choose the template carefully: a contract approval template is different from a campaign or policy approval template.
Step 3: Review the name and description filled in from the template
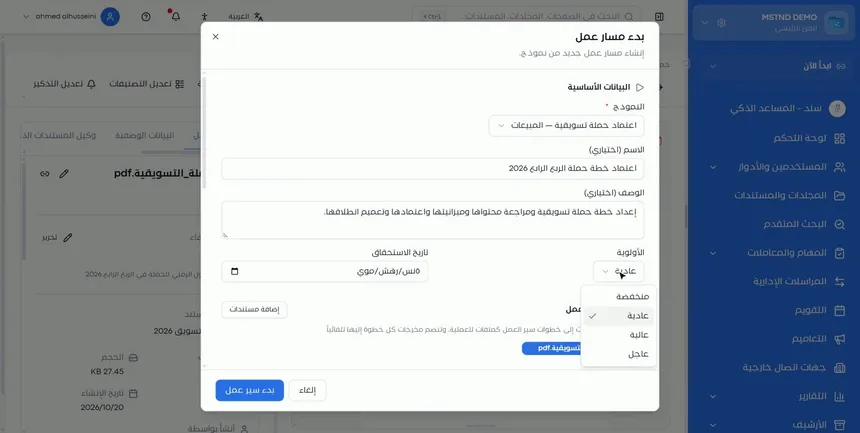
After you choose the template, the «Name (optional)» and «Description (optional)» fields are filled in automatically from the template. You can edit them freely.
Editing the name helps distinguish the transaction from other transactions that use the same template. For example, instead of the general name, write «Q4 campaign plan approval». This name is what the assignees will see in their tasks, and what you will search for later in transactions.
Step 4: Set the priority and the due date
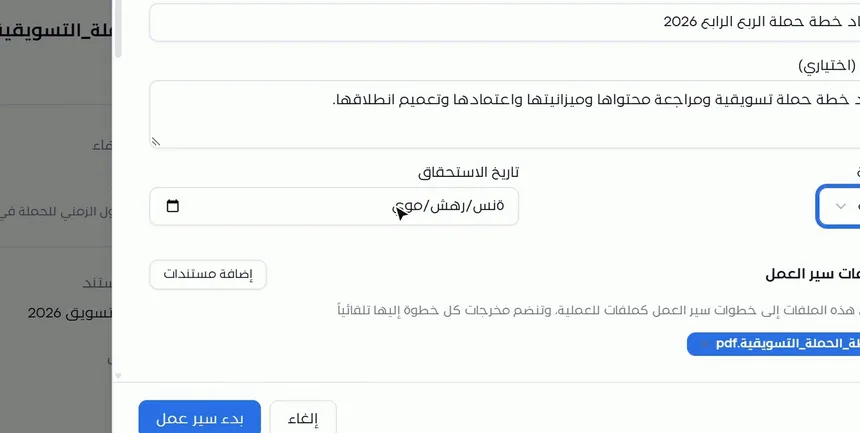
Choose the «Priority» from the list. The options shown are:
| Priority | When to choose it |
|---|---|
| Low | A transaction that can wait without affecting the work |
| Normal | Everyday, routine transactions |
| High | A transaction tied to a near deadline or with an important impact |
| Urgent | A transaction that must be completed immediately, before the others |
Then set the «Due date», which is the date by which the whole transaction must be finished. In the video, the «High» priority was chosen.
Step 5: Check the workflow files and add others if needed
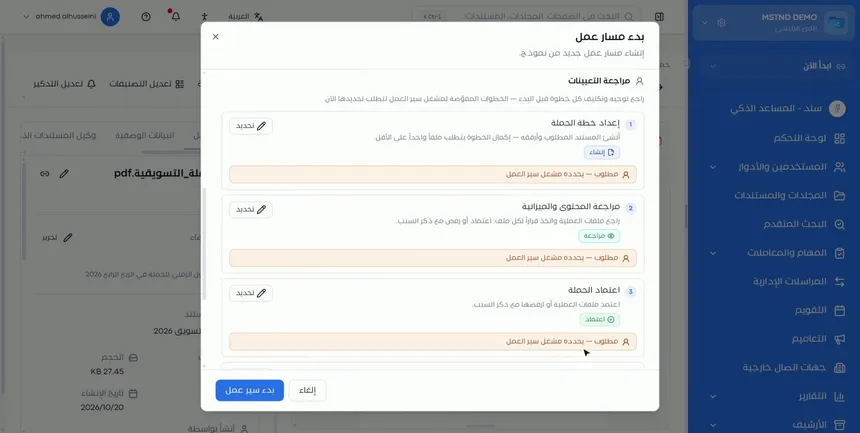
In the files section, the document you are in appears, attached automatically as a workflow file. If the transaction needs supporting documents, such as a budget or a price quotation, click «Add documents».
The window explains that these files are passed to the workflow steps as the operation's files, and that the outputs of each step join them automatically. So if an assignee creates a document in their step, it becomes available to the following steps.
Step 6: Open «Review assignments» and set the assignee of each step
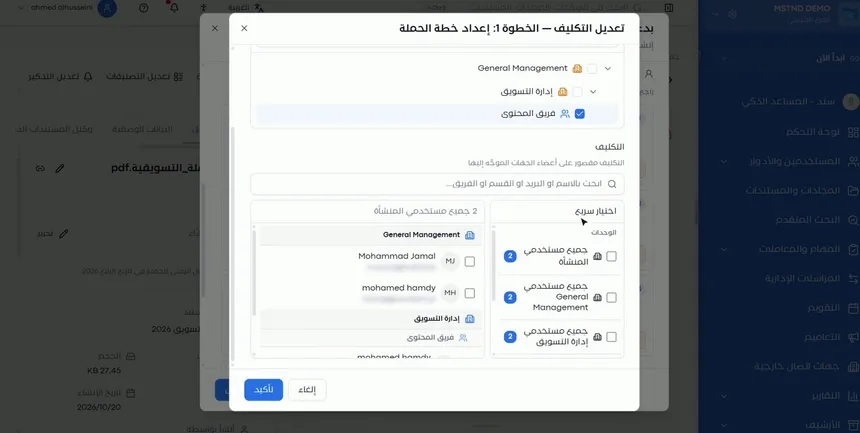
Scroll down to the «Review assignments» section. A line explains what is needed: review the routing and assignment of each step before starting, and steps delegated to the workflow initiator must be set now.
All the steps of the template appear in order. Each step has its name, its instructions and its operation type. In the video's example:
| Step | Operation type | Short instructions |
|---|---|---|
| 1. Prepare the campaign plan | Creation | Create the required document and attach it; completing the step requires at least one file |
| 2. Review the content and budget | Review | Review the operation's files and make a decision on each file: approve, or reject with a reason |
| 3. Approve the campaign | Approval | Approve the operation's files or reject them with a reason |
| 4. Circular on the campaign launch | Circular | Create the circular and publish it to its intended recipients |
| 5. Archive the campaign file | Archiving | Archive the operation's files in the appropriate folder |
The steps that carry the «Required — set by the workflow initiator» notice are steps whose assignee the template has not fixed, and they are waiting for you to set it.
Step 7: Route the step to a unit, choose the assigned employee, then «Confirm»
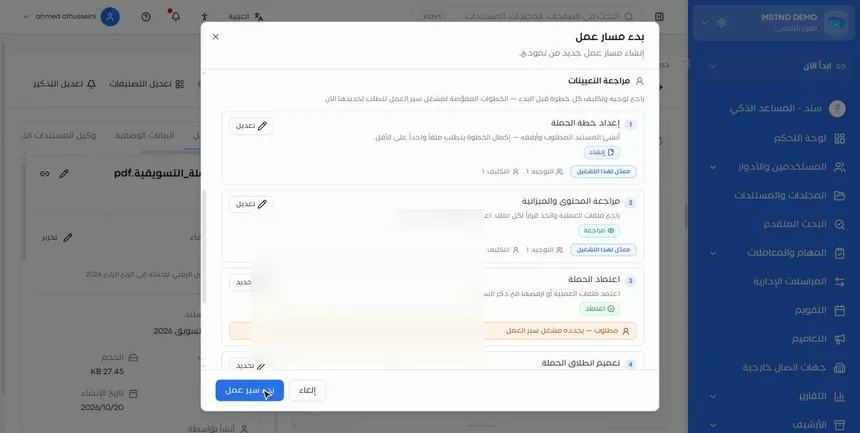
Click «Set» next to the step, and the «Edit assignment» window opens with the step's name. It has two parts:
- Routing: the organizational structure tree. Choose the responsible unit, such as the «Content team» within the marketing department.
- Assignment: choose the assigned employee or employees. You can search by name, email, section or team, or use «Quick select» to choose all the users of a particular unit.
The window explains that assignment is limited to members of the units the step is routed to. Then click «Confirm».
Step 8: Repeat the assignment for the remaining steps until they all show «Modified for this run»
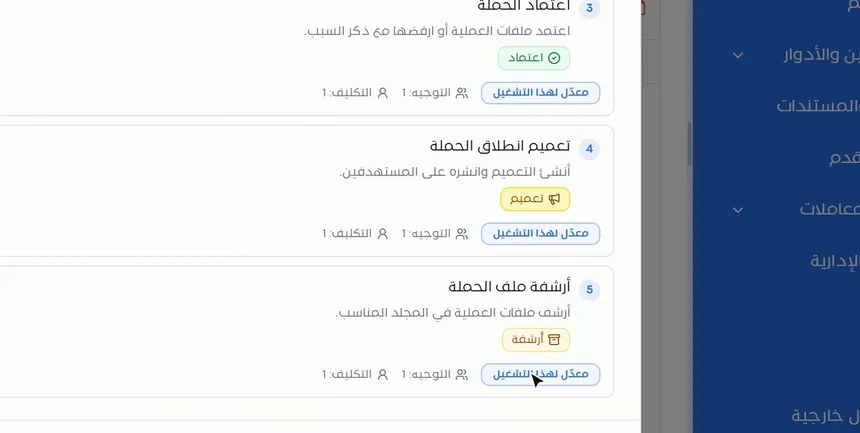
Repeat the same method for every step. After assignment, each step changes to show the «Modified for this run» mark, and next to it appear the number of «Routing» units and the «Assignment» count.
«Modified for this run» means the assignment applies to this transaction only. The original template does not change, and it can be used in another transaction with different assignments.
Step 9: Click «Start workflow» to launch the transaction
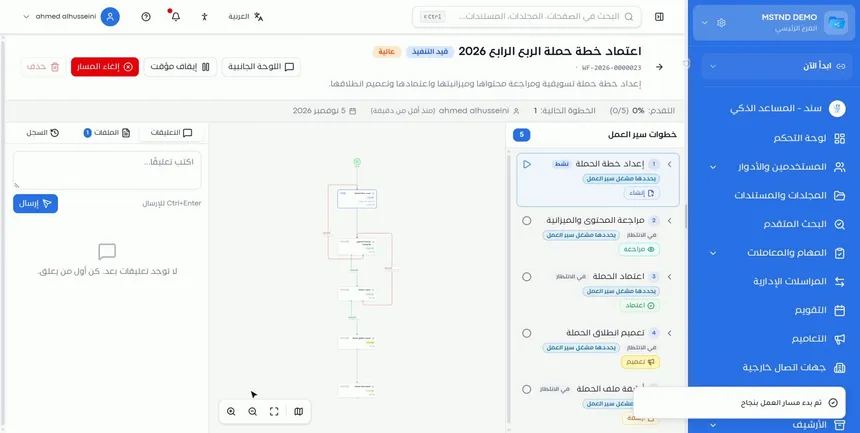
After completing the basic information, the files and the assignments, click «Start workflow» at the bottom of the window. The transaction goes immediately to the assignee of the first step, and a task appears for them on the Tasks page.
Step 10: Follow the transaction from the transaction page
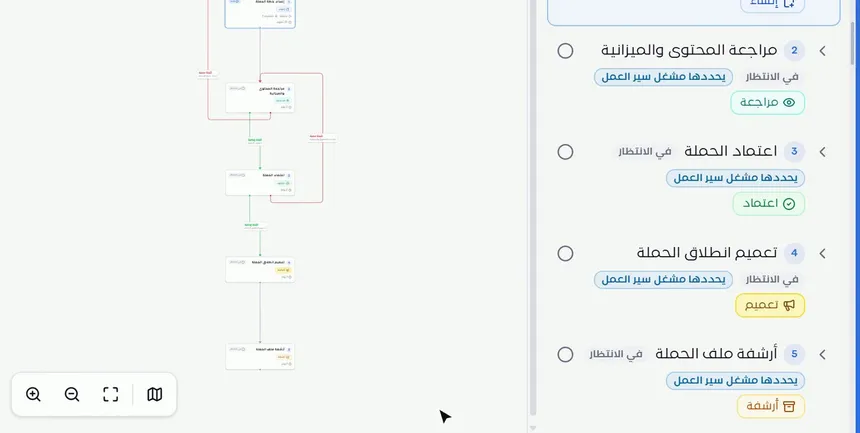
After starting, you move to the transaction page. From it you follow:
- Steps: each step with its status, such as «Pending», and its operation type.
- Progress: how far the transaction has got.
- Reference number: for searching for the transaction and referring to it.
- Path diagram: a drawing that shows the order of the steps and their branches, with tools for zooming in and out.
To learn everything this page shows, see Transaction details.
Options and their effect
| Option or setting | What it does | When to use it |
|---|---|---|
| «Template» | Sets the transaction's steps, their order and their operation types | Always; it is a mandatory field |
| «Name (optional)» | Distinguishes the transaction in lists and tasks | Edit it to describe the document and the period precisely |
| «Description (optional)» | Explains the purpose of the transaction | To give assignees extra context |
| «Priority» | Low, Normal, High, Urgent | According to the transaction's impact and how close its deadline is |
| «Due date» | The final deadline for completing the transaction | Always, so the transaction shows up in follow-up and among overdue items |
| «Add documents» | Attaches additional files to the transaction | When there are supporting documents |
| «Set» | Opens the «Edit assignment» window for the step | For every step that needs an assignee |
| Routing | Sets the unit responsible for the step | To link the step to a department or a team |
| Assignment | Sets the employees who carry out the step within the unit | To define individual responsibility |
| «Quick select» | Assigns all the users of a unit in one click | When any member of the unit can complete the step |
| «Confirm» | Saves the step's assignment for this run | After choosing the routing and the assignment |
| «Start workflow» | Launches the transaction to the first assignee | After all the assignments are complete |
| «Cancel» | Closes the window without starting | If you need to edit the document first |
Practical scenarios
Scenario: Approving a marketing campaign in a trading company
Situation: The content team has prepared the Q4 campaign plan, and it needs a review of the content and budget, then the manager's approval, then a launch circular and archiving.
What you do in Mstnd:
- Open the plan and click «Start workflow».
- Choose the «Marketing campaign approval» template, and edit the name to mention the quarter.
- Set the priority to «High» and set the due date.
- Assign the content team to the preparation, the financial reviewer to the review, and the manager to the approval.
- Click «Start workflow».
Result: The plan passes through every stage in order, and everyone can see where it has reached.
Scenario: Approving a new policy in a government entity
Situation: The institutional development department has prepared a remote work policy, and it needs a legal review, then the undersecretary's approval.
What you do in Mstnd:
- Open the policy draft and click «Start workflow».
- Choose the policy approval template.
- Route the review step to the legal department, and assign the relevant advisor.
- Route the approval step to the undersecretary's office.
- Launch the transaction and follow it from the transaction page.
Result: A documented approval path, with every stage recorded with its time and the person who carried it out.
Scenario: Reviewing a subcontractor contract in a contracting company
Situation: A contract with a subcontractor needs a technical review by the project manager, then a legal review, then the CEO's signature.
What you do in Mstnd:
- Open the contract and click «Start workflow».
- Choose the contract approval template, and add the bill of quantities through «Add documents».
- Set the priority according to the start date of the works.
- Assign the project manager, the legal advisor and the CEO.
- Launch the transaction.
Result: The contract and its attachments pass together through every reviewer, and the subcontractor does not start before the signature is complete.
Scenario: Approving a treatment protocol in a hospital
Situation: The quality committee has prepared a new protocol, and it needs a review by the head of the medical department, approval by the medical director, then a circular to the departments.
What you do in Mstnd:
- Open the protocol and click «Start workflow».
- Choose the appropriate template that includes a «Circular» step.
- Assign the department head to the review, the medical director to the approval, and the quality department to the circular.
- Launch the transaction.
Result: The protocol is not circulated before it is approved, and the circular is part of the same path.
How it relates to other features
- Workflow templates: the source of the templates you choose from when starting.
- Building a workflow template: this is where the template's steps are defined, including whether the assignee is fixed or set by the workflow initiator, which is what you see in «Review assignments».
- Transactions: every transaction you start appears in the transactions list, so you can follow it along with the others.
- Transaction details: the page you move to after starting, with the steps, the diagram and the log.
- Tasks: each step reaches its assignee as a task on the Tasks page.
- Carrying out a task: the assignee carries out their step from the task page, by previewing the file and approving or rejecting.
- Signature and Stamp: templates can include signature and stamp steps that are carried out on the document itself.
Tips and best practices
- Choose the template that matches the actual procedure, and do not settle for a similar one.
- Edit the transaction's name to describe the document and the period, since this is what assignees see in their tasks.
- Set a realistic due date that leaves room for all the steps.
- Attach all supporting documents from the start through «Add documents».
- Go through «Review assignments» down to the last step before starting.
- Assign specific people to approval steps, so that responsibility is clear.
- Follow the transaction from its page instead of asking the assignees.
- If the same assignments repeat every time, ask for them to be fixed in the template.
Warnings and common mistakes
FAQ
How do I start a workflow on a document in Mstnd?
Open the document, click «Start workflow» in the action bar, choose the template, set the priority and due date, set the assignee of each step in «Review assignments», then click «Start workflow».
Is the document attached to the workflow automatically?
Yes. The document you start the workflow from is attached automatically as a file of the transaction, and you can add other files with the «Add documents» button.
Can I edit the transaction's name and description?
Yes. The name and description are filled in automatically from the template; both are optional, and you can edit them before starting.
What does «Required — set by the workflow initiator» mean?
It means the template did not set a fixed assignee for this step, and that you, as the person starting the workflow, must set its routing and assignment before starting.
What does «Modified for this run» mean?
It means you set the step's assignment for this transaction only, without the original template changing.
What is the difference between routing and assignment?
Routing sets the unit responsible for the step, such as a department or a team, while assignment sets the employees, from among that unit's members, who carry it out.
What happens after I click «Start workflow»?
The transaction goes immediately to the assignee of the first step, and you move to the transaction page to follow the steps, the progress and the reference number.
What priority options are available when starting a workflow?
Low, Normal, High and Urgent.
Summary
- «Start workflow» launches an approval cycle on the open document without leaving its page.
- The template sets the steps and their operation types; the name and description are filled in from it and can be edited.
- The current document is attached automatically, and the outputs of each step join the transaction's files.
- «Review assignments» makes sure every step has routing and an assignee before starting.
- After starting, the first step reaches its assignee, and you follow everything from the transaction page.
Try it free: Create your organization's account in Mstnd
Was this article helpful?
Related articles
 0:44
Workflow templates in Mstnd: ready-made templates for your organization's procedures
Learn Mstnd workflow templates: recurring procedure templates with status, version, steps and transactions, search, filters, view, edit, copy, archive, create.
 1:18
Building a workflow template in Mstnd: design your own approval path
Learn to build a workflow template in Mstnd: name, visibility, step operations, deadlines, instructions, routing and assignment, rejection paths and publishing.
 0:41
Transactions in Mstnd: follow every workflow from one screen
Learn the Mstnd Transactions page: see every workflow with its number, status, priority and progress, use scope and filters, export it and start a new workflow.
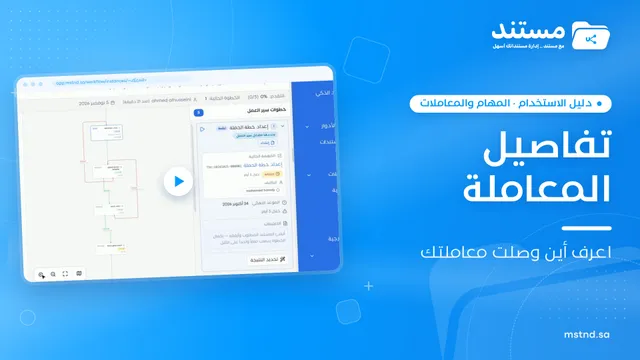 0:48
Transaction details in Mstnd: know where your transaction stands and who is handling it
Learn the Mstnd transaction details page: progress, current step, workflow steps, the path diagram and branches, comments, files and log, pausing or cancelling.
 0:56
The Tasks page in Mstnd: your tasks and your team's in one place
Mstnd's Tasks page lists your and your team's tasks with system number, operation, status, priority, assignees and due date, plus scopes, filters and a report.
 0:57
Carrying out a task in Mstnd: from «Start» to «Complete task»
Learn the Mstnd task page: view its data and routing, start work, preview the operation file, approve or reject it with a note, then complete and log the task.