

Your first sign-in to Mstnd after your request is accepted: from the notification to getting to work
In this article
After the Mstnd team approves your organization's request, you receive a notification; you then sign in and choose your organization from the «Select organization» screen. On your first sign-in, a short introductory tour of the main interface elements starts for you, and then you find your organization's setup steps, in order, in the «Get started» list. This guide explains what you see in your first minutes inside the system and how to make use of them to start working right away as your free trial begins.
Quick overview
| Item | Details |
|---|---|
| Module | Getting started |
| Where it is in the interface | The «Select organization» screen after signing in, then the Dashboard with the introductory tour and the «Get started» list in the side menu |
| Direct link | https://app.mstnd.sa/select-tenant |
| Goal | Move from an approved account to a ready work environment, with a quick introduction to the interface and the setup steps |
| Who it is for | Every user entering Mstnd for the first time, and especially the organization's owner, who will set it up for the team |
| Video length | Less than a minute |
| What you will learn | Choosing your organization, the elements of the introductory tour, using the «Get started» list and keeping track of the trial period |
Watch the video
In less than a minute, the video shows what happens from the moment your request is accepted until your account is ready for work.
Why this feature?
The first moment inside any new system shapes the user's impression of it. If users find a crowded interface with no guidance, they waste time exploring and may leave the system before discovering its value. If, instead, something introduces them to the essential elements and suggests the next step, they start working with confidence.
The first sign-in experience in Mstnd was designed to achieve exactly that. The introductory tour introduces you to the elements you will use every day, and the «Get started» list turns setup into short, clear steps. The starting point suggested to you is based on what you told Mstnd when creating your account, such as your goals and priorities.
| Without guidance | With the first sign-in experience in Mstnd |
|---|---|
| You do not know where to start | The «Get started» list shows the setup steps in order |
| You look for where search, settings and help are | The introductory tour points to each element in its place |
| A generic start that does not reflect your needs | A starting card chosen based on what you said when signing up |
| You do not know how much of the trial is left | A bar at the top of the page shows the days left in the trial period |
Where to find it
- Open the notification message you receive after the account is approved.
- Sign in to Mstnd with the email and the password you chose when signing up.
- The «Select organization» screen appears: https://app.mstnd.sa/select-tenant
- Choose your organization: you move to the Dashboard, and the introductory tour starts automatically on your first sign-in.
- You find the «Get started» list at the top of the side menu, under the organization's name.
Concepts and terms
| Term | Meaning in Mstnd |
|---|---|
| Select organization | A screen that appears after signing in so you can choose the organization you will work in |
| Organization | Your company's or entity's own workspace, with its users, documents and settings |
| Switching between organizations | Moving from one organization to another, if you are a member of more than one, from the top of the side menu |
| Introductory tour | A series of short guidance windows that introduce you to the essential interface elements |
| Get started | A list of the organization's setup steps that shows the status of each step and your progress |
| Interactive lessons | Short tours that guide you step by step inside the system |
| Quick search | A search field at the top of the interface for searching pages, folders and documents |
Step by step
Step 1: Sign in and choose your organization
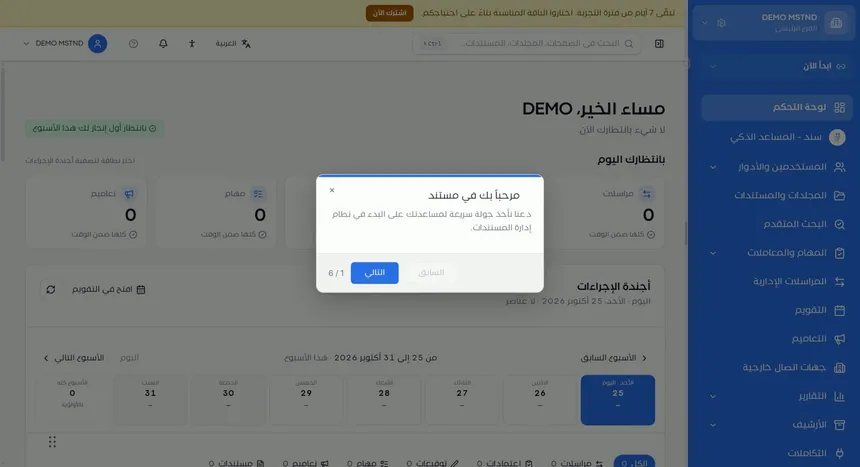
As soon as your request is accepted, you receive a notification about it. Sign in to Mstnd, and the «Select organization» screen appears. Choose your organization from the list to enter it.
You may wonder: why choose an organization when I registered only one? Because Mstnd lets a single user be a member of more than one organization, such as a consultant who works with several companies, or a group that runs several entities. Each organization has its own separate users, documents and settings, so this choice determines the space you will work in.
After you choose, you move to the Dashboard, and a «Welcome to Mstnd» window appears, inviting you to a quick tour to help you get started.
Step 2: Follow the introductory tour on your first sign-in
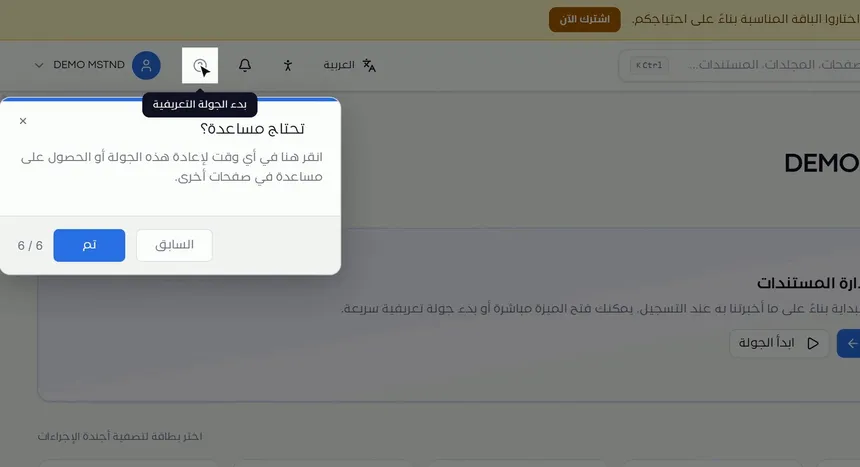
The tour consists of several short windows. Each window shows its number and the total number of windows, with «Next» and «Back» buttons. The tour takes you to the elements you will use every day:
- Side menu: it holds all the sections of the system, such as the Dashboard, Sanad (the AI assistant), Users and roles, Folders and documents, Advanced search, Tasks and workflows, Administrative correspondence, Calendar, Circulars and more.
- Switching between organizations: from the top of the side menu, where the current organization's name appears.
- Quick search: a field at the top of the page for searching pages, folders and documents; you can also open it with the keyboard shortcut shown next to it.
- Your account: in the top corner, where your name appears.
- Help: the question mark icon in the top bar.
The tour ends at the help icon with a «Need help?» message, which explains that you can click the icon at any time to replay the tour or to get help on other pages. Click «Done» to finish the tour.
Step 3: Open «Get started» and follow your organization's setup steps
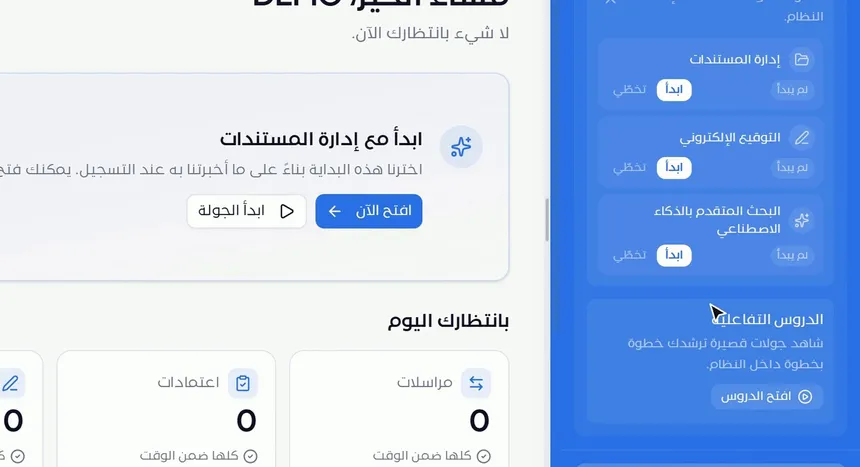
At the top of the side menu you find «Get started». When you open it, your organization's setup steps appear. Each step has a status («Not started» at first) and two buttons: «Start» and «Skip». The steps shown are:
- Document management: to start organizing your documents and folders.
- Electronic signature: to learn about signing documents inside the system.
- Advanced AI search: to learn about searching inside document content and by description.
Below the steps is the «Interactive lessons» section: short tours that guide you step by step inside the system, which you open with the «Open lessons» button.
On the Dashboard itself, a suggested starting card appears, such as «Start with document management», with a line explaining that it was chosen based on what you told Mstnd when signing up. From the card you can open the feature directly with the «Open now» button, or start an introductory tour dedicated to it with the «Start tour» button.
Step 4: Your account is ready and your free trial has started
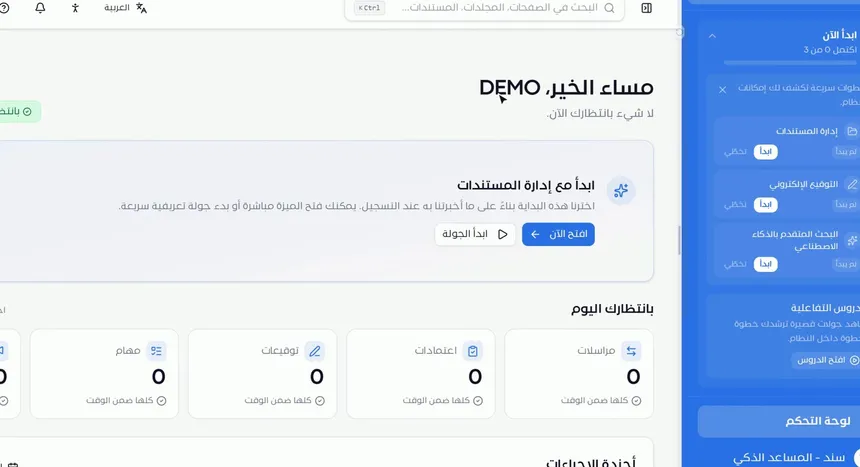
Your account is now ready, your free trial has started and you can work right away. The «Get started» list shows your progress, such as «0 of 3 completed», and updates every time you complete a step.
At the top of the page, a bar shows the number of days left in the trial period, so you always know where you stand.
You will notice that the «Waiting for you today» cards on the Dashboard show zeros at first, with the message «Nothing waiting for you right now». This is normal in a new organization, and the Dashboard will fill up with work as soon as you and your team start uploading documents and creating tasks and correspondence. To learn the details of the Dashboard, see the Dashboard guide.
Options and their effect
| Option or setting | What it does | When to use it |
|---|---|---|
| Choosing an organization from «Select organization» | Takes you into the workspace of the chosen organization | After every sign-in, if you are a member of more than one organization |
| «Next» / «Back» in the tour | Moves you between the windows of the introductory tour | During the tour |
| Closing the tour | Ends the tour immediately | If you already know the interface |
| «Done» | Ends the tour after the last window | At the end of the tour |
| Help icon | Replays the tour or shows the page's help | When you need a reminder of the interface elements |
| «Start» in «Get started» | Starts the chosen setup step | When you are ready to set up that area |
| «Skip» in «Get started» | Skips the setup step | If the step does not concern your organization right now |
| «Open lessons» | Opens the interactive lessons | To learn a feature by practicing inside the system |
| «Open now» on the starting card | Opens the suggested feature directly | To actually start working |
| «Start tour» on the starting card | Starts a tour dedicated to the suggested feature | To learn the feature before using it |
Practical scenarios
Scenario: The owner of a trading company sets up the system for the team
Situation: The owner of a trading company has had the account approved and wants to set up the system before inviting the employees.
What you do in Mstnd:
- Sign in and choose your organization from «Select organization».
- Complete the introductory tour to get to know the side menu and search.
- In «Get started», click «Start» on «Document management» and organize the main folders.
- Review the structure in Organizational structure, then send the invitations from Invitations.
Result: The employees enter an organized system from their first day, instead of an empty one.
Scenario: A legal consultant who works with more than one organization
Situation: A legal consultant has been invited to two different organizations that both use Mstnd.
What you do in Mstnd:
- After signing in, choose the organization you are working on today from «Select organization».
- When you need to move to the other organization, switch between organizations from the top of the side menu.
Result: The work of each organization stays separate, with its own documents and permissions, without mixing.
Scenario: A quality coordinator in a hospital learns the system on her own
Situation: A quality coordinator has been invited to the system and wants to learn the basics without waiting for formal training.
What you do in Mstnd:
- Follow the whole introductory tour on your first sign-in.
- Open «Interactive lessons» from «Get started» and choose the ones that relate to your work.
- Try asking Sanad, the AI assistant a question to find a document.
Result: The coordinator learns the system through practice in a short time.
Scenario: The IT department of a government entity evaluates the system
Situation: The evaluation team in a government entity wants to test specific capabilities during the trial period.
What you do in Mstnd:
- Keep an eye on the bar showing the days left in the trial, at the top of the page.
- Use «Get started» to test «Electronic signature» and «Advanced AI search».
- Use «Skip» for the steps outside the scope of the evaluation.
Result: A focused evaluation that covers the capabilities that matter to the entity within the trial period.
How it relates to other features
- Creating a new account: the stage before your first sign-in, where you set the goals on which the suggested starting card is based.
- Dashboard: the page that opens after you choose your organization, and that becomes your daily starting point.
- Sanad, the AI assistant: it appears in the side menu, and you can ask it about anything while you learn the system.
- Invitations: after the initial setup, you invite your team to join the organization.
- Organizational structure: to review the structure you chose during sign-up and make sure it matches your reality.
- Folders: the «Document management» step in «Get started» leads you to organizing the folders.
Tips and best practices
- Do not skip the introductory tour on your first sign-in; it takes only a minute.
- Start from the «Get started» step that matches your first priority at sign-up.
- Use «Skip» deliberately for the steps that do not concern your organization, so the list stays focused on what matters to you.
- Set up the folders and the structure before inviting the team, so the employees find an organized environment.
- Keep an eye on the days left in the trial, and plan to test the capabilities that matter most to your organization during it.
- If you are a member of more than one organization, check the organization name shown at the top of the side menu before uploading any document.
- Bookmark the Mstnd link in your browser so you can reach it quickly every day.
Warnings and common mistakes
FAQ
What happens after my sign-up request to Mstnd is accepted?
You receive a notification that the request was accepted. You then sign in and choose your organization from the «Select organization» screen, after which an introductory tour starts and the «Get started» list appears so you can set up your organization.
Why does the «Select organization» screen appear after signing in?
Because a single user can be a member of more than one organization, and each organization has its own separate data. Choosing the organization determines the workspace you enter.
How do I replay the introductory tour?
Click the help icon (the question mark) in the top bar; from there the introductory tour starts again.
What is the «Get started» list?
It is a list at the top of the side menu that shows the organization's setup steps (document management, electronic signature and advanced AI search) plus the interactive lessons, along with your progress.
Can I skip the «Get started» steps?
Yes, every step has a «Skip» button. Use it for the steps you do not need right now.
How do I know how much of the free trial is left?
A bar at the top of the page shows the number of days left in the trial period.
How do I move between two organizations in Mstnd?
From the top of the side menu, where the current organization's name appears, you can switch to another organization you are a member of.
Why is the Dashboard empty on my first sign-in?
Because the organization is new and no documents have been uploaded or tasks created yet. The Dashboard fills up automatically once work starts.
Summary
- After your request is accepted, you receive a notification; you then sign in and choose your organization from «Select organization».
- The introductory tour introduces you to the side menu, switching between organizations, quick search, your account and help.
- The «Get started» list shows the organization's setup steps with «Start», «Skip» and your progress, plus the interactive lessons.
- The suggested starting card on the Dashboard is based on what you told Mstnd when signing up.
- Your account is ready, your free trial has started, and the bar at the top reminds you of the days left.
Try it free: Create your organization's account in Mstnd
Was this article helpful?
Related articles
 2:15
Creating a new Mstnd account: from your email to setting up your organization
Create your Mstnd organization account: verify email and mobile, add company and sector details, pick a structure template, invite your team, then await review.
 1:57
The Mstnd Dashboard: everything waiting for you on one screen
Learn the Mstnd Dashboard: the «Waiting for you today» cards, the Action agenda, workflows, Sanad recommendations, team activity and how to plan your day.
 0:47
Sanad, the AI assistant in Mstnd: ask in your own words and let it do the work
Sanad is the Mstnd AI assistant: ask in your dialect; it searches and summarizes documents, asks to clarify and runs commands like creating a folder, with undo.
 0:47
Invitations in Mstnd: track your team's invitations and send them in one go
Learn the Invitations tab in Mstnd: track each invitation's status, resend, copy the link or cancel, and invite several employees with one role and position.
 0:29
The organizational structure in Mstnd: your organization as it really is
Learn the organizational structure in Mstnd: an interactive chart to zoom and drag, show or hide member names, with color-coded sections, teams and leads.
 1:26
Folders in Mstnd: organize your organization's documents from day one
Learn the Mstnd Folders page: Personal space, structure folders, Shared with me, new folders with a confidentiality level, color and icon, views and actions.