

Folders in Mstnd: organize your organization's documents from day one
In this article
The Folders page in Mstnd is where all of the organization's documents are stored and organized. It divides them into three spaces: your personal space, the organizational structure folders of each department, and the folders shared with you. It lets you create folders with a confidentiality level, a color and an icon, display them in four ways, and manage each folder from its actions menu. Its goal is to give every document a known place that only the people entitled to it can reach.
Quick overview
| Item | Details |
|---|---|
| Module | Folders and documents |
| Where it is in the interface | The side menu → «Folders and documents» → the «Folder and document management» page |
| Direct link | https://app.mstnd.sa/folders |
| Goal | Organize the organization's documents in clearly structured folders protected by confidentiality levels |
| Who it is for | Every user, and especially department managers and records and archive officers who design the folder structure |
| Video length | About 1 minute and 26 seconds |
| What you will learn | Moving between the three spaces, creating a folder with a confidentiality level, changing the view, sorting, filtering and searching, the folder actions menu, and «Manage items» |
Watch the video
In under a minute and a half, the video shows the Folders page with its three tabs, then creating a new folder step by step, the view and sort options, the folder actions menu and the «Manage items» menu.
Why this feature?
In many organizations, documents are scattered across employees' devices, email and shared folders with no rules. Every employee names and arranges files in their own way, so time is lost searching, files get duplicated, and sensitive documents are seen by people who do not need them.
The Folders page in Mstnd sets one structure for the whole organization: a personal space for your own work, folders linked to the organizational structure for each department, and one place for what others have shared with you. Every folder has a confidentiality level that determines who can see it.
| Before organizing folders in Mstnd | With the Folders page |
|---|---|
| Documents are scattered across devices, email and drives | One place brings together your folders and connected drives such as Google Drive |
| You do not know where the finance department keeps its contracts | The organizational structure folders show each department's folders by position |
| You search your email for a file a colleague sent | The «Shared with me» tab gathers everything that has been shared with you |
| Sensitive files are open to anyone who can reach the shared folder | Every folder has a confidentiality level: public, restricted, secret or top secret |
| All folders look the same | A color and an icon for each folder set it apart visually |
Value for the organization: a unified structure that makes governance, auditing and knowledge transfer easier when staff change. Value for the individual: faster access to what you need, and confidence that what you save is in the right place.
Where to find it
- From the side menu, choose «Folders and documents».
- The «Folder and document management» page opens on the «Personal space» tab.
- Move between the tabs: «Personal space», «Organizational structure» and «Shared with me».
Direct link: https://app.mstnd.sa/folders
Concepts and terms
| Term | Meaning in Mstnd |
|---|---|
| Personal space | Your own folders, plus the drives connected to your account |
| Connected drives | External storage services linked to Mstnd, such as Google Drive, that appear next to your folders |
| Organizational structure (tab) | The folders of departments and sections, arranged by the organization's administrative structure and the positions in it |
| Shared with me | The folders and files that other users have shared with you |
| Confidentiality level | A classification that determines who can see a folder's content: public, restricted, secret, top secret |
| View mode | The way items are displayed: cards, list, table or tree |
| The ⋮ menu | The three-dot menu on a folder card, which holds the folder's actions |
| Manage items | A menu at the top of the page for managing your tags, the categories and the templates |
Step by step
Step 1: Get to know your personal space
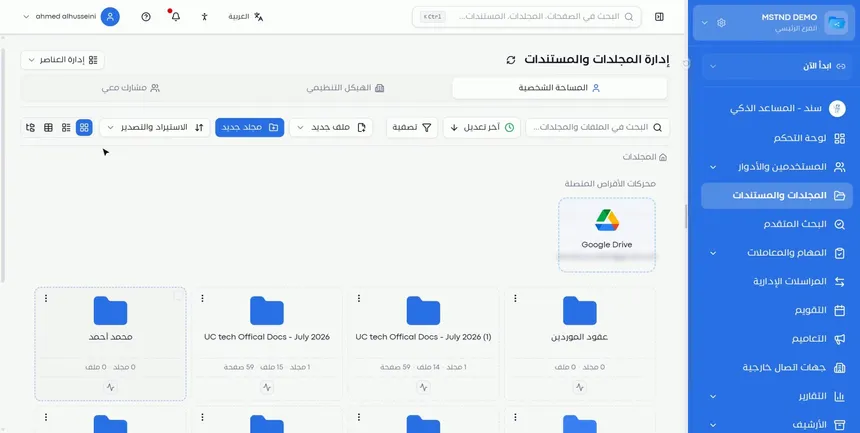
The first thing you see on the Folders page is «Personal space». At the top it shows the «Connected drives» area, such as Google Drive if it is linked to your account, and below it the cards of your folders.
Each card shows the folder's name, the number of subfolders and files inside it, and the number of pages if it contains files. It also shows an activity button and the three-dot menu.
Having the connected drives on the same page means you do not need to move between two systems: you can reach your files in external storage from inside Mstnd.
Step 2: Move between the three tabs
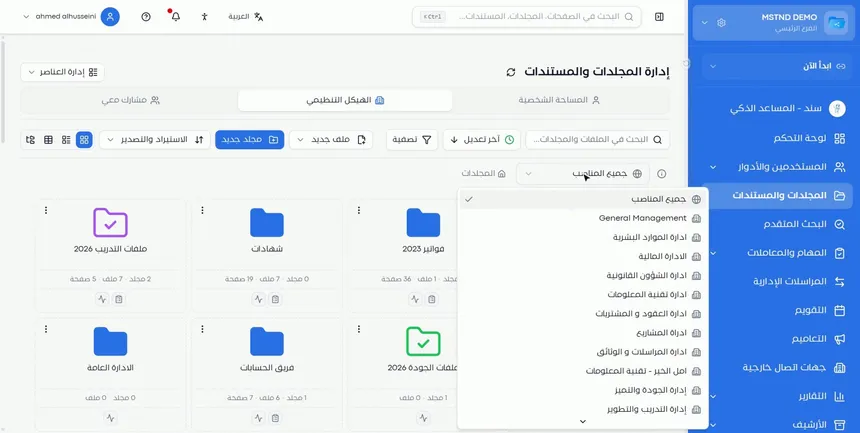
At the top of the page there are three tabs, each with its own purpose:
| Tab | What it shows | When to use it |
|---|---|---|
| «Personal space» | Your own folders and the connected drives | For your individual work and for drafts before you share them |
| «Organizational structure» | Each department's folders by structure and position | For official documents that belong to a particular department |
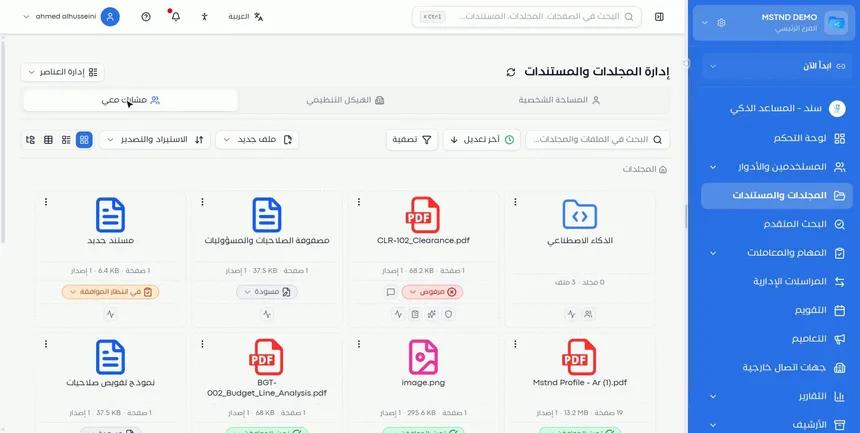
| «Shared with me» | The folders and files others have shared with you | To reach your colleagues' work without searching your email |
In the «Shared with me» tab, files appear as cards that show the file type, its number of pages, its size, its version and its status, such as «Draft», «Rejected» or «Pending approval». This helps you see at a glance what is waiting for your turn.
Step 3: View each department's folders by position
In the «Organizational structure» tab, folders are arranged by the organization's departments and positions. You choose the department or the position, and the folders linked to it appear.
The value of this tab is that the folders follow the administrative structure you built in Organizational structure. When a department is added or a manager changes, the folders stay organized according to the organization's actual structure, not according to each employee's own judgment.
Step 4: Create a new folder with a name and a description
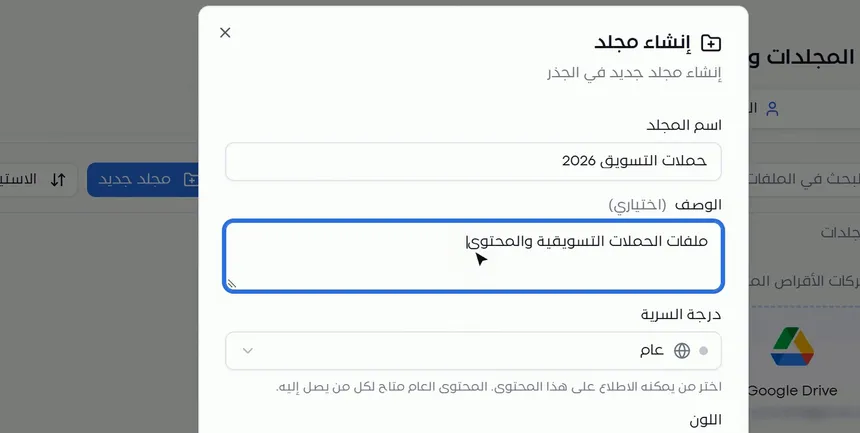
Click the «New folder» button in the toolbar, and the creation window opens. Start with:
- Name: choose a clear name that indicates the content, such as «Marketing campaigns 2026» or «Supplier contracts».
- Description (optional): a sentence that explains what the folder holds, such as «Marketing campaign files and content».
The description is optional, but it helps when there are folders with similar names, or when a new employee joins and needs to understand the folder structure quickly.
Step 5: Set the confidentiality level
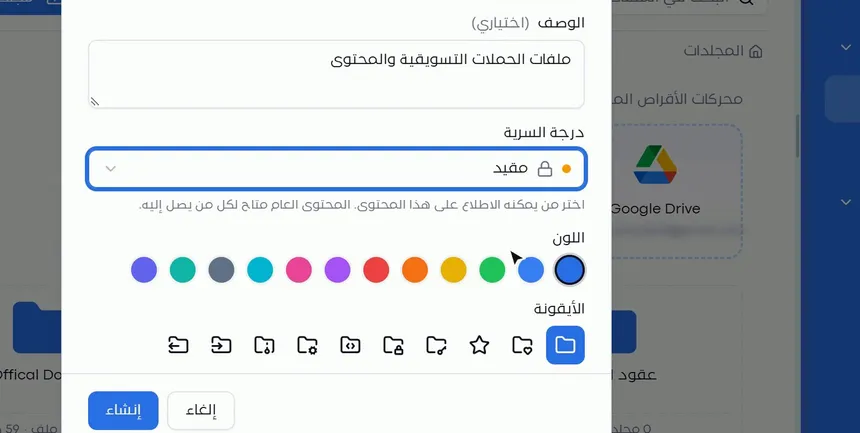
The «Confidentiality level» field determines who can see the folder's content. There are four options:
| Confidentiality level | Typical use |
|---|---|
| Public | Content available to anyone who can reach it, such as guides and general forms |
| Restricted | Internal content limited to a specific group, such as the marketing department's campaign files |
| Secret | Sensitive content, such as contracts and employee salaries |
| Top secret | Highly sensitive content, such as board decisions and critical legal documents |
The text under the field explains that public content is available to anyone who can reach it. So do not leave a folder on «Public» unless its content is really suitable for that.
Step 6: Choose the color and the icon, then «Create»
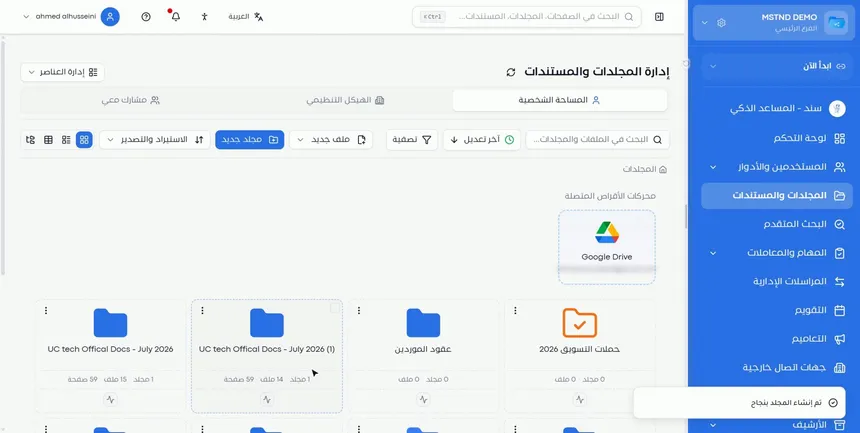
Choose the folder's color from the color palette and its icon from the available set of icons, then click «Create». The new folder appears immediately among the folder cards, with its color and icon.
The color and the icon are not just decoration. When the organization follows a common rule, such as one color for finance and another for HR, or a lock icon for secret folders, recognizing a folder becomes faster than reading its name.
Step 7: Switch the view mode
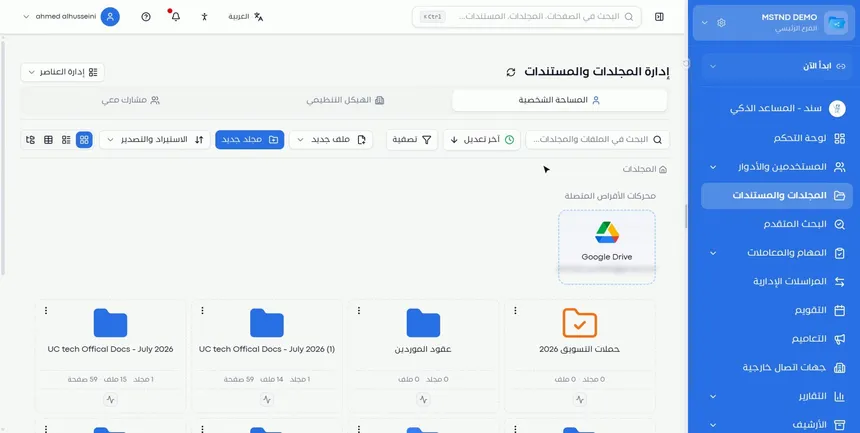
At the end of the toolbar there are four buttons for the view modes:
| View mode | What sets it apart | When to choose it |
|---|---|---|
| Cards | A visual view with the icon, the color and statistics | For general browsing and recognizing folders quickly |
| List | Items arranged in rows | When there are many items and you need to scan them quickly |
| Table | Columns with details | To compare items and review their details |
| Tree | The folders and their branches in a hierarchy | To understand the nesting of subfolders and move through it |
Step 8: Sort and filter items, or search by name
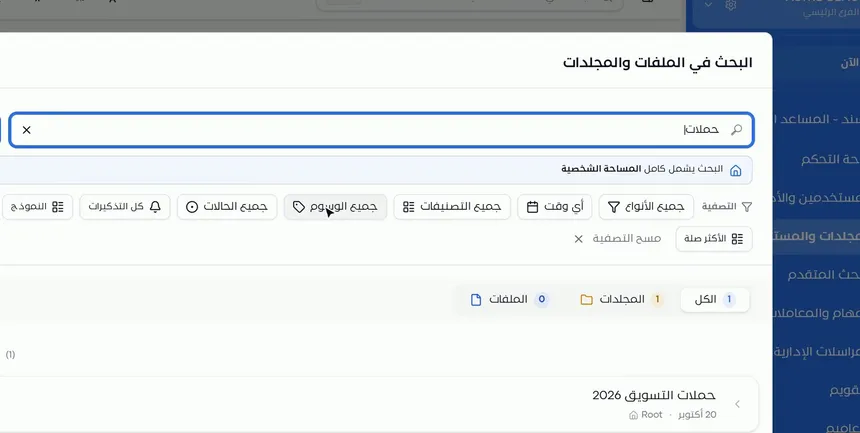
The toolbar includes three tools for quick access:
- Search: the «Search files and folders» field shows the items whose name matches what you type.
- Sort: such as «Last modified» or «Name», with a toggle between ascending and descending order.
- «Filter»: to limit the items shown according to specific criteria.
Sorting by «Last modified» is useful for keeping track of what you are currently working on. Sorting by «Name» is useful when the organization follows a common naming rule.
Step 9: Use the ⋮ menu to manage the folder
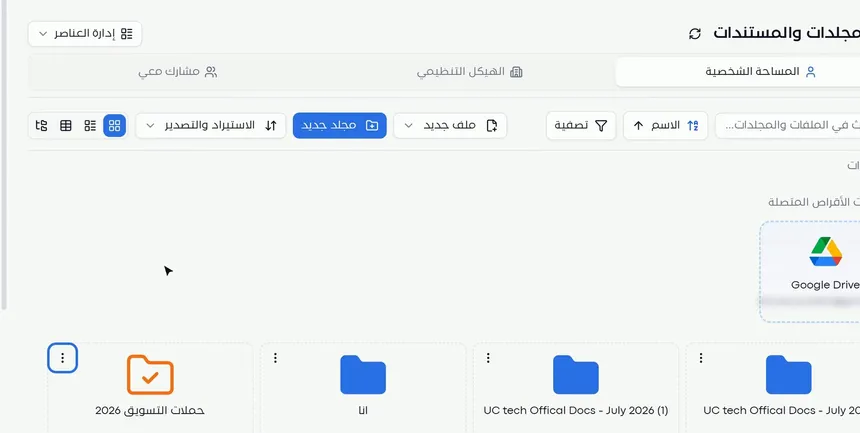
Click the three dots ⋮ on any folder card, and its actions appear:
- Details: to view the folder's information.
- Edit: to change the name, the description, the confidentiality level, the color or the icon.
- Move: to move the folder to another place in the structure.
- Share: to give your colleagues access to the folder.
- Export: to download the folder's content.
- Archive: to move the folder to the archive when work on it is finished.
Archiving is better than deleting for finished folders: it takes them out of the daily view and keeps them restorable from the Digital archive.
Step 10: Manage tags, categories and templates from «Manage items»
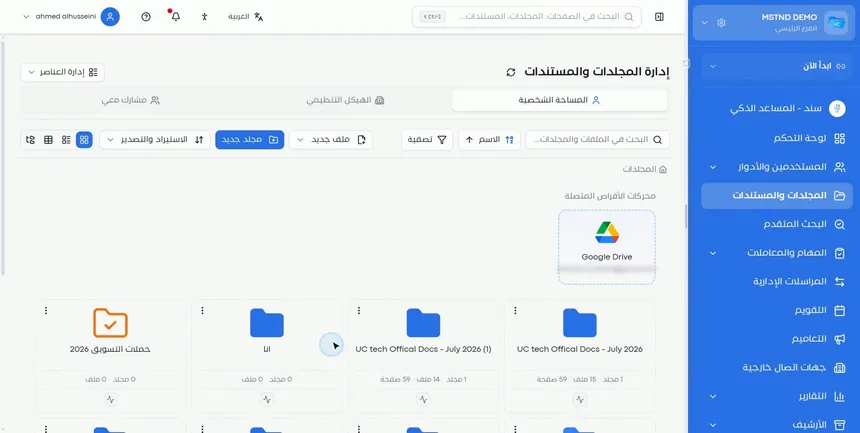
At the top of the page is the «Manage items» button, which gives you access to:
- My tags: your own tags, which you add to documents to group them.
- Categories: the approved document categories.
- Templates: the document templates that new files are created from.
Managing these items from one place keeps tags and categories organized and free of duplicates, and they are what you will later rely on for filtering, search and reports.
Options and their effect
| Option or setting | What it does | When to use it |
|---|---|---|
| «Personal space» | Shows your folders and the connected drives | For individual work and drafts |
| «Organizational structure» | Shows the departments' folders by position | For each department's official documents |
| «Shared with me» | Shows what others have shared with you | To reach your colleagues' work |
| «New folder» | Opens the folder creation window | When starting a project or a new type of document |
| Description (optional) | Explains the folder's content | When there are similar folders or a large team |
| Confidentiality level | Determines who can see the content | Always at creation, and whenever the content's sensitivity changes |
| Color and icon | Set the folder apart visually | To apply a common visual rule across the organization |
| Cards / List / Table / Tree | Change how items are displayed | Depending on the need: browsing, scanning, comparing or hierarchical navigation |
| Sort | Orders items by last modified or by name | To follow the latest items or to find one by name |
| «Filter» | Limits the items shown | When there are many items |
| The ⋮ menu | Details, edit, move, share, export, archive | To manage an existing folder |
| «Manage items» | My tags, categories, templates | To organize the classification and creation tools |
Practical scenarios
Scenario: A government entity builds the folder structure for its departments
Situation: A government entity has started using Mstnd and wants each department to have its own official folders with suitable confidentiality levels.
What you do in Mstnd:
- First build the departments in Organizational structure.
- Open «Folders and documents» → the «Organizational structure» tab to see each department's folders.
- Create subfolders such as «Outgoing», «Incoming» and «Decisions», each with a suitable confidentiality level.
- Agree on a color for each department and an icon for secret folders.
Result: A unified structure that reflects the administrative structure, and every employee knows where to save and where to look.
Scenario: A contracting company organizes its project documents
Situation: A contracting company runs several projects, and each project has contracts, drawings and reports.
What you do in Mstnd:
- Create a folder for each project with a standard name that includes the project code.
- Set the confidentiality level of the contracts folder to «Secret», and that of the periodic reports folder to «Restricted».
- Use the «Tree» view to review the subfolder structure of each project.
- When a project ends, choose «Archive» from the ⋮ menu.
Result: Each project's documents are in their place, and finished projects are out of the daily view without being lost.
Scenario: A hospital protects its HR files
Situation: The HR department of a hospital keeps the employees' files and wants to prevent anyone who does not need them from seeing them.
What you do in Mstnd:
- Create an «Employee files» folder with the «Top secret» confidentiality level.
- Give it the lock icon and a distinctive color.
- Share the folder only with the members of the HR team, from the ⋮ menu → «Share».
Result: Sensitive files are protected by a clear confidentiality level and stand out visually from the other folders.
Scenario: A trading company moves its files from Google Drive
Situation: A trading company keeps its files in Google Drive and wants to start organizing them in Mstnd without losing access to them.
What you do in Mstnd:
- Connect Google Drive from Integrations, and it appears under «Connected drives».
- Create the new folder structure in «Personal space» or «Organizational structure».
- Use Import and export to move entire folders as a compressed file.
Result: A gradual, organized move, while the old files remain reachable from one place.
How it relates to other features
- Folder content: when you open any folder, you move to the view of its content, where you manage files and carry out bulk actions.
- Uploading files: after creating the folder, you upload files to it with the «New file» button.
- Organizational structure: the «Organizational structure» tab in Folders reflects the departments and positions you build there.
- Internal sharing and public link: the «Share» option in the ⋮ menu gives colleagues access, and what is shared with you appears in «Shared with me».
- Import and export: to import an entire folder from a compressed file, or to export a folder's content.
- Integrations: the source of connected drives such as Google Drive.
- Reminders, tags and categories: the tags and categories you manage from «Manage items» are applied to documents from each document's page.
- Digital archive: archived folders move there and can be restored from it.
Tips and best practices
- Design the folder structure before uploading files. Sketch it on paper first: the main levels, then the sub-levels.
- Adopt a common naming rule, such as «Department – Type – Year», so that sorting by «Name» becomes more useful.
- Choose the confidentiality level based on the most sensitive file in the folder, and review it whenever the nature of the content changes.
- Agree across the organization on what the colors and icons mean, and document this in a short internal guide.
- Use the personal space for drafts, and move a document to the department's folder once it is approved.
- Do not create too many levels of nesting. Three or four levels are usually enough, and anything more slows down access.
- Archive finished folders instead of deleting them, so that they remain restorable.
- Review the tags and categories in «Manage items» regularly, and merge any duplicates.
Warnings and common mistakes
FAQ
How do I create a new folder in Mstnd?
On the «Folder and document management» page, click «New folder», enter the name and description, set the confidentiality level, choose the color and icon, then click «Create».
What is the difference between Personal space and Organizational structure?
«Personal space» holds your own folders and the connected drives, while «Organizational structure» shows the departments' folders arranged by the administrative structure and positions.
Which confidentiality levels are available for a folder?
Four levels: public, restricted, secret and top secret. The confidentiality level determines who can see the folder's content.
Where do I find the files my colleagues have shared with me?
In the «Shared with me» tab on the Folders page, where the folders and files shared with you appear together with each file's status.
Can I connect Google Drive to Mstnd?
Yes. Connected drives such as Google Drive appear at the top of the personal space, and you connect them from the Integrations page.
Which folder view modes are available?
Four modes: cards, list, table and tree. You switch between them with the buttons at the end of the toolbar.
How do I move or archive a folder?
Click the three dots ⋮ on the folder card, then choose «Move» or «Archive». The same menu also includes details, edit, share and export.
Where do I manage tags, categories and templates?
From the «Manage items» button at the top of the Folders page, which includes «My tags», «Categories» and «Templates».
Summary
- The Folders page divides your documents into three spaces: personal, organizational structure, and shared with me.
- Every new folder has a name, a description, a confidentiality level, a color and an icon, and the confidentiality level is the most important of these settings.
- Four view modes, together with search by name, sorting and filtering, make reaching any folder quick.
- The ⋮ menu gathers the folder's actions: details, edit, move, share, export and archive.
- «Manage items» organizes the tags, categories and templates used across the whole organization.
Try it free: Create your organization's account in Mstnd
Was this article helpful?
Related articles
 1:05
Folder content in Mstnd: find your file and manage it in seconds
The Mstnd folder content screen explained: file cards and status changes, multi-select and bulk actions, the folder side panel, and AI chat about the files.
 0:49
Uploading files to Mstnd: drag and drop, and the system does the rest
Mstnd file upload: drag and drop several files at once, change the destination folder, set status, category and tags, automatic analysis and import from a link.
 0:29
The organizational structure in Mstnd: your organization as it really is
Learn the organizational structure in Mstnd: an interactive chart to zoom and drag, show or hide member names, with color-coded sections, teams and leads.
 0:57
Sharing a document internally and by public link in Mstnd
Learn document sharing in Mstnd: internally to people, units or positions with view, edit or delete permission, or by public link with password and expiry date.
 0:58
Import and export in Mstnd: move entire folders in one compressed file
Learn import and export in Mstnd: import a whole ZIP file with its folder structure, or export a folder with versions, OCR text, tags, signatures and audit log.
 0:34
Integrations in Mstnd: connect your files, appointments and systems
Learn the Mstnd Integrations page: import from Google Drive and OneDrive, sync Google and Outlook calendars, and explore ERP, CRM and e-signature integrations.