

Nafath in Mstnd: sign-in and signing with a verified identity
In this article
The «Nafath» page in Mstnd settings is where your organization manages sign-in verification and document signing through Nafath, the Saudi national single sign-on. From it you check the status of «Sign in with Nafath», track the «Nafath requests» balance, register members' ID numbers so they can sign through Nafath, and choose the actions that require Nafath verification in internal documents, external sharing and the correspondence portal. The result is that every important signature, stamp or approval is verified with the confirmed identity of the person who made it.
Quick overview
| Item | Details |
|---|---|
| Module | Settings |
| Where it is in the interface | Side menu → «Settings» → «Nafath» |
| Direct link | https://app.mstnd.sa/settings/nafath |
| Goal | Link sign-in and sensitive actions on documents to an identity verified through Nafath |
| Who it is for | The system administrator, the information security officer, and the organization's legal affairs and approvals officers |
| Video length | Less than a minute |
| What you will learn | Turning on sign-in verification, reading the request balance, registering member ID numbers and choosing the actions that require Nafath |
Watch the video
In less than a minute, the video goes through the page's sections in order: sign-in with Nafath, Nafath requests and member ID numbers, then signing documents with Nafath and the actions it covers.
Why this feature?
An electronic signature saves printing and running around, but its legal and administrative value depends on one question: is the person who signed really the owner of the signature? A password alone can be shared or stolen, and an image of a signature alone can be copied. That is why organizations, especially for sensitive actions, need to link the signature to a verified identity.
Nafath, the national single sign-on, provides this link. When you turn it on in Mstnd for the actions you choose, the user is asked to verify through Nafath before completing the action, so the action is verified with the confirmed identity of the person who took it.
| Without Nafath verification | With Nafath verification |
|---|---|
| The signature is tied only to the user's account | The signature is verified with the signer's confirmed identity |
| It is hard to prove who approved or rejected when there is a dispute | Approval and rejection are verified by identity |
| External parties sign without their identity being verified | You can require verification through Nafath in external sharing |
| Identity settings are scattered or missing | Sign-in, balance, ID numbers and actions on one page |
Value for the organization: greater reliability in sensitive actions, and a record you can rely on during a review or a dispute. Value for the individual: protection for employees themselves, so no signature or approval they did not make can be attributed to them.
Where to find it
- From the side menu, open «Settings».
- Choose «Nafath».
- The page opens with the description «Manage sign-in verification and document signing through Nafath from one place», and it has two sections: «Sign in with Nafath» and «Sign documents with Nafath».
Direct link: https://app.mstnd.sa/settings/nafath
Concepts and terms
| Term | Meaning in Mstnd |
|---|---|
| Nafath national single sign-on | The identity verification service that sign-in and sensitive actions in Mstnd are linked to |
| Sign-in verification | Verification through Nafath at every sign-in to the organization to ensure members' identities; available on request |
| Nafath requests | The balance of verifications through Nafath: plan requests used, additional balance and total remaining |
| Member ID numbers | The list of members whose ID numbers are not registered yet, so that you register them and they can sign through Nafath |
| Signature verification through Nafath | A setting that makes the actions you choose require verification through Nafath before they are completed |
| Internal documents | Signing, stamping, approval and rejection actions on the organization's documents |
| Correspondence portal | The actions related to correspondence, such as signing, approval and rejection |
Step by step
Step 1: Open the «Nafath» page
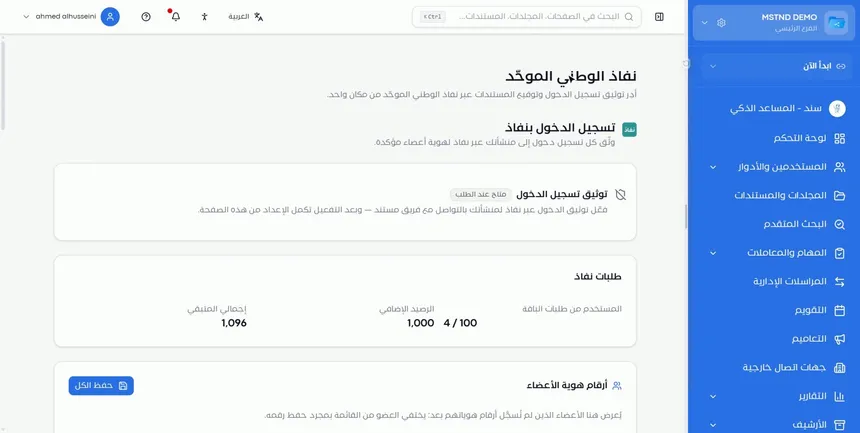
From this page you manage sign-in verification and document signing with a confirmed identity, all from one place. The page is divided into two main parts: what relates to signing in to the organization, and what relates to actions on documents. Start by understanding the current state of each part before you change anything.
Step 2: Get to know «Sign in with Nafath»
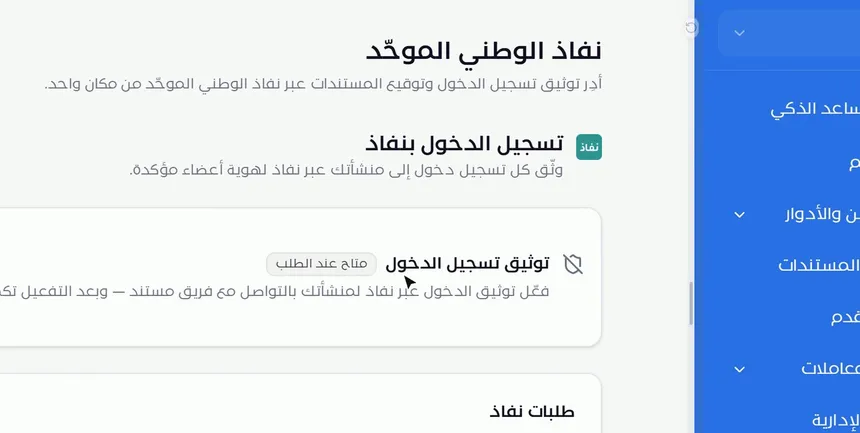
The «Sign in with Nafath» section is described as: «Verify every sign-in to your organization through Nafath for confirmed member identities». Inside it is the «Sign-in verification» card with an «Available on request» badge. This means that this verification is turned on for your organization by contacting the Mstnd team, not with a switch on the page.
Turn it on if your organization needs assurance that everyone who signs in to the system is really the account owner, as in entities that handle sensitive information.
Step 3: Review the «Nafath requests» balance
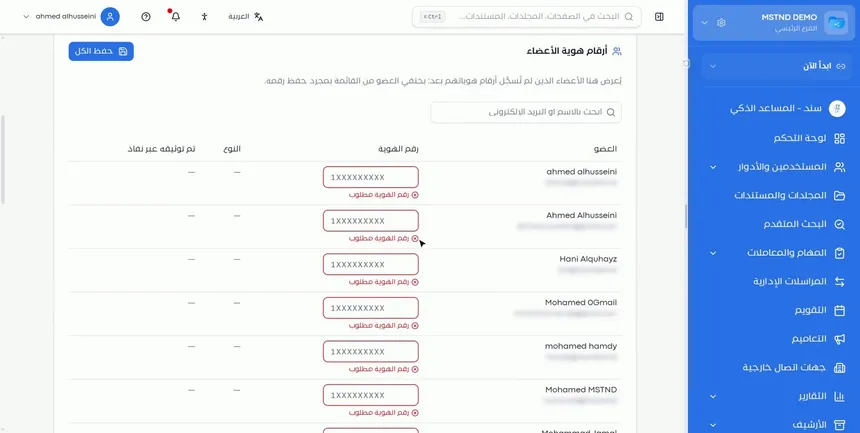
The «Nafath requests» section shows the balance of verifications:
- Plan requests used.
- Additional balance.
- Total remaining.
Every verification through Nafath is counted against this balance. Review it regularly, especially if you turned on Nafath for frequently used actions, so employees are not stopped from completing actions because the balance has run out.
Step 4: Register «Member ID numbers»
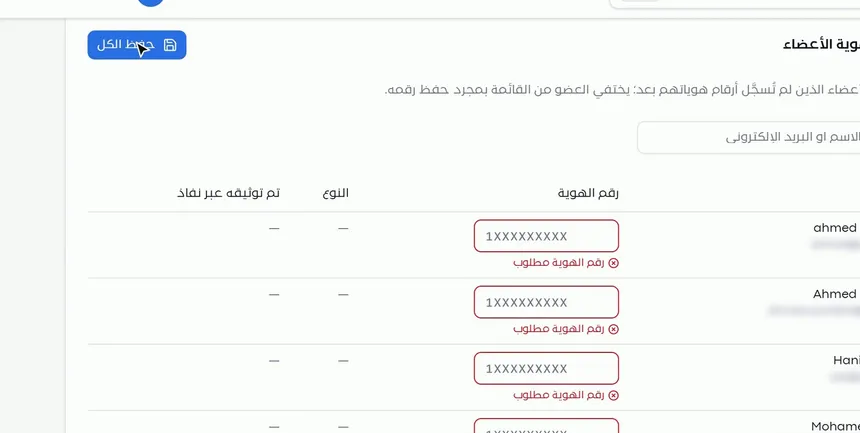
For a member to be able to sign through Nafath, their ID number must be registered in the system. The «Member ID numbers» section shows the members whose ID numbers are not registered yet, in a table with the columns «Member», «ID number», «Type» and «Verified through Nafath». You can search by name or email.
Enter the ID number in the field next to each member, then click «Save all». A member disappears from the list as soon as their number is saved, so the list always stays limited to those who are not complete yet.
Step 5: Make sure «Sign documents with Nafath» is on
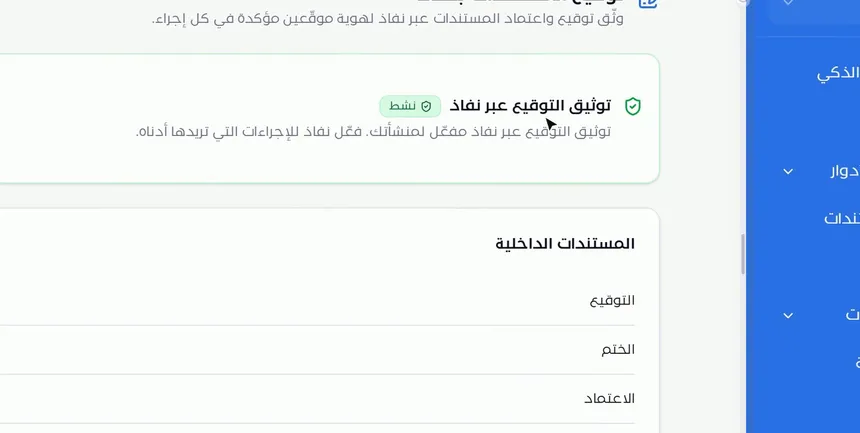
The «Sign documents with Nafath» section is described as: «Verify document signing and approval through Nafath for confirmed signer identities in every action». Inside it is the «Signature verification through Nafath» card with an «Active» badge, which reads: «Signature verification through Nafath is enabled for your organization. Turn on Nafath for the actions you want below».
In other words, the general activation is in place, and the detailed decision is yours: you choose for yourself which actions need Nafath verification.
Step 6: Choose the «Internal documents» actions
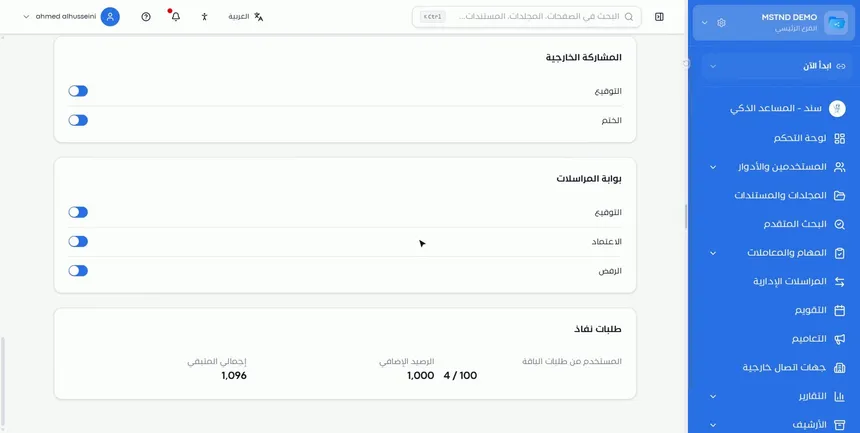
In «Internal documents» there are four actions that can require Nafath:
- Signing.
- Stamping.
- Approval.
- Rejection.
Turn on Nafath for the actions that have a clear legal or administrative effect. Signing and stamping usually need it most, because they give the document its official status. Approval and rejection deserve verification when they are decisions with real impact, such as approving a contract or rejecting a payment request.
Step 7: Set up «External sharing» and the «Correspondence portal»
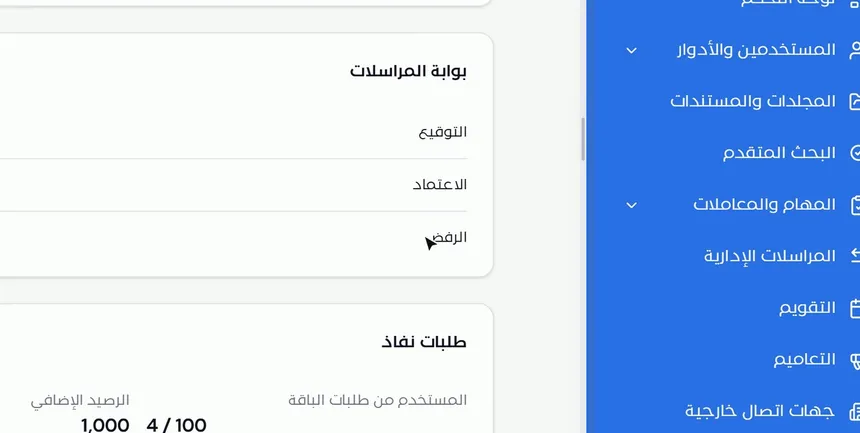
Verification is not limited to employees. In the external sharing section, you choose the actions that require Nafath when an external party works with a document you shared with it. In the «Correspondence portal» you find the signing, approval and rejection actions.
This way, every important action is verified with the identity of the person who took it, whether they are inside the organization or from an external party.
Options and their effect
| Option or setting | What it does | When to use it |
|---|---|---|
| «Sign-in verification» | Verifies every sign-in to the organization through Nafath; it is turned on by contacting the Mstnd team | When you need assurance about the identity of everyone who signs in to the system |
| «Nafath requests» | Shows the plan requests used, the additional balance and the total remaining | For regular tracking of consumption |
| «Member ID numbers» | Registers each member's ID number so they can sign through Nafath | When new members join, or before turning on Nafath for a new action |
| «Save all» | Saves the ID numbers entered; saved members disappear from the list | After entering the numbers of several members |
| Internal documents: signing / stamping | Require verification through Nafath before signing or stamping | For official documents and contracts |
| Internal documents: approval / rejection | Require verification through Nafath before the decision | For decisions that carry weight in a workflow |
| External sharing | Requires verification through Nafath from the external party for the selected actions | When an external party signs or approves your documents |
| Correspondence portal: signing / approval / rejection | Require verification through Nafath in correspondence actions | For correspondence that needs proof of the identity of whoever handled it |
Practical scenarios
Scenario: A government entity verifies its approvals
Situation: A government entity wants every signature, stamp and approval on its official documents to be verified with the identity of the person who made it.
What you do in Mstnd:
- Register the ID numbers of the members involved in signing and approval, and click «Save all».
- Turn on Nafath in «Internal documents» for signing, stamping, approval and rejection.
- Contact the Mstnd team to turn on «Sign-in verification».
- Review the «Nafath requests» balance weekly.
Result: Every official decision is verified with the identity of the person who made it, from the moment of signing in to the signature.
Scenario: A contracting company signs its contracts with subcontractors
Situation: A contracting company sends contracts to subcontractors for signature, and needs proof that the person who signed is the authorized representative.
What you do in Mstnd:
- Turn on Nafath for the required actions in the external sharing section.
- When you share the contract externally, add the recipient's ID number and require verification through Nafath.
- Turn on Nafath for signing in «Internal documents» for the signature of the project manager on your side.
Result: A contract signed by both parties with confirmed identities.
Scenario: A law firm protects its approval and rejection decisions
Situation: A law firm approves memos and documents through an internal workflow, and wants to make sure no one can deny a decision they made.
What you do in Mstnd:
- Turn on Nafath for approval and rejection in «Internal documents».
- Make sure the ID numbers of all the lawyers involved are registered.
- Carry out the approval steps from the Carrying out a task page as usual, with verification through Nafath.
Result: Every decision in the workflow is verified by identity and recorded.
Scenario: The administrative communications department in a hospital
Situation: An administrative communications department in a hospital handles correspondence that needs signatures and approvals from different parties.
What you do in Mstnd:
- Turn on Nafath in the «Correspondence portal» for signing, approval and rejection.
- Register the ID numbers of the officials responsible for approval.
- Keep an eye on «Nafath requests» as the volume of correspondence grows.
Result: Approved correspondence carries clear verification of the identity of whoever approved it.
How it relates to other features
- Signing: when you click «Apply signature», your identity is verified through Nafath if signing is among the enabled actions.
- Stamping: «Apply stamp» requires verification through Nafath to verify the stamp when you turn it on here.
- External sharing: you can require verification through Nafath from the external party by adding the ID number in the share.
- Users: the members whose ID numbers you register are your organization's users themselves, and from their page you manage their roles and accounts.
- Carrying out a task: the approval and rejection steps in tasks are the decisions that can be verified with Nafath.
- New correspondence: the correspondence portal actions relate to the correspondence that is created and approved in the system.
- Stamps: approved stamps are defined there, and verifying their use with Nafath is set up here.
Tips and best practices
- Register the ID numbers of the members involved before turning on Nafath for any action, so their work is not held up.
- Start by turning on Nafath for signing and stamping, then extend it to approval and rejection as needed.
- Review the «Nafath requests» balance periodically, and relate it to the volume of the enabled actions.
- Make registering ID numbers the responsibility of one authorized person or one unit in the organization.
- Add ID number registration to the onboarding steps for new employees.
- Turn on Nafath in external sharing for contracts and documents that parties outside the organization sign.
- Explain to employees why they are asked to verify through Nafath for certain actions: understanding reduces objections.
Warnings and common mistakes
FAQ
What is the «Nafath» page in Mstnd?
It is a page in the settings where you manage sign-in verification and document signing through Nafath, the national single sign-on, along with the Nafath request balance and member ID numbers, all from one place.
How do I turn on sign-in with Nafath in Mstnd?
«Sign-in verification» is available on request, and it is turned on for your organization by contacting the Mstnd team.
Why is an employee unable to sign through Nafath?
First check whether their ID number is registered in the «Member ID numbers» section. A member cannot sign through Nafath before their number is registered, and they stay in the list until it is saved.
Can I require Nafath for selected actions only?
Yes. You choose for yourself the actions that need Nafath verification in internal documents (signing, stamping, approval and rejection), external sharing and the correspondence portal.
What does the «Nafath requests» balance mean?
It is the balance of verifications through Nafath, showing the plan requests used, the additional balance and the total remaining.
Can I require verification through Nafath from an external party?
Yes. You can turn on Nafath for external sharing actions, and when you share a document with an external party, you can require verification through Nafath by adding the ID number.
Why does a member disappear from the ID number list after saving?
Because the list only shows members whose ID numbers are not registered yet, so a member disappears as soon as their number is saved.
What is the benefit of verifying rejection with Nafath?
A rejection is a decision with an effect, just like an approval. Verifying it by identity proves who made it and prevents disputes about it later.
Summary
- The «Nafath» page brings sign-in verification and document signing with a confirmed identity together in one place.
- «Sign-in verification» is available on request by contacting the Mstnd team.
- The «Nafath requests» balance shows what has been used, the additional balance and what remains, and it needs regular tracking.
- Registering members' ID numbers is a condition for them to be able to sign through Nafath.
- You choose the actions that require Nafath in internal documents, external sharing and the correspondence portal.
Try it free: Create your organization's account in Mstnd
Was this article helpful?
Related articles
 0:52
Electronic signature in Mstnd: sign your documents without printing
Learn electronic signature in Mstnd: draw, type or upload your signature, place it on the page, save it as a new version and verify your identity via Nafath.
 0:25
Electronic stamp in Mstnd: stamp your documents with your organization's stamps
Learn electronic stamps in Mstnd: choose an approved organization stamp, place it on the page at the right size and apply it, authenticated via Nafath.
 0:49
External sharing: send a document to an external party securely
Learn external sharing in Mstnd: send a document to an external party by private link via email or WhatsApp, with password, expiry date, permissions and Nafath.
 1:03
Managing users in Mstnd: roles, status, positions and invitations
Learn the Mstnd Users page: search and filters, the user profile with effective permissions and positions, changing roles, deactivating, and inviting new staff.
 0:57
Carrying out a task in Mstnd: from «Start» to «Complete task»
Learn the Mstnd task page: view its data and routing, start work, preview the operation file, approve or reject it with a note, then complete and log the task.
 1:34
Creating new correspondence in Mstnd: from writing to stamping and sending
Create outgoing or incoming mail in Mstnd: recipient, follow-up owners, priority, confidentiality, reply date, attachments, digital sticker, send or register.