

Sharing a document internally and by public link in Mstnd
In this article
Sharing in Mstnd is how you give others access to a specific document without moving or copying it. From the «Share» dialog on the document page, you can share it internally with people, organizational units or positions, with «View», «Edit» or «Delete» permission and an optional expiry date, or create a «Public link» protected by a password, an expiry date and specific permissions. «View shares» gathers everyone who has access to the document in one place.
Quick overview
| Item | Details |
|---|---|
| Module | Document page |
| Where it is in the interface | The «Share» button in the actions bar at the top of the document page, with the «View shares» button next to it |
| Direct link | https://app.mstnd.sa/file/<document ID> |
| Goal | Give access to the document only to the extent needed and for a set period, with the ability to review and revoke it |
| Who it is for | Every user who collaborates on documents, and department heads who distribute documents to their teams |
| Video length | About one minute |
| What you will learn | Sharing with people, units or positions, choosing the permission and the expiry date, managing current shares and creating a protected public link |
Watch the video
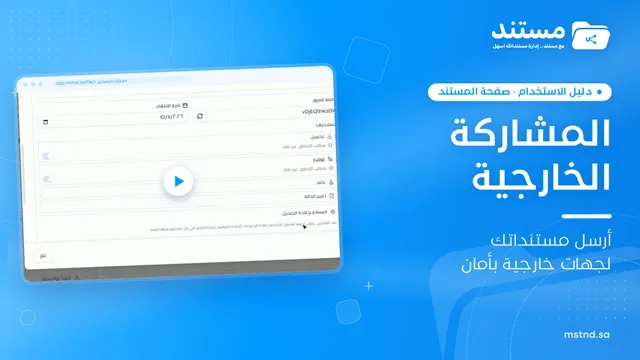
In less than a minute, the video shows the «Internal sharing» and «Public link» tabs of the share dialog, then the «View shares» button, which sums up everyone who has access to the document.
Why this feature?
The traditional way to share a document is to send it as an email attachment or through chat apps. This produces multiple copies without anyone knowing which is the latest, and the organization loses control over who has seen the document and when. And if an employee moves from one department to another, the copies stay in their mailbox.
Sharing in Mstnd solves this problem because the document stays where it is, and what you grant is access permission to it. You set the permission level and its duration, and you review or revoke it whenever you like. And when you share by position, access moves automatically when the person holding the position changes.
| Before sharing in Mstnd | With sharing in Mstnd |
|---|---|
| You email a copy of the file, and the copies multiply | The document stays a single copy, and the people you share with reach it where it is |
| You do not know who holds a copy of the document | «View shares» shows everyone who has access in one place |
| Permission is either full or none | You choose between «View», «Edit» and «Delete» for each share |
| A share stays open forever | You set an expiry date and the share stops automatically |
| You share again every time the employee in a position changes | A share by position moves to the new holder |
| Sending an open link to anyone without protection | A public link with a password, an expiry date and specific permissions |
Value for the organization: a lower risk of document leaks, the "least privilege" principle applied, and full clarity on who can reach what. Value for the individual: quick sharing in a few clicks, without attaching files or keeping track of scattered copies.
Where to find it
- Side menu → «Folders and documents».
- Open the folder, then open the document you need, and the document page appears.
- In the actions bar at the top of the page, click «Share».
- The «Share» dialog opens with three tabs: «Internal sharing», «External sharing» and «Public link».
Direct link: https://app.mstnd.sa/file/<document ID>
To review who has access without opening the share dialog, use the «View shares» button in the same actions bar.
Concepts and terms
| Term | Meaning in Mstnd |
|---|---|
| Internal sharing | Giving users inside the organization access to the document with a specific permission |
| Quick select | A list of organizational units that lets you select all the users of a whole unit in one go, with its member count |
| Share by position | Giving access to a position in the organizational structure, so whoever holds the position gets it automatically |
| Default permission | The access level applied to a new share: «View», «Edit» or «Delete» |
| Expiry date | An optional date on which the share stops automatically |
| Public link | A link that gives «Anyone with the link» access to the document; it can be protected |
| Current shares | A list of the people the document has been shared with, showing each one's permission, with the option to change or revoke it |
| View shares | A button that shows everyone who has access to the document in one place |
Step by step
Step 1: Open the «Share» dialog from the document page
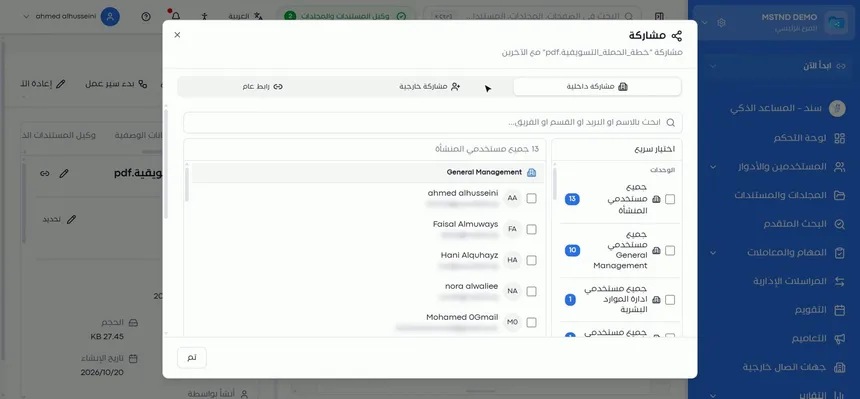
On the document page, click the «Share» button in the actions bar. A dialog titled «Share» opens, with the name of the document you are sharing shown under the title, so you can make sure you are working on the right document.
The dialog has three tabs: «Internal sharing», which is the default tab, «External sharing» and «Public link». Which tab you choose depends on one question: is the recipient a user in your organization, a registered external party, or anyone the link reaches?
Step 2: Search for users by name, section or team
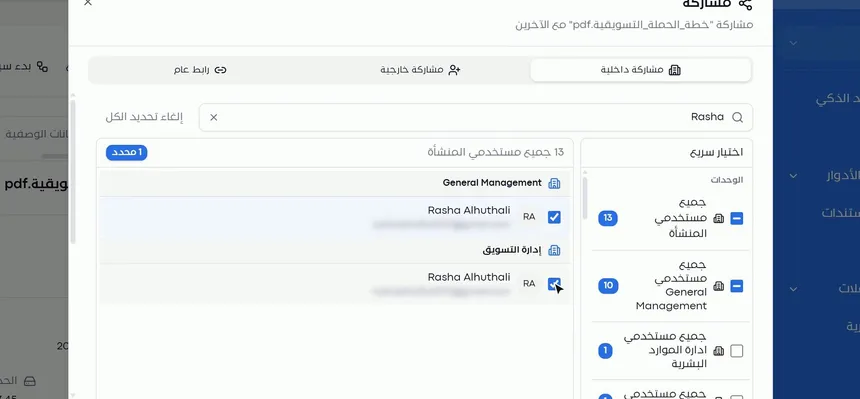
The «Internal sharing» tab shows a search field that accepts a name, an email, a section or a team. Below it is a list of the organization's users grouped by department, with their total number.
Searching by section or team helps when you do not remember individual names, or when you want to reach a particular group quickly. Type part of the name and the list narrows down instantly.
Step 3: Select people, or a whole unit from «Quick select»
You have two ways to select:
- Selecting individuals: tick each user you want to share with.
- «Quick select»: shows the organizational units, such as «All organization users» or «All users of» a particular department, with the number of members in each unit. Selecting a unit selects all of its members in one go.
Use «Quick select» when the document is meant for a whole department, such as an internal regulation for the HR department. Use individual selection when the document is sensitive and concerns specific people.
Step 4: Share by position
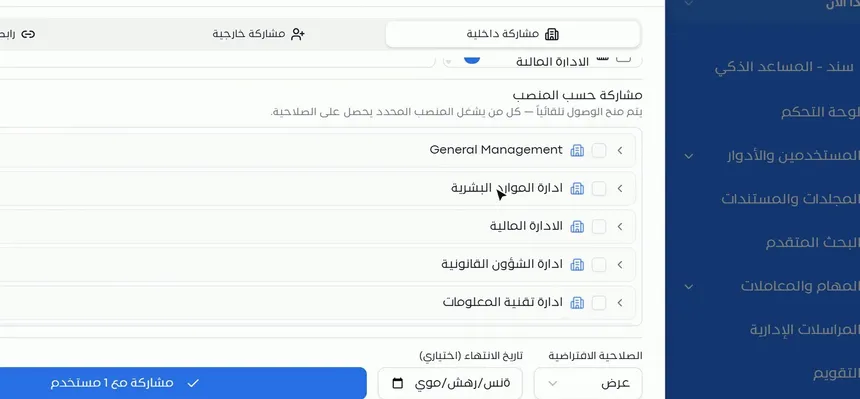
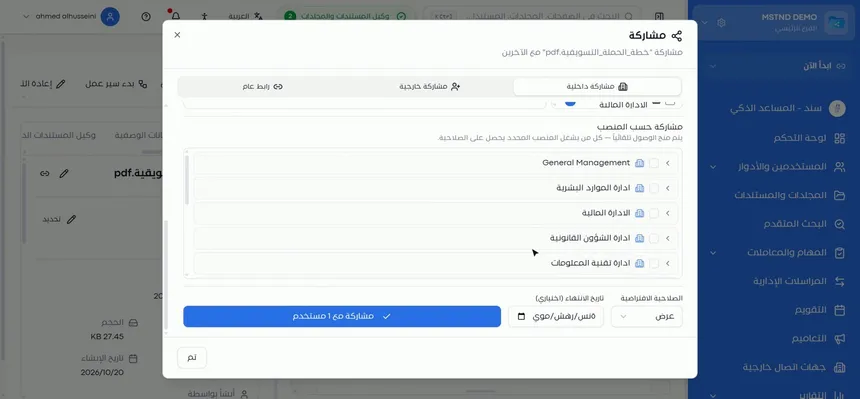
Below the list of users is the «Share by position» section, with a note under it explaining that access is granted automatically to whoever holds the selected position. The departments appear as an expandable list, from which you choose the position you need.
The difference between this method and individual selection is fundamental. A share with a person is tied to that person, while a share with a position is tied to the role. If the employee leaves the position and someone else takes their place, the new holder gets access without you having to share again.
Step 5: Set the permission and expiry date, then share
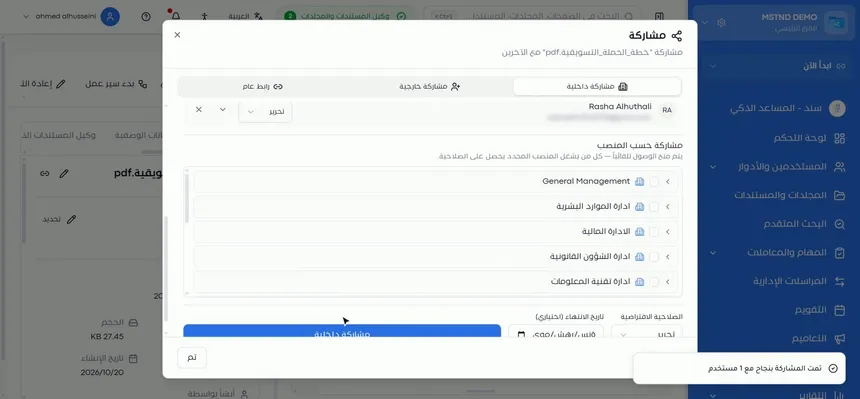
At the bottom of the dialog, you find two fields before the action button:
- «Default permission»: choose «View», «Edit» or «Delete».
- «Expiry date (optional)»: set a date on which the share stops.
Then click the share button; its text shows the number of users you are about to share with. Once it is done, a notification confirms that the share was successful, and the user appears in the list of current shares.
| Permission | What the person you share with can do | Suitable for |
|---|---|---|
| View | See the document | Circulars, regulations and reference documents |
| Edit | Make changes to the document | Drafts that more than one person works on |
| Delete | Delete the document, in addition to the above | Very limited cases, for the people responsible for the document |
Step 6: Change the permission or revoke the share from the current shares
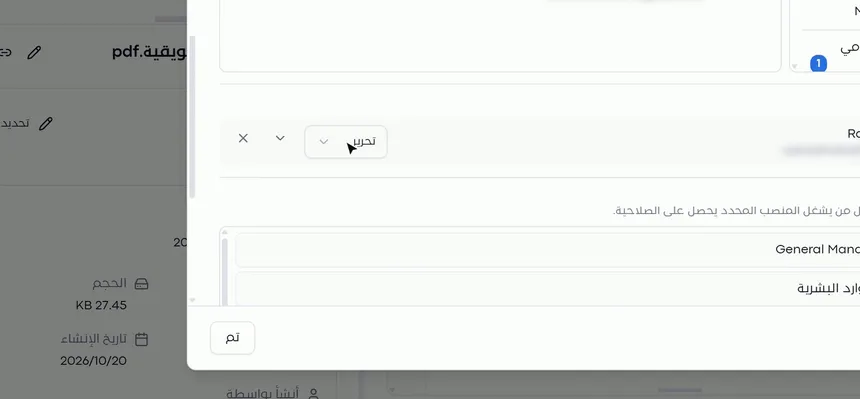
The current shares appear at the top of the tab. Each user has a drop-down list with their permission, and an (×) mark to revoke their share. From the drop-down list, you change the permission, for example from «View» to «Edit», without deleting the share and creating it again.
This is useful when the stage of the work changes. A reviewer who needed «Edit» during drafting may only need «View» once the document is approved.
Step 7: Turn on «Public link»
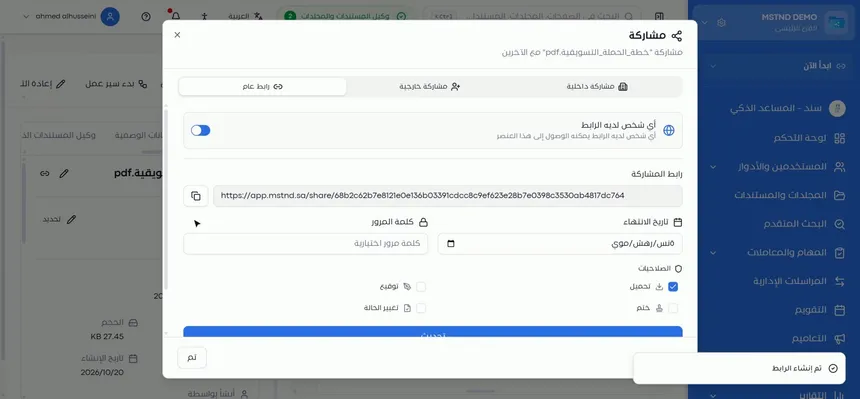
Go to the «Public link» tab. You will find an option titled «Anyone with the link», with an explanation that anyone who has the link can access the item, and a toggle next to it. Turn the toggle on, and the document link is created immediately.
A public link suits cases where the recipient is neither a user in the organization nor a party registered in the external contacts, and you need to get the document to them quickly.
Step 8: Protect the link with an expiry date, a password and permissions
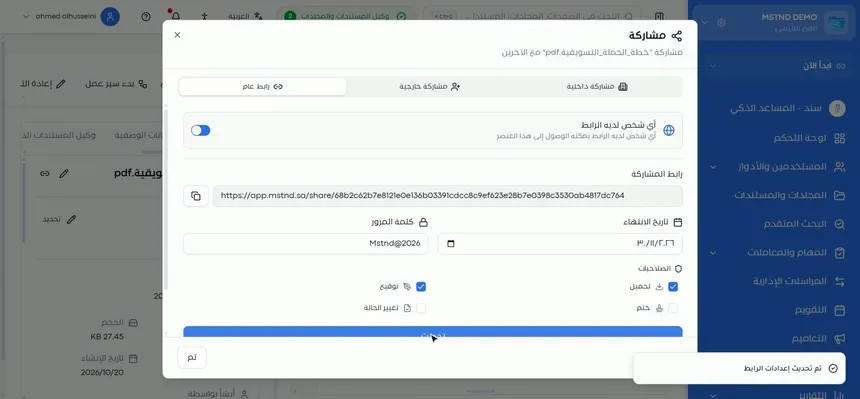
Once the link is on, the protection settings appear:
- «Expiry date»: the link stops working after it.
- «Password»: only those who know it can open the document.
- «Permissions»: set what the person who opens the link can do: «Download», «Sign», «Stamp», «Change status».
After adjusting the settings, click «Update» to save them, and a notification confirms that the link settings were updated.
Step 9: Copy the link and send it
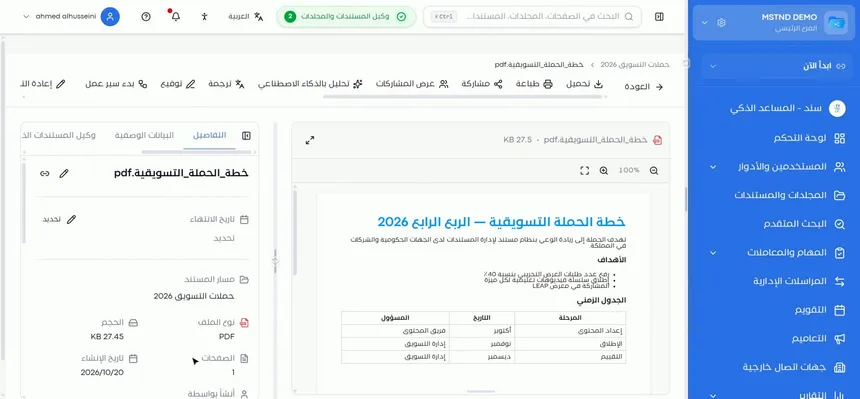
Next to the «Share link» field is a copy button. Click it, then paste the link into the message you send the recipient, by whatever means suits you. The protection settings you set will keep applying to everyone who opens the link.
Step 10: Review everyone who has access from «View shares»
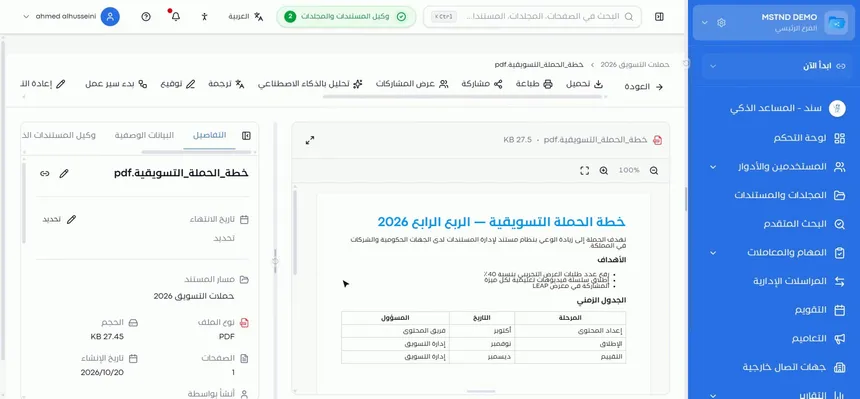
After closing the dialog, click «View shares» in the actions bar. It shows you everyone who has access to the document in one place, whether they were added individually or through a unit or a position. Use it for periodic reviews, especially for confidential documents.
Options and their effect
| Option or setting | What it does | When to use it |
|---|---|---|
| «Internal sharing» | Shares the document with the organization's users | For collaboration between employees and departments |
| Searching by name, email, section or team | Narrows down the list of users | To reach a person or a group quickly |
| Selecting an individual user | Gives that person access | For sensitive documents meant for specific people |
| «Quick select» for a unit | Selects all the users of the unit | For a document that concerns a whole department or team |
| «Share by position» | Gives access to whoever holds the position | For documents tied to the role rather than the person |
| «Default permission»: View | Viewing only | Reference and approved documents |
| «Default permission»: Edit | Allows editing | Collaborating on drafts |
| «Default permission»: Delete | Allows deletion | The people responsible for the document only |
| «Expiry date (optional)» | Stops the share automatically | Temporary shares, such as for a review or an audit |
| Changing the permission or (×) in the current shares | Changes or revokes an existing share | When the stage changes or the need ends |
| «Public link» / «Anyone with the link» | Creates an access link to the document | For a recipient who is neither a user nor a registered party |
| Link password | Limits access to those who know it | Almost always, with a public link |
| Link permissions: Download, Sign, Stamp, Change status | Set what the person opening the link can do | Depending on the purpose of the share |
| «View shares» | Shows everyone who has access | For reviews and audits |
Practical scenarios
Scenario: A government entity distributes an internal regulation to a whole department
Situation: An updated regulation on leave procedures has been issued, and every employee in the HR department needs to read it without anyone editing it.
What you do in Mstnd:
- Open the regulation and click «Share».
- From «Quick select», select «All users of» the HR department.
- Set «Default permission» to «View» and complete the share.
- Check «View shares» to make sure everyone is included.
Result: The regulation reached the whole department as a single copy that cannot be edited.
Scenario: A contracting company shares a contract with the procurement manager position
Situation: A long-term supply contract that the procurement manager needs, whoever holds the position.
What you do in Mstnd:
- In the share dialog, go to «Share by position».
- Expand the relevant department and choose the procurement manager position.
- Choose the «View» permission and complete the share.
Result: When the procurement manager changes, the new holder gets access automatically, without anyone sharing again.
Scenario: A hospital shares a draft policy with a review committee for a set period
Situation: A draft infection control policy needs comments from committee members from different sections within two weeks.
What you do in Mstnd:
- Search for the committee members by name and select them.
- Choose «Edit» and set the «Expiry date» to two weeks later.
- Once the review is over and the policy is approved, change their permissions to «View» from the current shares.
Result: Organized collaboration within a set time, with no edit permissions left open after approval.
Scenario: A trading company sends a price quote to a prospective client
Situation: A prospective client needs to see and download a price quote, and is not registered in the external contacts.
What you do in Mstnd:
- Open the «Public link» tab and turn on «Anyone with the link».
- Set an expiry date that matches the quote's validity, and add a password.
- Turn on the «Download» permission only and click «Update».
- Copy the link and send it, and send the password in a separate message.
Result: The quote reached the client with protection, and the link stopped working automatically when the quote's validity ended.
How it relates to other features
- External sharing: the third tab in the same share dialog, used with parties registered in the external contacts, with a notification, a password and verification through Nafath.
- Organizational structure: the units in «Quick select» and the positions in «Share by position» come from the structure, so an accurate structure means accurate sharing.
- Sections and teams: searching by section or team depends on how the sections, the teams and their members are defined.
- Permissions: role permissions set what a user can do in the system in general, while sharing gives access to one specific document.
- Folders: when you create a folder you set who can see it, and sharing adds access at the level of a single document.
- Activity: sharing operations are recorded in the activity log, so you can find out who shared what and when.
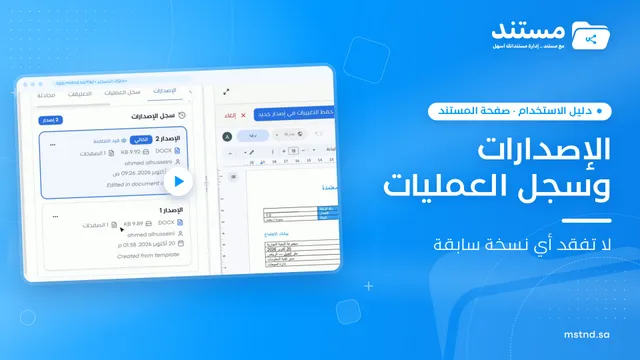
- Versions and operations log: the document's operations log shows the actions performed on it, including those carried out by the people it is shared with.
Tips and best practices
- Choose «View» by default, and raise the permission only for those who really need it.
- Set an expiry date for every temporary share, such as reviews, audits and committees.
- Prefer sharing by position for documents tied to a job, and individual selection for personal or sensitive documents.
- Use «Quick select» for units instead of ticking dozens of names by hand: it is faster and less likely to leave someone out.
- Do not use a public link for the organization's users: internal sharing is more precise and easier to review.
- Protect every public link with a password and an expiry date, and send the password through a different channel.
- Review «View shares» periodically for confidential documents, and revoke what is no longer needed.
- When the document's stage changes, such as its approval after the draft stage, reconsider the «Edit» permissions you have granted.
Warnings and common mistakes
FAQ
How do I share a document with a colleague in the organization?
Open the document and click «Share», then in the «Internal sharing» tab search for your colleague by name or email and select them. Choose the permission and complete the share.
Can I share a document with a whole department at once?
Yes. From «Quick select» you select a whole unit, such as «All users of» a particular department, and all of its members are selected, with their count.
What is the difference between sharing with a person and sharing by position?
A share with a person is tied to that person, while a share by position gives access to whoever holds the position automatically, so it moves to the new holder when the position changes hands.
What permissions are available in internal sharing?
Three permissions: «View» for reading, «Edit» for making changes, and «Delete». You can change them later for each user from the current shares.
Can a share end automatically?
Yes. Set «Expiry date (optional)» when you share, and the share stops on that date without any action from you.
How do I protect a document's public link?
In the «Public link» tab, set an expiry date and a password, choose the allowed permissions, such as «Download», «Sign», «Stamp» or «Change status», then click «Update».
What is the difference between a public link and external sharing?
Anyone who has a public link can use it, while external sharing is addressed to a specific party from the external contacts with a link of its own, along with a notification, an access log and the option of verification through Nafath.
How do I know everyone who can access a document?
Click «View shares» in the actions bar of the document page, and it shows everyone who has access in one place.
Summary
- Sharing gives access to the document without copying it, so a single copy stays under control.
- You can share with individuals, with a whole unit from «Quick select», or by position.
- Every share has a permission («View», «Edit» or «Delete») and an optional expiry date, and it can be changed or revoked.
- A public link is protected with a password, an expiry date and specific permissions.
- «View shares» is your reference for reviewing who can reach the document.
Try it free: Create your organization's account in Mstnd
Was this article helpful?
Related articles
 0:49
External sharing: send a document to an external party securely
Learn external sharing in Mstnd: send a document to an external party by private link via email or WhatsApp, with password, expiry date, permissions and Nafath.
 0:27
Permissions in Mstnd: a complete reference for who sees and who edits
Learn the Permissions tab in Mstnd: every permission by category, with its name, code, description and the roles that include it, and how to search and filter.
 0:29
The organizational structure in Mstnd: your organization as it really is
Learn the organizational structure in Mstnd: an interactive chart to zoom and drag, show or hide member names, with color-coded sections, teams and leads.
 1:26
Folders in Mstnd: organize your organization's documents from day one
Learn the Mstnd Folders page: Personal space, structure folders, Shared with me, new folders with a confidentiality level, color and icon, views and actions.
 0:23
The activity log in Mstnd: who did what, and when
The Mstnd activity log shows every operation in the system with who did it and when; search by keyword or user name and pick a date range to review events.
 0:38
Versions and the operations log in Mstnd: a complete history for every document
Mstnd versions and the operations log: save edits as a new version and keep the old one, view, download or translate any copy, and track who did what and when.