

Electronic stamp in Mstnd: stamp your documents with your organization's stamps
In this article
Electronic stamp in Mstnd lets you stamp any document with one of the organization's approved stamps that the system administrator has added, directly from the document page and without printing. You choose the stamp, place it in its spot on the page at a suitable size, then apply it, and the system verifies your identity through Nafath so that the stamp is authenticated. This feature serves departments that issue letters, certificates and contracts that need an official stamp.
Quick overview
| Item | Details |
|---|---|
| Module | Document page |
| Where it is in the interface | Document page → action bar → «Stamp» |
| Direct link | https://app.mstnd.sa/file/<document ID> |
| Goal | Stamp documents electronically with the organization's approved stamps, with the identity of whoever stamps verified through Nafath |
| Who it is for | Administrative affairs, administrative communications, human resources, legal and finance departments, and anyone who issues official documents |
| Video length | About 25 seconds |
| What you will learn | Opening the stamp window, choosing the right stamp, placing it and adjusting its size on the page, and applying it with Nafath verification |
Watch the video
In about 25 seconds, the video shows the steps for stamping a marketing campaign plan: opening the «Stamp document» window, choosing the organization's stamp, placing it on the page, then applying it.
Why this feature?
A paper stamp is tied to a place and a person. The stamp usually sits in a single office, and every document that needs a stamp has to pass through it: the document is printed, stamped, then scanned to return to the system. And if the person in charge of the stamp is away, transactions are delayed.
Electronic stamp in Mstnd solves this problem in two ways. First, the organization's stamps are stored centrally in the system, so the document does not need a paper journey. Second, every stamping goes through identity verification via Nafath, so the organization knows who stamped each document.
| Before electronic stamp | With electronic stamp in Mstnd |
|---|---|
| Print the document, stamp it by hand, then scan it | Stamp directly from the document page |
| The stamp is in one place, and work is delayed when the person in charge is away | The organization's stamps are available in the system to authorized users |
| It is hard to know who stamped the document and when | Identity verification through Nafath in every stamping |
| Stamp images circulate and may be copied and used out of context | Approved stamps managed by the system administrator, who can deactivate any of them |
Value for the organization: central control over official stamps, a record of every stamping, and faster issuing of documents.
Value for the individual: stamp a document in seconds, without waiting for the paper stamp or going to another office.
Where to find it
- Open the document you need to stamp from the folders or from the search results.
- In the action bar at the top of the document page, click «Stamp». If the button does not appear directly, you will find it among the other actions in the same bar.
- The «Stamp document» window opens, with the file name and the notice «Requires Nafath verification» at the top.
Direct link: https://app.mstnd.sa/file/<document ID>
Concepts and terms
| Term | Meaning in Mstnd |
|---|---|
| Electronic stamp | An image of an official stamp of the organization, applied to the document page inside the system |
| Approved organization stamps | The stamps the system administrator has added and activated; they are the only ones that appear when stamping |
| «Choose stamp» | A list in the stamp window that shows the available stamps with each stamp's name, image and type |
| Stamp type | A classification shown at the bottom of the stamp card, such as «Approval» |
| Stamp frame | The box that appears on the page after you click; it can be dragged and resized, and it shows the page number |
| «Apply stamp» | The button that starts Nafath verification and then fixes the stamp on the document |
| Nafath verification | Verifying the identity of whoever stamps through Nafath, the Saudi national single sign-on |
Step by step
Step 1: Click «Stamp» in the action bar
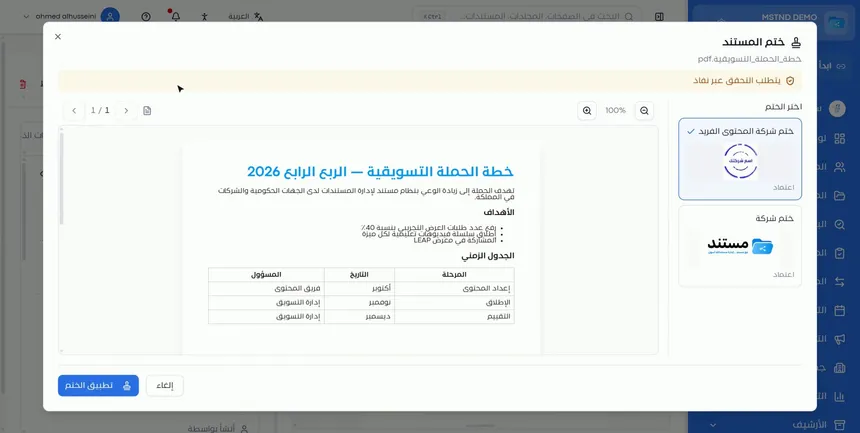
From the document page, click «Stamp» in the action bar. The «Stamp document» window opens, and it has three parts:
- Top of the window: the file name and the «Requires Nafath verification» notice.
- Side panel: the «Choose stamp» list with the organization's stamps.
- Middle: the document page, with tools for zooming in and out and for moving between pages.
Review the document in the viewer before choosing the stamp. A stamp means the organization endorses the document, so the document must be in its final form.
Step 2: Choose the stamp from the approved organization stamps
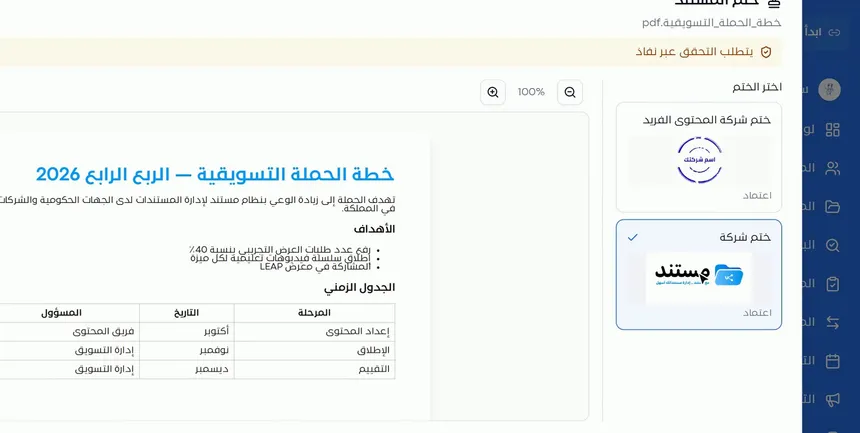
Under «Choose stamp», the approved stamps that the system administrator has added appear. Each card shows the stamp's name, image and type. Click the right stamp, and a check mark appears next to its name.
The organization may have more than one stamp, such as an official round stamp and a stamp with the organization's logo. Choose the stamp that suits the type of document and its destination.
Step 3: Click where the stamp goes on the page and adjust its position and size
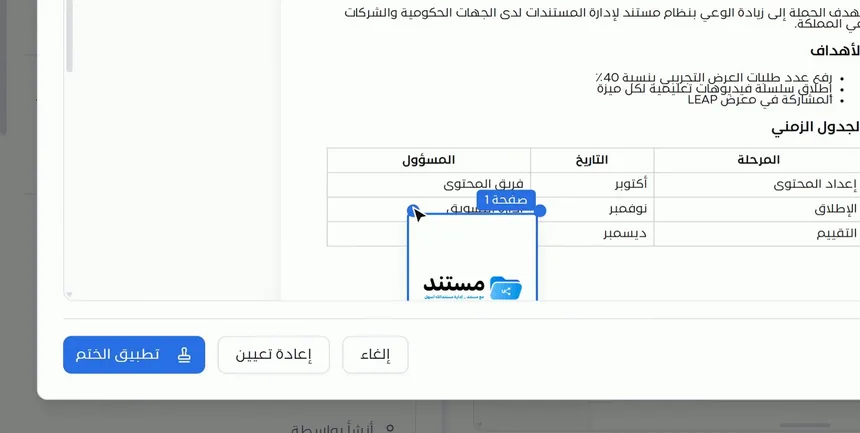
Click the spot you want on the document page, and the stamp appears inside a frame that shows the page number. Then:
- Drag the frame to the appropriate position, such as the stamp box or next to the signature.
- Enlarge or reduce the stamp with the frame's handles until it fits the space.
- Move between pages from the top of the viewer if the position is on another page.
If you want to start over, click «Reset».
Step 4: Click «Apply stamp» and complete Nafath verification
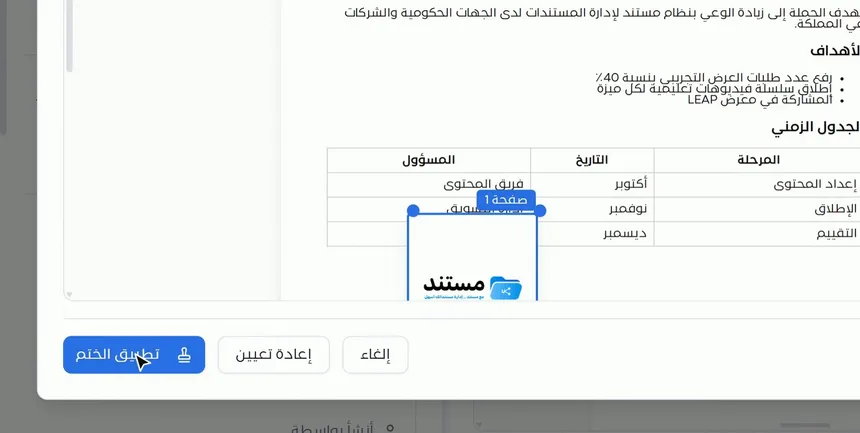
After adjusting the stamp's position and size, click «Apply stamp». The system verifies your identity through Nafath, so that the stamp is authenticated and linked to the identity of the person who applied it.
Once verification is complete, the stamp is fixed on the document, and the operation is recorded in the document's «Operations log».
Options and their effect
| Option or setting | What it does | When to use it |
|---|---|---|
| «Stamp» in the action bar | Opens the «Stamp document» window | When the document needs a stamp |
| «Choose stamp» | Sets which of the approved organization stamps is used | In every stamping |
| Clicking on the page | Places the stamp where you click | To set the initial position of the stamp |
| Dragging the frame | Moves the stamp to another position | To fine-tune the position |
| The frame's handles | Enlarge or reduce the stamp | To fit the stamp to the available space |
| Zooming in and out | Changes the display size of the page | To place the stamp precisely |
| Moving between pages | Takes you to another page | If the stamp's position is not on the first page |
| «Reset» | Clears the current position of the stamp | If you placed the stamp in the wrong spot |
| «Apply stamp» | Starts Nafath verification and fixes the stamp | After reviewing the position and size |
| «Cancel» | Closes the window without stamping | If you need to review the document first |
Practical scenarios
Scenario: The administrative communications department of a government entity stamps an outgoing letter
Situation: An outgoing letter to another entity, signed by the manager, needs the entity's official stamp before it is sent.
What you do in Mstnd:
- Open the letter after it has been signed.
- Click «Stamp» and choose the official stamp.
- Place the stamp next to the signature and adjust its size.
- Click «Apply stamp» and complete Nafath verification.
- Send the letter from Administrative correspondence.
Result: A signed, stamped and authenticated letter, ready to send without printing.
Scenario: HR in a contracting company issues an experience certificate
Situation: A former employee has requested an experience certificate stamped with the company's stamp.
What you do in Mstnd:
- Create the certificate from a template in Mstnd.
- Open the certificate and click «Stamp».
- Choose the company stamp and place it at the bottom of the certificate.
- Apply the stamp, then share the certificate with the employee.
Result: An official, stamped certificate issued in minutes.
Scenario: The finance department of a trading company stamps a price quotation
Situation: A price quotation for a client needs the company's stamp to make it official.
What you do in Mstnd:
- Open the final price quotation.
- Click «Stamp» and choose the appropriate stamp.
- Place the stamp in the stamp box at the bottom of the quotation.
- Apply the stamp, then share the quotation with the client through external sharing.
Result: A stamped price quotation reaches the client quickly, and its original stays saved in the system.
Scenario: A school stamps course attendance certificates
Situation: The school organized a training course for teachers and needs stamped attendance certificates.
What you do in Mstnd:
- Open each attendance certificate.
- Stamp each certificate with the school stamp in the same position.
- Archive the stamped certificates in the course folder.
Result: Stamped certificates with a uniform look, saved in one place.
How it relates to other features
- Signature: official documents often need both a signature and a stamp, and both work the same way from the action bar.
- Stamps: in the settings, the system administrator adds stamps, sets their name, type and description, and activates or deactivates them.
- Nafath, the Saudi national single sign-on: this is where members' ID numbers are registered and where stamping is set as one of the actions that require verification.
- Starting a workflow on the document: a workflow can include a step whose operation type is «Stamp», which reaches the person responsible for it.
- Versions and operations log: the operations log records every action on the document, including stamping.
- Administrative correspondence: stamped outgoing letters are sent and followed up from correspondence.
Tips and best practices
- Stamp the document after it has been signed and approved, not before.
- Read the document in the viewer before stamping, and make sure it is in its final form.
- Choose the stamp that suits the type of document if the organization has more than one stamp.
- Place the stamp in the box meant for it, or next to the signature, according to the practice followed in your organization.
- Adjust the size so the stamp is clear without covering the text.
- Ask the system administrator to deactivate any stamp that is no longer in use, so it is not chosen by mistake.
- Make sure in advance that your ID number is registered in the Nafath settings.
Warnings and common mistakes
FAQ
How do I stamp a document electronically in Mstnd?
Open the document, click «Stamp» in the action bar, choose the stamp from the organization's stamps, click its spot on the page and adjust it, then click «Apply stamp» and complete Nafath verification.
Where do the stamps that appear when stamping come from?
The system administrator adds them from the settings, on the «Stamps» page, and employees see only the approved stamps that are active.
Can I change the size of the stamp on the page?
Yes. After you click on the page, the stamp appears inside a frame that you can drag and enlarge or reduce until it fits the space.
Why does Mstnd ask for Nafath verification when stamping?
So that the stamp is authenticated and linked to the identity of the person who applied it: the system verifies your identity before fixing the stamp.
Can I upload my own stamp image when stamping?
The stamp window shows only the organization's approved stamps. Stamps are added from the «Stamps» settings by the system administrator.
What is the difference between a signature and a stamp in Mstnd?
A signature is personal, and each user creates it in their profile, while a stamp belongs to the organization and is added by the system administrator. Both are applied from the action bar and go through Nafath verification.
Can stamping be a step in a workflow?
Yes. Workflow templates support steps whose operation type is «Stamp», so the assignee receives a task to stamp the document.
Summary
- Electronic stamp lets you stamp a document directly from its page, without printing.
- You choose from the approved organization stamps managed by the system administrator.
- You place the stamp with a click, then drag it and adjust its size, and you can «Reset» its position.
- «Apply stamp» goes through Nafath verification, so the stamp is authenticated with your identity.
- The stamp complements the signature and the workflow in the cycle of issuing official documents.
Try it free: Create your organization's account in Mstnd
Was this article helpful?
Related articles
 0:52
Electronic signature in Mstnd: sign your documents without printing
Learn electronic signature in Mstnd: draw, type or upload your signature, place it on the page, save it as a new version and verify your identity via Nafath.
 0:28
Organization stamps in Mstnd: add your official stamps digitally
Learn the stamp settings in Mstnd: add an official stamp with its name, type, description and image, and activate or deactivate any stamp for staff to use.
 0:57
Nafath in Mstnd: sign-in and signing with a verified identity
Set up Nafath in Mstnd: sign-in verification, tracking the Nafath request balance, registering member ID numbers and choosing which actions require Nafath.
 1:14
Starting a workflow on a document in Mstnd: launch the approval from the document
Learn to start a workflow from a Mstnd document: pick a template, set priority and due date, assign steps and launch the transaction with the document attached.
 0:38
Versions and the operations log in Mstnd: a complete history for every document
Mstnd versions and the operations log: save edits as a new version and keep the old one, view, download or translate any copy, and track who did what and when.
 0:50
Administrative correspondence in Mstnd: outgoing and incoming in one organized register
Administrative correspondence in Mstnd: outgoing and incoming in one register, indicators, filters by direction, status and confidentiality, and reply threads.