

Organization stamps in Mstnd: add your official stamps digitally
In this article
The «Stamps» page in Mstnd settings is where the organization's approved stamps are defined digitally: each stamp has a name, a type, a description and an image, and any stamp can be activated or deactivated at any time. Once a stamp is saved, it becomes available to staff when they use the «Stamp» button on the document page, so they stamp documents electronically without printing or stamping by hand. This page serves the organization's settings administrators, who decide which stamps are approved and which are deactivated.
Quick overview
| Item | Details |
|---|---|
| Module | Settings |
| Where it is in the interface | Side menu → «Settings» → «Stamps»; the page title is «Company stamps» |
| Direct link | https://app.mstnd.sa/settings/stamps |
| Goal | Provide a library of approved official stamps that staff use when stamping documents |
| Who it is for | The system administrator and settings administrators, and departments that approve their documents with a stamp, such as administrative and financial affairs |
| Video length | Less than half a minute |
| What you will learn | Reading the «Available stamps» list, activating or deactivating a stamp, adding a new stamp with its fields and image, and saving it |
Watch the video
In less than half a minute, the video shows how to add a «Marketing department» stamp, from the start until it appears in the list of available stamps.
Why this feature?
The official stamp is one of the most important approval tools in Saudi organizations. In paper-based work, stamping means printing the document, sending it to whoever keeps the stamp, then scanning it again. This cycle takes time, ties the stamp to one place and one person, and makes it hard to know who stamped what and when.
The «Stamps» page moves the stamp into a digital form that the organization manages centrally. The system administrator adds the approved stamps and deactivates the ones that are no longer in use, and staff pick only from the approved list when they stamp any document.
| Before digital stamps | After setting up stamps in Mstnd |
|---|---|
| Printing the document to stamp it, then scanning it | Stamping the document electronically, directly from its page |
| The stamp sits in one office, with one person | The stamp is available to staff from anywhere through the system |
| It is hard to prevent an old stamp from being used | Any stamp can be deactivated with the «Active» switch without deleting it |
| It is not easy to know who stamped a document and when | The stamp is applied through the system, and identity verification through Nafath can be required before it |
Value for the organization: central control over the approved stamps, and a lower risk of an unapproved stamp being used. Value for the individual: stamping a document in seconds, without waiting or moving around.
Where to find it
- From the side menu, open «Settings».
- Choose «Stamps».
- The «Company stamps» page appears with the description «Manage the company's various stamps», and below it «Available stamps».
Direct link: https://app.mstnd.sa/settings/stamps
Concepts and terms
| Term | Meaning in Mstnd |
|---|---|
| Company stamps | The organization's library of official stamps, as it appears in the settings |
| Available stamps | The list of added stamps; each stamp has a card with its image, name and type |
| Stamp name | A name that identifies the stamp when it is picked; it is a required field, such as «Marketing department stamp» |
| Stamp type | A classification of the stamp's function, such as «Administrative stamp» or «Official stamp»; it appears on the card, for example as «Approval» |
| Description | An explanation of when the stamp is used, such as «Used to approve marketing campaign documents» |
| Stamp image | The file that appears on the document when it is stamped, preferably with a transparent background |
| Active | A switch that sets whether the stamp is available for use or deactivated |
Step by step
Step 1: Review the available stamps and the status of each one
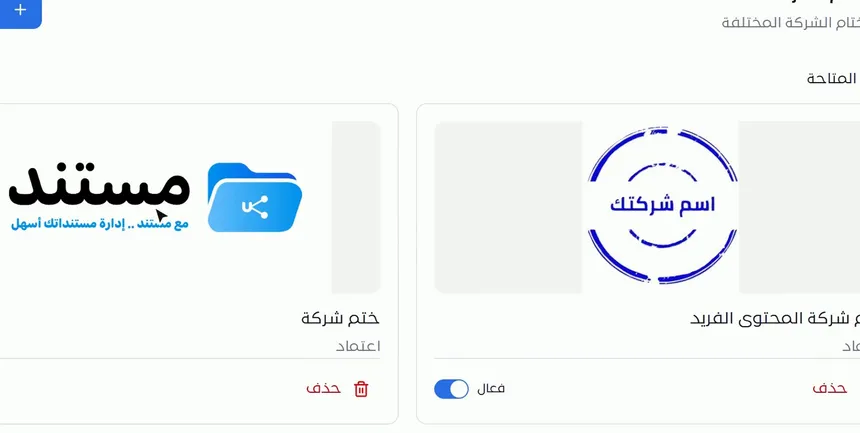
The page shows the organization's approved stamps as cards. Each card contains:
- The stamp image as it will appear on the document.
- The stamp name, such as «Company stamp».
- Its type, such as «Approval».
- An «Active» switch to activate or deactivate the stamp.
- A «Delete» button.
The difference between deactivating and deleting matters. Deactivating makes the stamp temporarily unavailable while it stays in the list, so you can bring it back with one click. Deleting removes the stamp from the list. So when a stamp stops being used for a while, such as the stamp of a department that is being reorganized, deactivating is the better choice.
Step 2: Click «Add stamp»
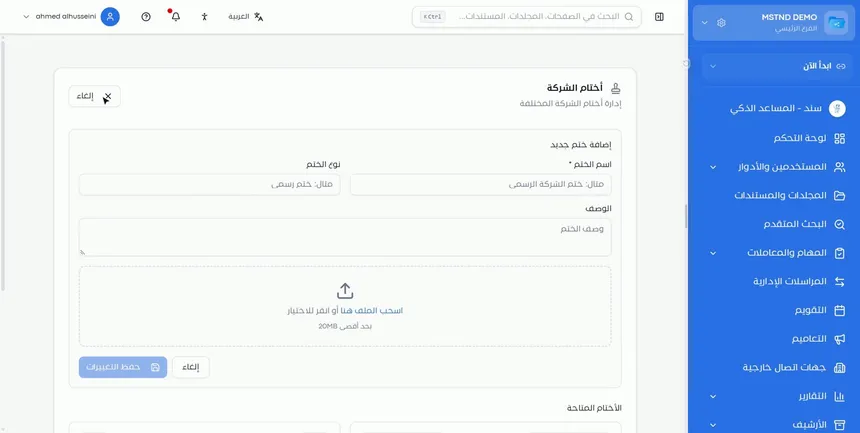
To add a new stamp, click «Add stamp». The «Add new stamp» form appears above the list, with:
- «Stamp name», with a mark next to it showing that it is required.
- «Stamp type».
- «Description».
- An upload area for the stamp image.
- The «Save changes» and «Cancel» buttons.
The «Save changes» button stays unavailable until you complete the required data. If you change your mind, click «Cancel» to leave without adding anything.
Step 3: Enter the stamp's name, type and description
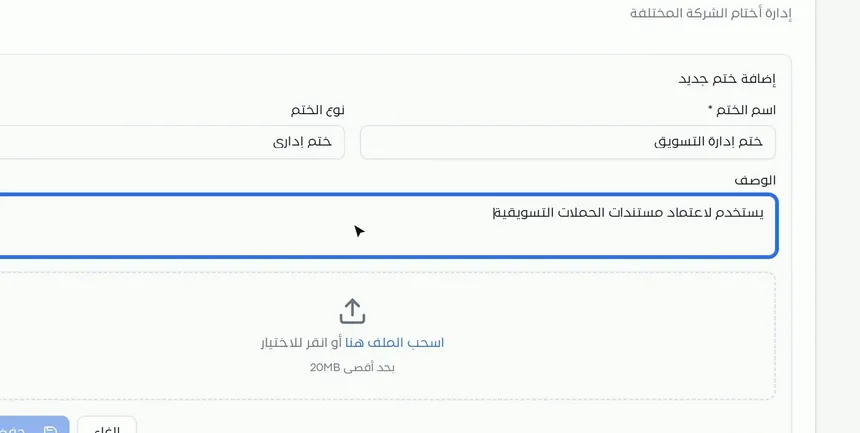
Fill in the three fields:
- «Stamp name»: enter a name that lets staff recognize the stamp at once, such as «Marketing department stamp».
- «Stamp type»: such as «Administrative stamp». The type helps distinguish internal approval stamps from official stamps.
- «Description»: explain when the stamp is used, such as «Used to approve marketing campaign documents».
Why does the description matter? Because when stamping, the employee picks from a list of stamps. A clear description prevents picking the wrong department's stamp, especially when stamp names are similar.
Step 4: Upload the stamp image and save
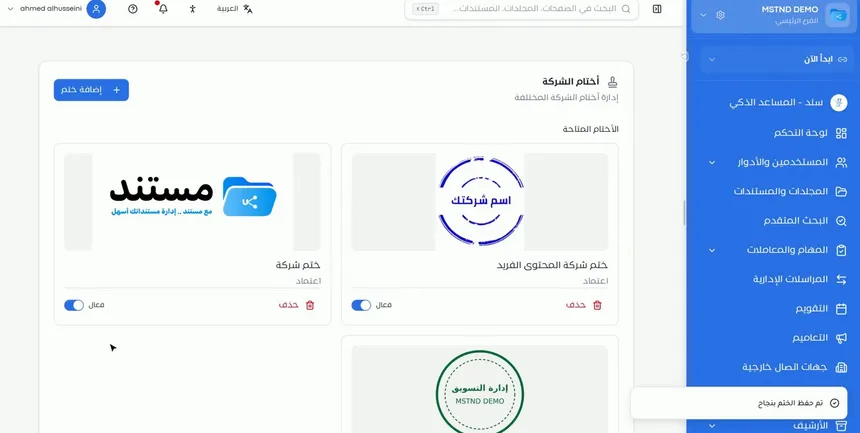
In the upload area, drag and drop the image file, or click to choose it. The interface shows the maximum file size below the upload area; the screenshot shows «Max 20MB».
The stamp image should preferably be a PNG with a transparent background. A transparent background makes the stamp appear on the page as if it were printed on it, without a white box covering the text or the signature beneath it.
After uploading, click «Save changes». The message «Stamp saved successfully» appears, and the stamp is added to «Available stamps».
Step 5: Check that the stamp is now available to staff
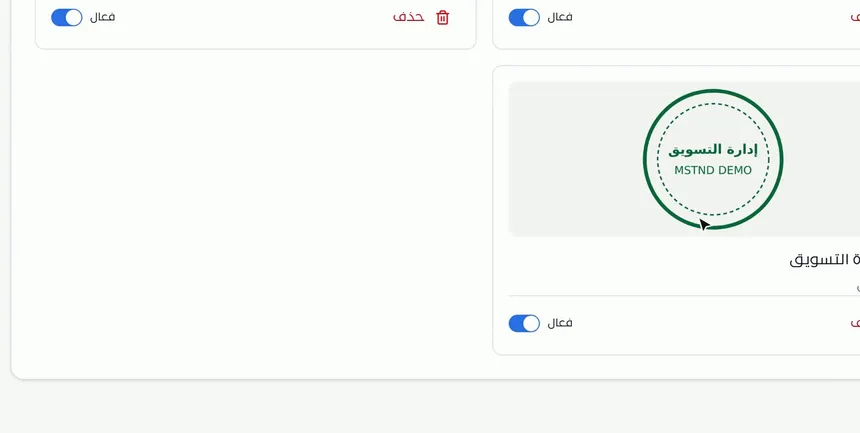
The new stamp appears in the list with its switch set to «Active». From this moment it is available to staff when they stamp documents: the employee opens the document, clicks «Stamp», picks the stamp from the organization's approved stamps, then places it in the right spot on the page.
Options and their effect
| Option or setting | What it does | When to use it |
|---|---|---|
| «Add stamp» | Opens the «Add new stamp» form | When a new stamp is approved for the organization or for a department |
| «Stamp name» | Sets the name shown to staff; it is required | Always, with a clear name that indicates the entity |
| «Stamp type» | Classifies the stamp's function | To distinguish approval stamps from official and administrative stamps |
| «Description» | Explains when the stamp is used | When there are several stamps with similar names |
| Uploading the stamp image | Sets how the stamp looks on the document | A PNG with a transparent background is preferred |
| «Save changes» | Saves the stamp and adds it to the list | After the fields are complete and the image is uploaded |
| «Cancel» | Closes the form without saving | When you decide not to add the stamp |
| The «Active» switch | Activates or deactivates the stamp | To deactivate a stamp temporarily while keeping it |
| «Delete» | Removes the stamp from the list | When the stamp is retired permanently |
Practical scenarios
Scenario: A contracting company approves project progress claims
Situation: The finance department of a contracting company stamps progress claims and payment orders, and the stamp used to be kept only in the finance manager's office.
What you do in Mstnd:
- Add a stamp named «Finance department stamp» of type «Administrative stamp».
- In the description, write: «For approving progress claims and payment orders».
- Upload the stamp image with a transparent background, and save.
- Add a «Stamp» step to the workflow template for approving progress claims.
Result: Progress claims are stamped directly in the system as part of the approval path, without printing or moving around.
Scenario: A government entity reorganizes its departments
Situation: A government entity merged two departments, and the stamp of one of them is no longer approved, but the entity wants to keep its record.
What you do in Mstnd:
- Open «Stamps».
- Turn off the «Active» switch for the stamp of the dissolved department.
- Add the new department's stamp with its name and description.
Result: The old stamp no longer appears to staff when they stamp documents, and the new stamp is the approved one.
Scenario: A private school stamps certificates and attestation letters
Situation: Student affairs at a school issues attestation letters and certificates that need the school's official stamp.
What you do in Mstnd:
- Add an «Official school stamp» of type «Official stamp».
- Add a «Student affairs stamp» for internal attestation letters.
- In each stamp's description, state the type of documents it is used for.
Result: The employee picks the right stamp for each document without confusion.
Scenario: A trading company stamps its contracts with customers
Situation: A trading company sends contracts to external customers, and needs the company stamp on each contract before sending it.
What you do in Mstnd:
- Make sure the company stamp is added and active in «Stamps».
- The responsible employee stamps the contract from the document page.
- They share the contract with the customer through external sharing.
Result: An electronically stamped contract reaches the customer straight away.
How it relates to other features
- Stamping: the actual use of the stamps added here. The employee clicks «Stamp» on the document page, picks from the organization's approved stamps, then places the stamp and applies it.
- Nafath, the Saudi national single sign-on: sets whether stamping requires identity verification through Nafath, in internal documents and in external sharing.
- Signing: signatures and stamps work together to approve documents. A signature is personal to each user, while a stamp is institutional and managed by the organization.
- Building a workflow template: «Stamp» can be the action type of a workflow step, so the document is stamped automatically as part of the approval path.
- New task: «Stamp» is one of the action types available when you create a task and assign it to an employee.
- External sharing: you can give the external party permission to stamp the document shared with them.
Tips and best practices
- Give each approving entity its own stamp with a clear name, instead of one general stamp for everyone.
- Write a description that states the type of documents each stamp is used for.
- Use a high-resolution PNG image with a transparent background.
- Deactivate a stamp instead of deleting it when the pause is temporary.
- Review the «Available stamps» list periodically, and deactivate the stamps that are no longer approved.
- Link the stamp to workflow steps so that it becomes part of the official approval path.
- Turn on Nafath verification for stamping sensitive documents from the Nafath page.
Warnings and common mistakes
FAQ
How do I add the company stamp to Mstnd?
Open «Settings», then «Stamps», and click «Add stamp». Enter the name, type and description, upload the stamp image, then click «Save changes».
What is the best format for the stamp image?
A PNG file with a transparent background is preferred, so that the stamp appears on the document without a background covering what is beneath it.
How do I deactivate a stamp without deleting it?
Turn off the «Active» switch on the stamp's card. The stamp stays in the list, and you can activate it again later.
Who can use the stamps after they are added?
Once saved, a stamp becomes available to staff when they stamp documents with the «Stamp» button on the document page.
Can identity verification be required before stamping?
Yes. When a stamp is applied, the system verifies the identity of the person stamping through Nafath so that the stamp is authenticated, and you choose the actions that require it on the «Nafath, the Saudi national single sign-on» page.
What is the difference between a stamp and a signature in Mstnd?
A signature is personal: each user saves it in their own profile. A stamp is institutional: the system administrator adds it in the settings, and staff use it.
Can the organization have more than one stamp?
Yes. «Available stamps» shows all the stamps that have been added, and you can add a stamp for each department or purpose.
Summary
- The «Stamps» page is your organization's library of approved official stamps.
- Each stamp has a required name, a type, a description and an image, preferably with a transparent background.
- The «Active» switch lets you deactivate a stamp temporarily without deleting it.
- A saved stamp is available to staff immediately when they stamp documents.
- Stamps work together with workflows, tasks and external sharing, and with verification through Nafath.
Try it free: Create your organization's account in Mstnd
Was this article helpful?
Related articles
 0:25
Electronic stamp in Mstnd: stamp your documents with your organization's stamps
Learn electronic stamps in Mstnd: choose an approved organization stamp, place it on the page at the right size and apply it, authenticated via Nafath.
 0:57
Nafath in Mstnd: sign-in and signing with a verified identity
Set up Nafath in Mstnd: sign-in verification, tracking the Nafath request balance, registering member ID numbers and choosing which actions require Nafath.
 0:52
Electronic signature in Mstnd: sign your documents without printing
Learn electronic signature in Mstnd: draw, type or upload your signature, place it on the page, save it as a new version and verify your identity via Nafath.
 1:18
Building a workflow template in Mstnd: design your own approval path
Learn to build a workflow template in Mstnd: name, visibility, step operations, deadlines, instructions, routing and assignment, rejection paths and publishing.
 0:49
External sharing: send a document to an external party securely
Learn external sharing in Mstnd: send a document to an external party by private link via email or WhatsApp, with password, expiry date, permissions and Nafath.
 1:03
Creating a new task in Mstnd: assign the work and follow its progress
Learn to create a new task in Mstnd: title, description, dates, priority, operation type, files, routing, assignment and links, then create or save as a draft.