

Electronic signature in Mstnd: sign your documents without printing
In this article
Electronic signature in Mstnd lets you sign any document directly from its page, without printing or scanning. You create your signature once from your profile, by drawing it, typing it or using an image, then place it in the right spot on the page and save the signed document as a new version, while the system verifies your identity through Nafath so that the signature is authenticated. This feature serves managers, approvers and anyone who signs contracts, letters and minutes.
Quick overview
| Item | Details |
|---|---|
| Module | Document page |
| Where it is in the interface | Creating the signature: profile → «Digital signatures». Signing the document: document page → action bar → «Sign» |
| Direct link | https://app.mstnd.sa/file/<document ID> |
| Goal | Sign documents electronically with a saved signature, with identity verification through Nafath |
| Who it is for | Managers and approvers, contracts and procurement officers, human resources, and anyone who signs official documents |
| Video length | About 52 seconds |
| What you will learn | Creating a signature in three ways, setting the default signature, placing the signature on the page, choosing between a new version and replacement, and verifying through Nafath |
Watch the video
In under a minute, the video shows the full signing journey: from creating a new signature in «Digital signatures» to placing it on a marketing campaign plan and applying it with Nafath verification.
Why this feature?
A paper signature goes through many steps: printing the document, signing it, scanning it, then uploading it again. If the signer is out of the office, everything is delayed. And with multiple paper and scanned copies, it is hard to know which copy is actually the signed one.
Electronic signature in Mstnd shortens this journey to minutes. Your signature is saved in your profile, the document is already in the system, and the signature is saved as a new version without losing the previous one. Nafath verification links the signature to the identity of its owner.
| Before electronic signature | With electronic signature in Mstnd |
|---|---|
| Print, then sign, then scan, then upload | Sign directly from the document page |
| The signature is delayed if the signer is out of the office | The signer signs from anywhere they can sign in to Mstnd |
| It is hard to tell the signed copy from the unsigned one | The signed copy is saved as a new, separate version |
| A scanned image of a signature that can be copied easily | A signature authenticated by identity verification through Nafath |
Value for the organization: a faster signing cycle, a clear record of signed copies, and verification of the signer's identity.
Value for the individual: a ready signature in your profile that you use in a few clicks, with no paper or scanner.
Where to find it
Signing has two parts, and each has its own place:
First: creating and managing the signature
- Open your profile menu.
- Choose «Digital signatures».
- Your saved signatures appear, along with the «Add signature» button.
Second: signing a document
- Open the document you need to sign.
- In the action bar at the top of the page, click «Sign».
- The «Sign document» window opens.
Direct link to the document: https://app.mstnd.sa/file/<document ID>
Concepts and terms
| Term | Meaning in Mstnd |
|---|---|
| «Digital signatures» | A page in your profile that shows your saved signatures and lets you add new ones |
| Signature name | A name that sets the signature apart from the others, such as «Main», «Initials» or «Arabic» |
| Signature type | How the signature is created: «Draw», «Type» or «Upload image» |
| Default signature | The signature you set as your main one; it carries the «Default» tag when you choose a signature |
| «Create new version» | An option that saves the signed document as a new version while keeping the original; it is the recommended option |
| Replace the current document | The alternative option, which applies the signature to the current document itself |
| Nafath verification | Verifying the signer's identity through Nafath, the Saudi national single sign-on, before the signature is confirmed |
Step by step
Step 1: Open «Digital signatures» from your profile
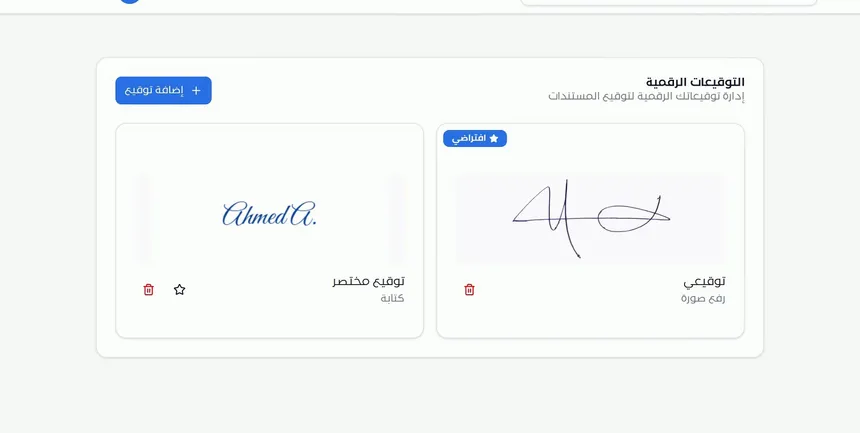
From your profile, choose «Digital signatures». Here you find all your saved signatures, and the «Add signature» button for creating a new one.
You can save more than one signature. For example: a full signature for contracts, and a short signature with your initials for signing pages or internal minutes.
Step 2: Add a signature by drawing, typing or uploading an image
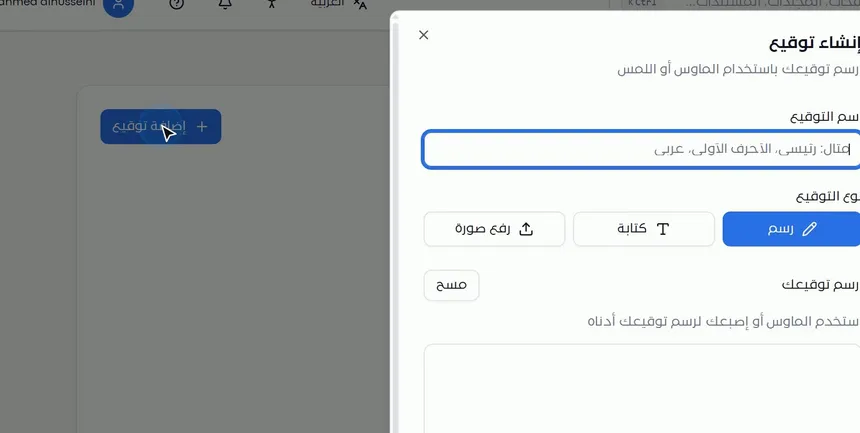
Click «Add signature» and the «Create signature» window opens. First type the signature name, then choose the signature type:
| Type | How it works | When to choose it |
|---|---|---|
| «Draw» | You draw your signature with the mouse or with your finger on a touch screen, and you can erase it and draw it again with the «Clear» button | When you want a signature close to your handwritten one |
| «Type» | You type your name as text, and it is shown in a font style that looks like handwriting | When you want a clear, neat signature quickly |
| «Upload image» | You upload an image of your signature | When you have a ready, clear image of your signature |
Step 3: Choose the font style and color, review the preview, then «Save»
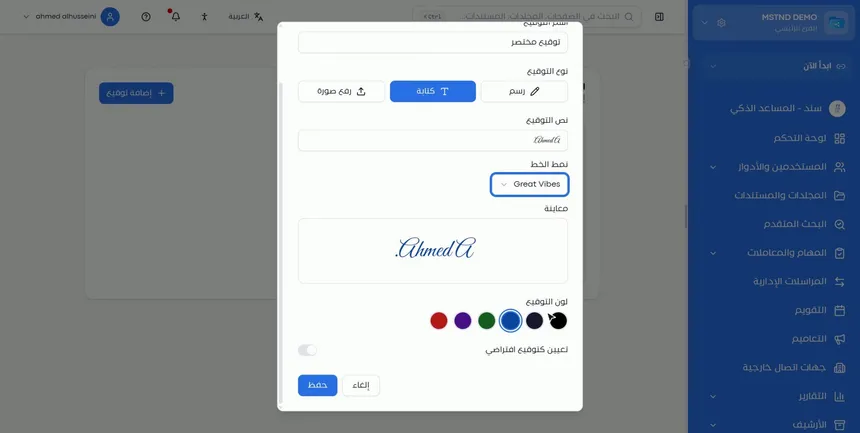
If you chose «Type», enter the «Signature text», then choose a «Font style» from the list. The signature appears instantly in the «Preview» box. Then choose a «Signature color» from the available colors.
At the bottom of the window is the «Set as default signature» option. Review the preview carefully, then click «Save».
Step 4: The signature is ready, and you can make it the default
The new signature appears in the list of your saved signatures and is now ready to use. You can also set it as your default signature.
The default signature is the one that carries the «Default» tag in the signing window, so you can spot it quickly among your signatures. Make the signature you use most often your default.
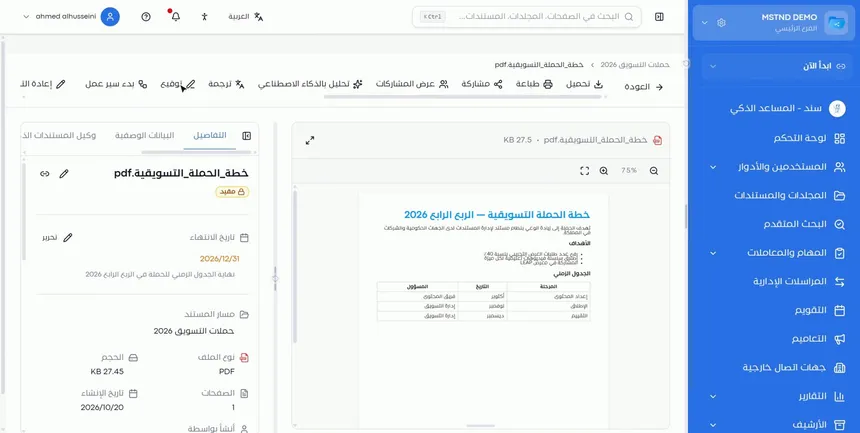
Step 5: Click «Sign» on the document page
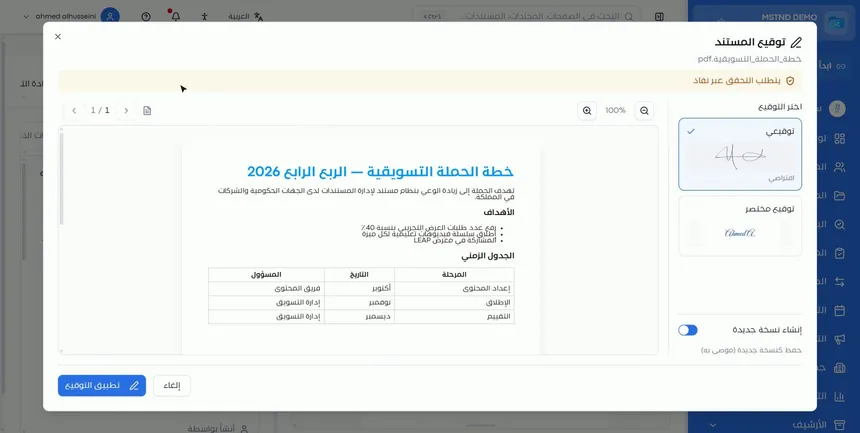
Open the document you want to sign, then click «Sign» in the action bar at the top of the page. The «Sign document» window opens, with the notice «Requires Nafath verification» at the top.
Before signing, read the whole document in the viewer. A signature is an acknowledgment of the content, so it is best to make sure you are signing the correct version.
Step 6: Choose the signature and place it on the page
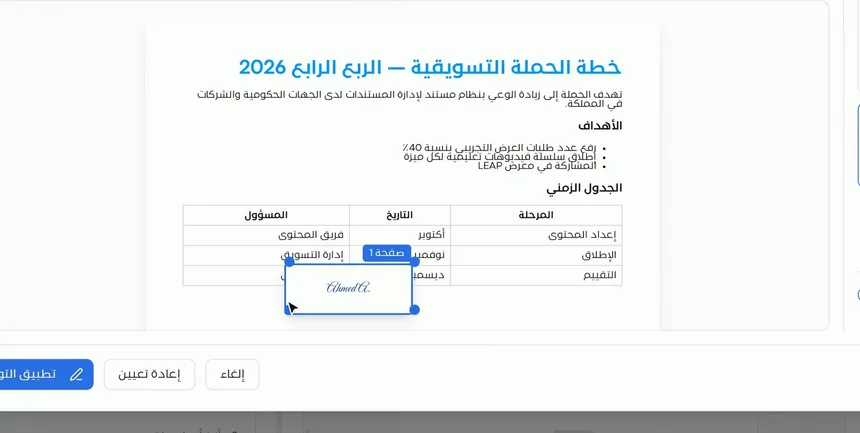
In the window's side panel, under «Choose signature», select one of your saved signatures. Then click the spot you want on the document page, and the signature appears inside a frame that shows the page number.
Drag the frame to the appropriate spot, such as the signature box or the bottom of the page. You can move between pages and zoom in and out from the top of the viewer. If you want to start over, click «Reset».
Step 7: Choose between saving it as a new version or replacing the current document
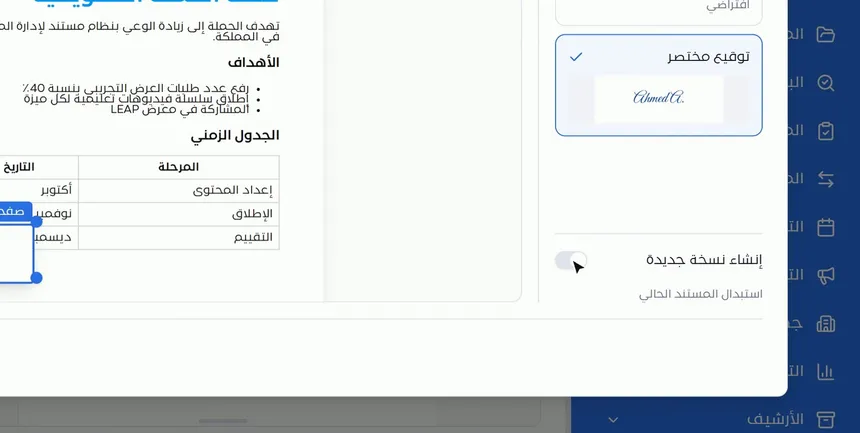
Below the list of signatures is the «Create new version» option. When you turn it on, the signed document is saved as a new version, which is the recommended option. When you leave it off, the current document is replaced.
| Option | Result | When to choose it |
|---|---|---|
| «Create new version» (recommended) | A new signed version is saved, and the unsigned version stays available in the versions list | In most cases, especially for contracts and official documents |
| Replace the current document | The signature is applied to the current document itself | When you do not need to keep an unsigned copy |
Step 8: Click «Apply signature» and complete Nafath verification
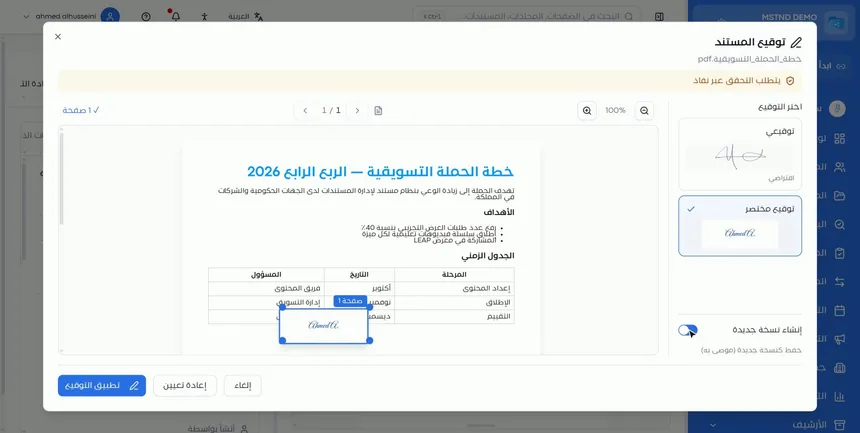
After you choose the signature, place it and decide how to save, click «Apply signature». The system verifies your identity through Nafath, so that the signature is authenticated and linked to your identity.
Once verification is complete, the signature is applied, and the signed document appears according to the option you chose: a new version or the current document itself.
Options and their effect
| Option or setting | What it does | When to use it |
|---|---|---|
| «Add signature» | Opens the «Create signature» window | When creating your first signature or adding another one |
| Signature name | Sets the signature apart among your signatures | Always, especially when you have more than one signature |
| «Draw» | You draw the signature with the mouse or by touch | For a signature close to your handwritten one |
| «Type» | You type your name and choose a font style for it | For a neat, quick signature |
| «Upload image» | Uses a ready-made signature image | When you have a clear image of your signature |
| «Font style» and «Signature color» | Set the look and the color of the typed signature | When you choose «Type» |
| «Set as default signature» | Makes the signature your main one and gives it the «Default» tag | For the signature you use most |
| «Choose signature» | Sets the signature used on this document | In every signing |
| «Reset» | Clears the signature's position so you can start over | If you placed the signature in the wrong spot |
| «Create new version» | Saves the signed document as a new version | The recommended option in most cases |
| «Apply signature» | Starts Nafath verification, then applies the signature | After reviewing the position and the options |
| «Cancel» | Closes the window without signing | If you need to review the document first |
Practical scenarios
Scenario: A general manager in a trading company signs an approved plan
Situation: The marketing campaign plan has reached the general manager after being approved by the departments concerned, and it needs the general manager's signature.
What you do in Mstnd:
- Open the plan and read it in the viewer.
- Click «Sign» and choose your default signature.
- Place the signature in the approval box.
- Turn on «Create new version», then click «Apply signature» and complete Nafath verification.
Result: A signed and authenticated copy, with the previous version kept in the version history.
Scenario: A contracts officer in a contracting company signs a subcontractor agreement
Situation: A contract with a subcontractor needs the signature of the company's representative on the last page, and initials on every page.
What you do in Mstnd:
- Create two signatures in «Digital signatures»: a full signature, and a short signature with your initials.
- Open the contract and click «Sign».
- Place the short signature on the pages and the full signature on the last page, moving between pages from the top of the viewer.
- Save as a new version and apply the signature.
Result: A fully signed contract without printing, and a clear copy that can be shared with the subcontractor.
Scenario: The HR department of a hospital signs appointment letters
Situation: A number of appointment letters for new medical staff need the HR manager's signature.
What you do in Mstnd:
- Open each letter from the appointment letters folder.
- Sign with the default signature in the same position on each letter.
- Share the signed letter with the new employee.
Result: The signatures are done in a short time, and every signed letter is saved in its place.
Scenario: A school principal signs the minutes of a school council meeting
Situation: The minutes of the school council meeting are ready and need the principal's signature before they are archived.
What you do in Mstnd:
- Open the minutes and click «Sign».
- Place the signature at the bottom of the minutes.
- Apply the signature, then archive the minutes.
Result: Signed and authenticated minutes, ready for archiving without paper.
How it relates to other features
- Stamp: many official documents need a signature and a stamp together, and stamping works the same way from the action bar.
- Nafath, the Saudi national single sign-on: this is where the system administrator registers members' ID numbers and sets which actions require verification, signing among them.
- Versions and operations log: the signed copy appears as a new version, and the operations log records the signing.
- Starting a workflow on the document: a workflow can include a step whose operation type is «Signature», which reaches the assignee.
- External sharing: if the signer is from an external party, they can be given permission to sign through external sharing.
- Carrying out a task: signing tasks are carried out by opening the operation's file from inside the task and signing it.
Tips and best practices
- Create your signature once in «Digital signatures» before you need it, so signing is not delayed.
- Give your signatures clear names such as «Main» and «Initials», so you pick the right one quickly.
- Set the signature you use most as your default.
- Choose «Create new version» in most cases, so the unsigned version stays available in the versions list.
- Read the whole document before signing, and make sure it is the final version.
- Zoom in when choosing the signature's position, to place it precisely inside its box.
- Make sure in advance that your ID number is registered in the Nafath settings, so signing does not stop at verification.
Warnings and common mistakes
FAQ
How do I create an electronic signature in Mstnd?
From your profile, open «Digital signatures», click «Add signature», type its name and choose how to create it: draw, type or upload an image, then click «Save».
How do I sign a document electronically?
Open the document, click «Sign» in the action bar, choose your signature and place it on the page, then click «Apply signature» and complete Nafath verification.
Can I save more than one signature?
Yes. You can add more than one signature in «Digital signatures», such as a full signature and an initials signature, and set one of them as the default.
What is the difference between «Create new version» and replacing the current document?
«Create new version» saves the signed document as a new version and keeps the original in the versions list; it is the recommended option. Replacing applies the signature to the current document itself.
Why does Mstnd ask for Nafath verification when signing?
So that the signature is authenticated and linked to its owner's identity: the system verifies your identity through Nafath before applying the signature.
Can I draw my signature on a phone or tablet screen?
Yes. The «Draw» option lets you draw the signature with the mouse or with your finger on a touch screen.
How do I change the signature's position after placing it?
Drag the signature frame to the new spot before applying it, or click «Reset» to choose its position from the beginning.
Can an external party sign a document from Mstnd?
Yes. Through external sharing, the external party can be given permission to sign, with Nafath verification available.
Summary
- You create your signature once from «Digital signatures» by drawing, typing or uploading an image.
- Setting a default signature makes it easy to choose in every signing.
- You place the signature on the page by clicking and then dragging, with «Reset» available.
- «Create new version» is the recommended option for keeping the previous version.
- «Apply signature» goes through Nafath verification so that the signature is authenticated with your identity.
Try it free: Create your organization's account in Mstnd
Was this article helpful?
Related articles
 0:25
Electronic stamp in Mstnd: stamp your documents with your organization's stamps
Learn electronic stamps in Mstnd: choose an approved organization stamp, place it on the page at the right size and apply it, authenticated via Nafath.
 0:57
Nafath in Mstnd: sign-in and signing with a verified identity
Set up Nafath in Mstnd: sign-in verification, tracking the Nafath request balance, registering member ID numbers and choosing which actions require Nafath.
 0:38
Versions and the operations log in Mstnd: a complete history for every document
Mstnd versions and the operations log: save edits as a new version and keep the old one, view, download or translate any copy, and track who did what and when.
 1:14
Starting a workflow on a document in Mstnd: launch the approval from the document
Learn to start a workflow from a Mstnd document: pick a template, set priority and due date, assign steps and launch the transaction with the document attached.
 0:49
External sharing: send a document to an external party securely
Learn external sharing in Mstnd: send a document to an external party by private link via email or WhatsApp, with password, expiry date, permissions and Nafath.
 0:57
Carrying out a task in Mstnd: from «Start» to «Complete task»
Learn the Mstnd task page: view its data and routing, start work, preview the operation file, approve or reject it with a note, then complete and log the task.