

Email identity in Mstnd: send system notifications in your organization's name
In this article
«Email identity» in Mstnd is a setting that makes the emails the system sends, such as sharing, task, circular and correspondence notifications, arrive in your organization's name and from its email address, in the system colors and logo set in appearance and branding. In it you set the sender identity and the reply-to email, connect your mail server through the SMTP settings, verify the connection with a test email, and then choose which types of notifications are sent by email. It helps system administrators and IT staff in any organization that wants its automated messages to be official and trustworthy.
Quick overview
| Item | Details |
|---|---|
| Module | Settings |
| Where it is in the interface | Settings → «Email identity» |
| Direct link | https://app.mstnd.sa/settings/email |
| Goal | Send the system's email notifications in the organization's name and from its email address, and control their types |
| Who it is for | System administrators, the IT department and corporate communication officers |
| Video length | About 43 seconds |
| What you will learn | Setting the sender identity, entering the SMTP settings, turning on the secure connection, saving and verifying, sending a test email, and controlling email notifications |
Watch the video
The video walks through the «Email identity» page from top to bottom: the sender identity, the SMTP settings, verification and testing, then the list of email notifications.
Why this feature?
Mstnd sends many emails on your organization's behalf: a notification that a document was shared, a task assignment, a circular reminder, a notification of new correspondence. If these messages arrive from a generic address the recipient does not know, the recipient may ignore them or be suspicious of them, especially external parties. Mail systems may also classify them as spam.
When messages are sent from your organization's email and in its name, recipients know their source immediately, and their replies reach the right address. At the same time, you control which types of messages are sent, so employees are not flooded with emails they do not need.
| Before | After |
|---|---|
| Notifications from an unfamiliar generic address | Notifications in the organization's name and from its email |
| Recipients' replies go to an address that nobody monitors | The «Reply-to email» directs replies to the address you specify |
| Messages that do not reflect the organization's identity | Email templates in the system colors and logo |
| Every notification is sent by email without distinction | Each notification type is turned on or off separately |
The value for the organization is a unified, official presence in every message. The value for the recipient is messages from a source they trust, which they know how to reply to.
Where to find it
- Open Settings.
- Choose «Email identity».
Direct link: https://app.mstnd.sa/settings/email
Concepts and terms
| Term | Meaning in Mstnd |
|---|---|
| Sender identity | The name and email address under which the system's messages appear to the recipient |
| Reply-to email | The address that receives recipients' replies when they reply to a system message |
| SMTP | The protocol for sending email; it requires the details of your organization's mail server |
| Server and port | The address of the mail server and the port number the system connects through |
| Secure connection (SSL/TLS) | Encryption of the connection between Mstnd and the mail server |
| Save and verify | Saving the settings and testing whether the system can connect to the server |
| Test email | A trial message you send to an address you choose, to confirm that sending works |
| Email notifications | The list of system message types, with an on/off switch for each type |
Step by step
Step 1: Get to know the «Email identity» page
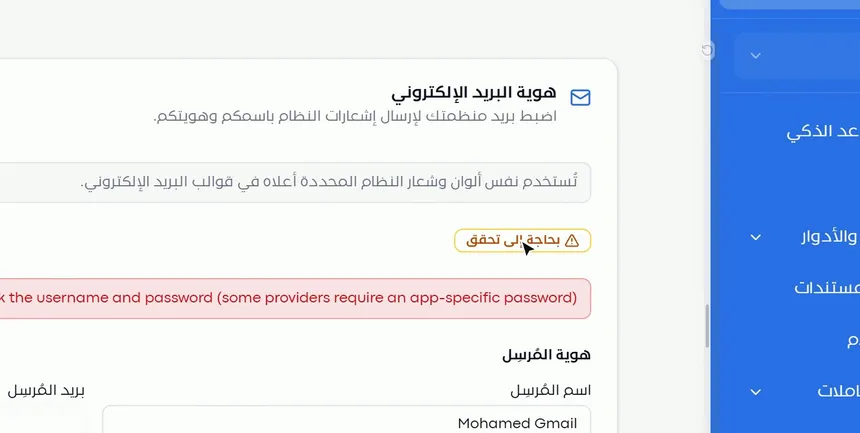
At the top of the page is the title «Email identity», and under it a description: set up your organization's email to send system notifications in your name and with your identity. A note explains that the email templates use the same system colors and logo set in the appearance and branding settings.
A badge also shows the status of the setup, such as «Needs verification» when the connection has not been verified yet. If verification fails, an error message explains the reason.
Step 2: Set the «Sender identity»
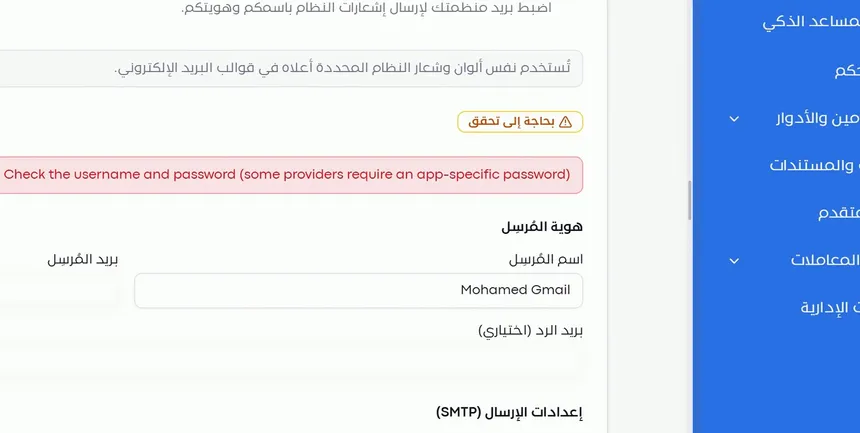
The «Sender identity» section has three fields:
- Sender name: the name the recipient sees in their inbox. Use the organization's name or the approved name of its internal system.
- Sender email: the address the messages are sent from.
- Reply-to email: the address that receives replies.
Why separate the reply-to email from the sender email? Because the automated sending address may not be monitored. When you set a reply-to email that a real team follows, such as the support or administrative communications mailbox, no reply gets lost.
Step 3: Enter the «SMTP settings»
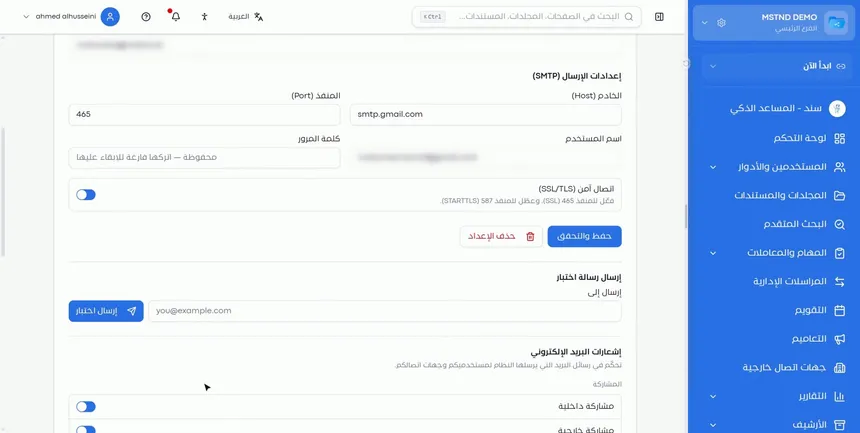
In «SMTP settings», enter the details of your organization's mail server:
| Field | What to enter |
|---|---|
| Server | The address of the outgoing mail server at your email provider |
| Port | The port number your provider specifies |
| Username | The email account used for sending |
| Password | That account's password |
Get these details from the IT department or from your email provider. If a verification error appears, check the sign-in credentials first.
Step 4: Turn on the secure connection, then save and test
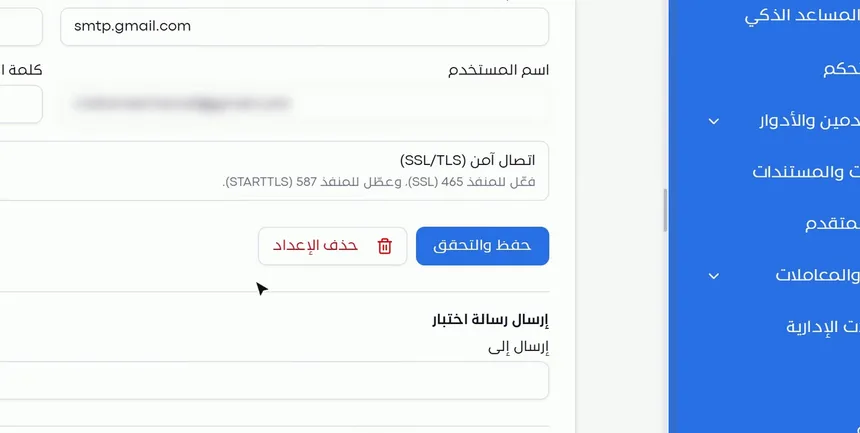
Turn on «Secure connection (SSL/TLS)» according to the port. The interface states the rule: turn it on for port 465 (SSL), and turn it off for port 587 (STARTTLS).
Then click «Save and verify». The system saves the settings and checks that it can connect to the server. Once verification succeeds, go to «Send a test email», type an address in «Send to», and send a trial message to confirm that it arrives and to see how it looks.
If you want to undo the setup entirely, there is a «Delete setup» button.
Step 5: Control «Email notifications»
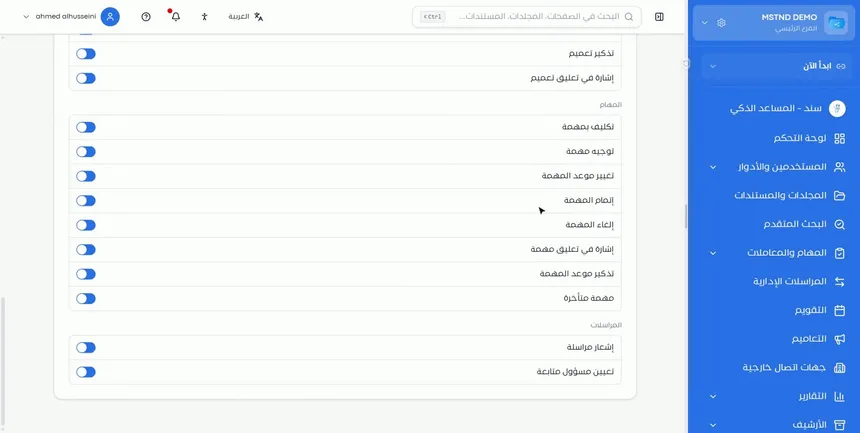
At the bottom of the page is the «Email notifications» section, which lists the system's message types grouped by module, with an on/off switch for each type. Examples shown on the page:
| Group | Example notifications |
|---|---|
| Circulars | Circular reminder, mention in a circular comment |
| Tasks | Task assignment, task routing, task due date change, task completion, task cancellation, mention in a task comment, task due date reminder, overdue task |
| Correspondence | Correspondence notification, follow-up officer assignment |
The list also includes other types, such as sharing and document notifications.
The rule here is balance. Turn on what requires the recipient to act, such as a task assignment or an overdue task, and consider turning off what an in-system notification can cover on its own, so that emails keep their weight with employees.
Options and their effect
| Option or setting | What it does | When to use it |
|---|---|---|
| Sender name | Sets the name shown in the system's messages | Always, with the organization's official name |
| Sender email | Sets the sending address | An official address on the organization's domain |
| Reply-to email | Directs replies to a specific address | When the sending address is not monitored |
| Server and port | Connect the system to the mail server | According to your email provider's details |
| Username and password | Authenticate the connection to the server | The email account dedicated to sending |
| Secure connection (SSL/TLS) | Encrypts the connection | Turn it on for port 465 and off for port 587 |
| «Save and verify» | Saves the setup and verifies the connection | After entering or editing the details |
| «Delete setup» | Removes the email setup | When changing provider or undoing the setup |
| «Send a test email» | Sends a trial message | After every save and verification |
| Email notification switches | Turn each message type on or off | To tune the volume and importance of messages |
Practical scenarios
Scenario: A government entity unifies the identity of its messages
Situation: The entity wants all system notifications to reach employees and other entities from its official email.
What you do in Mstnd:
- Set up Appearance and branding with the entity's logo and colors.
- In «Sender identity», enter the entity's name and official email, and a reply-to email that the communications department monitors.
- Enter the SMTP settings from the IT department, and turn on the secure connection according to the port.
- Click «Save and verify», then send a test email.
Result: Every message from the system carries the entity's name and logo, and replies reach a team that follows them.
Scenario: A contracting company communicates with external suppliers
Situation: The company shares documents with suppliers, and some of them ignore the notifications because they come from an unfamiliar address.
What you do in Mstnd:
- Set the sender identity to the company's name and email.
- Send a test email to an external address to confirm delivery.
- Make sure that sharing and document notifications are turned on.
Result: Suppliers recognize the source of the messages immediately, so they respond to shares faster.
Scenario: A hospital eases the email load on its staff
Situation: The medical staff complain about the large number of emails from the system.
What you do in Mstnd:
- Review the «Email notifications» list.
- Keep the notifications that require action, such as task assignment, overdue task and correspondence notification.
- Turn off the email for the less important notifications.
Result: Fewer, more important messages, so the essential ones do not get lost among the rest.
Scenario: A trading company changes its email provider
Situation: The company moved to a new email provider, and the system's messages stopped arriving.
What you do in Mstnd:
- Open «Email identity» and check the setup status and the error message, if there is one.
- Update the server, port and sign-in details according to the new provider.
- Set the secure connection according to the port, then click «Save and verify» and send a test email.
Result: Sending is back within minutes, and you confirm that it works before informing employees.
How it relates to other features
- Appearance and branding: the email templates use the colors and logo set there.
- Organization: the organization's basic details, which the sender identity should match.
- New correspondence: the option to send by «Email» depends on the email setup, and the correspondence notification is one of the email notification types.
- Circulars: the circular reminder and mentions in circular comments are among the notification types you control here.
- Tasks: assignment, routing, reminder and overdue notifications are the task notifications on this page.
- Internal sharing and public link: sharing notifications are sent with the identity you set here.
Tips and best practices
- In «Sender email», use an official address on the organization's domain, not a personal email.
- Set «Reply-to email» to an address that a real team follows, so that no replies get lost.
- Dedicate an email account to automated sending instead of using an employee's account, so that sending does not stop if the employee's details change.
- Match the secure connection setting to the port: 465 with it on, and 587 with it off.
- Send a test email after every change; do not settle for a successful verification.
- Review the email notifications list regularly, and turn off what users do not need.
- Set up appearance and branding first, so that the emails look consistent with the organization's identity.
Warnings and common mistakes
FAQ
What is «Email identity» in Mstnd?
It is a setting that makes the emails the system sends arrive in your organization's name and from its email address, in the system colors and logo, while you control which types of messages are sent.
How do I make Mstnd notifications come from my organization's email?
Open Settings, then «Email identity». Enter the sender identity and the SMTP settings, turn on the secure connection according to the port, then click «Save and verify» and send a test email.
What is the difference between the sender email and the reply-to email?
The sender email is the address the messages go out from, while the reply-to email is the address that receives recipients' replies.
When do I turn on the SSL/TLS secure connection?
According to the interface: turn it on when you use port 465 (SSL), and turn it off when you use port 587 (STARTTLS).
Why does a verification error appear even though the details are correct?
Check that the port matches the secure connection setting, and that your email provider does not require an app-specific password instead of the regular password.
How do I confirm that the email setup works?
After «Save and verify», use «Send a test email» to send a message to an address you choose, then check that it arrived.
Can I turn off only some of the emails?
Yes. In «Email notifications» you turn each message type on or off separately, such as the task due date reminder or the correspondence notification.
Do the emails follow my organization's colors and logo?
Yes. The email templates use the same system colors and logo set in the appearance and branding settings.
Summary
- «Email identity» makes the system's messages arrive in your organization's name and from its email.
- The sender identity sets the name and email address shown, and the reply-to email sets where replies arrive.
- The SMTP settings and the secure connection link the system to your organization's mail server.
- «Save and verify», then «Send a test email», make sure that sending actually works.
- «Email notifications» give you control over each message type separately.
Try it free: Create your organization's account in Mstnd
Was this article helpful?
Related articles
 0:29
Appearance and branding in Mstnd: the system in your organization's colors and logo
Learn the Mstnd appearance and branding settings: primary and secondary colors via code or suggestions, live preview, automatic text contrast and logo upload.
 0:21
Organization settings in Mstnd: your organization's official data in one place
Learn Mstnd organization settings: name, type, commercial registration and tax number, how to edit and save them, and why the unique identifier is display-only.
 1:34
Creating new correspondence in Mstnd: from writing to stamping and sending
Create outgoing or incoming mail in Mstnd: recipient, follow-up owners, priority, confidentiality, reply date, attachments, digital sticker, send or register.
 0:32
Circulars in Mstnd: get your decisions to everyone and track their response
Learn the Circulars page in Mstnd: every sent and received circular with its action type, status, priority and category, plus filters, search and new circulars.
 0:56
The Tasks page in Mstnd: your tasks and your team's in one place
Mstnd's Tasks page lists your and your team's tasks with system number, operation, status, priority, assignees and due date, plus scopes, filters and a report.
 0:57
Sharing a document internally and by public link in Mstnd
Learn document sharing in Mstnd: internally to people, units or positions with view, edit or delete permission, or by public link with password and expiry date.