

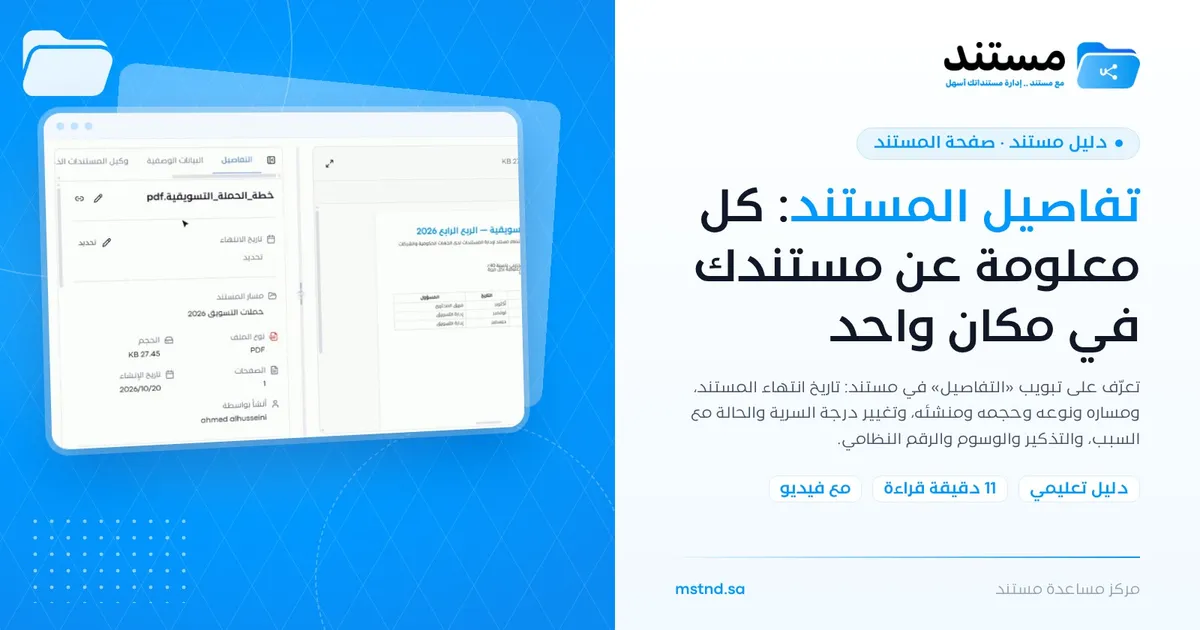
Document details: everything about your document in one place
In this article
The «Details» tab on the document page gathers all of the document's information in one place. From it you set the document's expiry date with a comment, see its path, type, size, number of pages, and who created it and when, and change the confidentiality level and the status while stating the reason. You also find the reminder, categories, tags and system number there, with the option to copy the document's link or edit its name from the top of the tab.
Quick overview
| Item | Details |
|---|---|
| Module | Document page |
| Where it is in the interface | The side panel of the document page → the «Details» tab (the first tab) |
| Direct link | https://app.mstnd.sa/file/<document ID> |
| Goal | Show the document's complete identity and manage its basic properties without leaving the page |
| Who it is for | Everyone who views or manages documents, especially document officers, reviewers and approvers |
| Video length | Less than a minute |
| What you will learn | Setting the expiry date, reading the file information, changing the confidentiality level and the status, finding the reminder, tags and system number, and copying the link and editing the name |
Watch the video
In less than a minute, the video shows the sections of the «Details» tab from top to bottom, including setting an expiry date and changing the status and the confidentiality level.
Why this feature?
When you open a document you often need quick answers: Is this version still in effect? Where is this file kept? Who created it? Is it a draft or approved? Is it confidential? When does it expire? In traditional systems this information is spread between the file properties, the folder name and the employees' memory, and some of it is never recorded at all.
The «Details» tab answers all of these questions in one place, next to the document. It does not just display them: it lets you edit the important properties, such as the status, the confidentiality level and the expiry date, with the reason documented.
| Before | With the «Details» tab |
|---|---|
| You do not know whether the document is a draft or approved | The status is visible, and changing it requires stating a reason |
| The expiry date of a contract or license is only inside the document's text | A set expiry date with a comment that explains what it means |
| The document's confidentiality is known only to whoever created it | The confidentiality level is visible as a badge next to the document name |
| You search the folders for the file's location | «Document path» shows its folder directly |
| You refer to the document by its name, and it gets confused with others | The «System number» identifies it uniquely |
| You send the file itself to your colleague | You copy the document's link and send it |
Where to find it
- Side menu → «Folders and documents».
- Open the document you need.
- In the side panel next to the document viewer, choose the «Details» tab. It usually appears already open when you open the document.
Direct link: https://app.mstnd.sa/file/<document ID>
Next to it you find other tabs, including «Metadata» and «Smart document agent». You can collapse the side panel from its icon to widen the area where the document is displayed.
Concepts and terms
| Term | Meaning in Mstnd |
|---|---|
| Expiry date | The date on which the document stops being in effect, such as the end of a contract or a campaign; a comment is added with it |
| Document path | The folder that holds the document |
| Confidentiality level | How sensitive the document is; it appears as a badge next to the name, such as «Public» or «Restricted» |
| Status | The document's stage in its life cycle, such as «Draft» or «Pending approval» |
| Reason for the status change | Text that is required when you change the status, to document the decision |
| System number | A unique number the system assigns to the document, which you can copy |
| Created by | The user who created or uploaded the document |
Step by step
Step 1: Open the «Details» tab
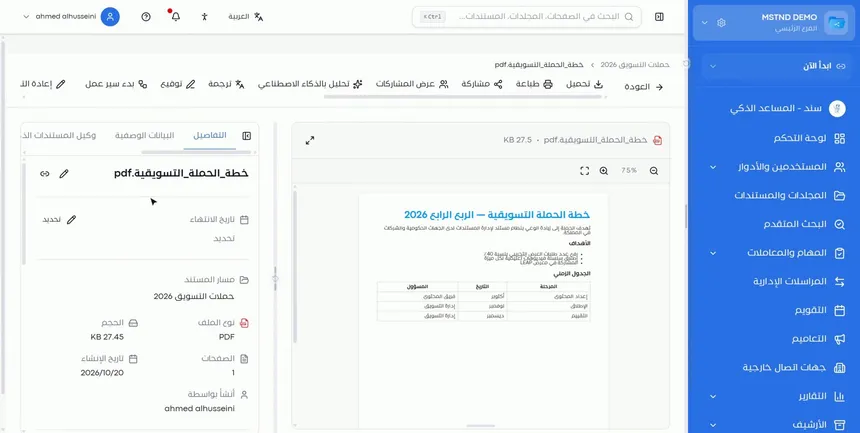
On the document page, the screen is split into the document viewer and a side panel. The first tab in the panel is «Details»: the document name appears at the top, followed by the information sections below it in order.
The advantage of this design is that you see the document and its information together. For example, you can read the contract's end date in the text, then set it as the expiry date in the panel without moving between screens.
Step 2: Set the document's expiry date with a comment
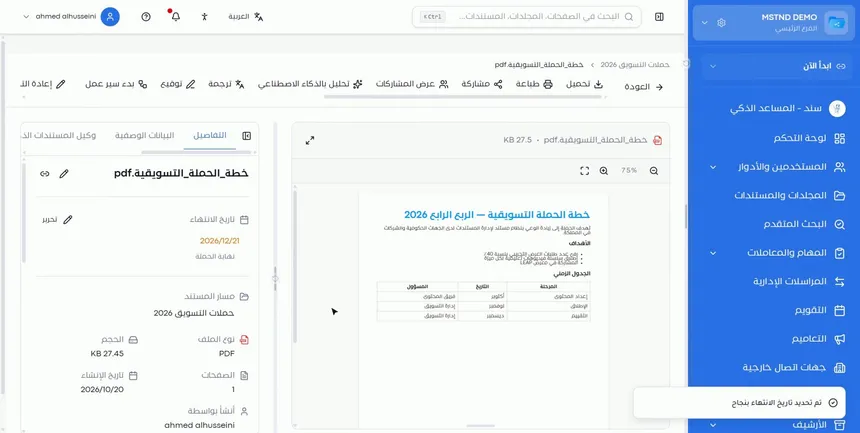
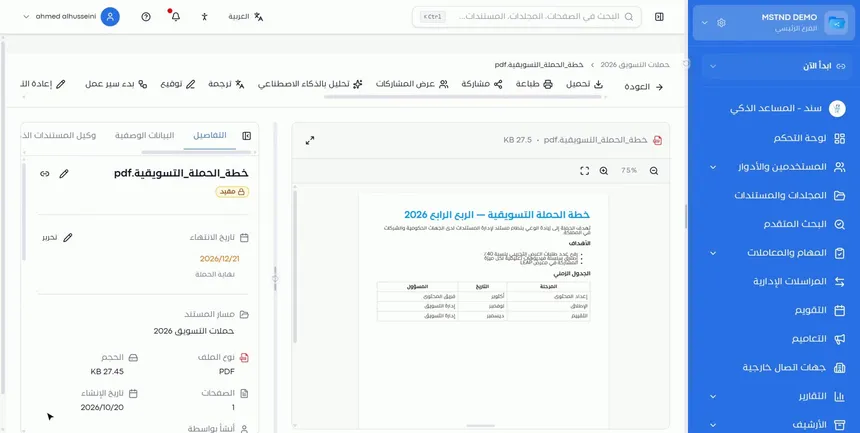
In the «Expiry date» section click «Set», then choose the date and write a comment that explains what it means, such as «End of the campaign» or «End of the contract». After saving, a notification confirms that the expiry date was set successfully, the date and the comment appear in the section, and the button becomes «Edit» so you can change them later.
The comment is not a minor detail. The date alone does not tell whoever reads it what exactly ends on that day: is it the end of the contract, the last date for renewal, or the end of a phase?
Step 3: Review the basic file information
Under the expiry date you find the file information:
| Field | What it shows | Why it helps |
|---|---|---|
| Document path | The folder that holds it | Knowing where it is without searching |
| File type | Such as PDF | Knowing how to handle it |
| Size | The file size | Estimating how fast it downloads or sends |
| Pages | The number of pages | Estimating the amount of content before reading it |
| Created by | The user who created it | Knowing whom to ask about the document |
| Creation date | The date the document was created | Knowing how recent it is |
These fields are for display, and the system updates them automatically. If you move the document to another folder, «Document path» changes accordingly.
Step 4: Change the confidentiality level and the status, stating the reason
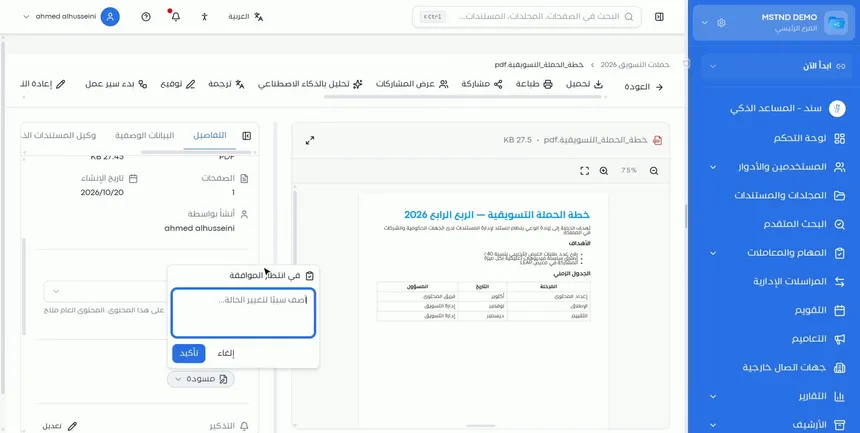
In the next section you find «Confidentiality level» and «Status», and you can change each of them in place:
- Confidentiality level: choose the suitable level from the list, such as «Public» or «Restricted». After the change, the level appears as a badge next to the document name at the top of the tab.
- Status: choose the new status, such as moving from «Draft» to «Pending approval». The field «Add a reason for the status change» appears; write the reason, then click «Confirm».
Requiring a reason when the status changes means every transition in the document's life cycle is documented and understandable to whoever reviews it later.
Step 5: Review the reminder, categories, tags and system number
At the bottom of the tab you find:
- «Reminder»: if there is one, with its date and note, and an «Edit» button.
- «Categories»: with an «Edit categories» button.
- «Tags»: with an «Edit tags» button.
- «System number»: a unique number the system assigns, with a button to copy it.
The system number is useful in correspondence and meetings. Instead of describing the document by its name, and names can be similar, you refer to it by its number.
Step 6: Copy the document's link or edit its name
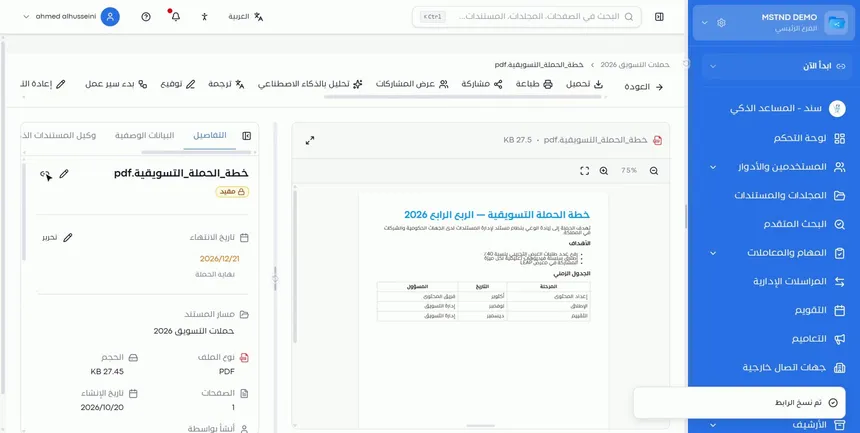
At the top of the tab, next to the document name, there are two icons:
- The link icon: copies the document's link, so you can send it to a colleague who has access and they can open the document directly.
- The pencil icon: edits the document's name right where it is.
Options and their effect
| Option or setting | What it does | When to use it |
|---|---|---|
| «Set» the expiry date | Adds an expiry date and a comment | For documents that have a validity period |
| «Edit» the expiry date | Edits the date or the comment | When extending or renewing |
| Changing the confidentiality level | Sets how sensitive the document is | When creating it or when the nature of the content changes |
| Changing the status | Moves the document to a new stage | When it moves from draft to pending approval and beyond |
| «Add a reason for the status change», then «Confirm» | Documents the reason for the status change | With every status change |
| «Cancel» in the status window | Undoes the change | If you chose a status by mistake |
| «Edit» the reminder | Edits the existing reminder | When the date changes |
| «Edit categories» / «Edit tags» | Edits the categories and tags | To improve organization |
| Copying the system number | Copies the unique number | To refer to the document in correspondence |
| The link icon | Copies the document's link | To send it to a colleague who has access |
| The pencil icon | Edits the document's name | To correct the name quickly |
Practical scenarios
Scenario: The procurement department of a government entity follows its contracts
Situation: Dozens of supply contracts, each with a different expiry date, and no contract should expire without a decision to renew or end it.
What you do in Mstnd:
- Open each contract, and in «Expiry date» click «Set».
- Enter the contract's end date, and write a comment such as «Supply contract ends; a renewal decision is needed».
- Set the confidentiality level to suit the nature of the contract.
Result: Clear expiry dates for all the contracts, which appear in the calendar and on the Dashboard before they arrive.
Scenario: A law firm moves a memo from draft to review
Situation: A lawyer has finished drafting a defense memo, and it needs the partner's review before it is submitted.
What you do in Mstnd:
- Open the memo, and change «Status» from «Draft» to «Pending approval».
- Write in the reason: «Drafting complete and ready for the partner's review».
- Raise the confidentiality level to «Restricted».
- Copy the system number and send it to the partner in your message.
Result: The memo's status is clear to the team, the reason for the transition is documented, and the memo is referred to by a number that cannot be confused.
Scenario: A hospital verifies the source of a document
Situation: A quality employee found a protocol in a folder where it was not expected, and needs to know who uploaded it and when.
What you do in Mstnd:
- Open the document and review «Created by» and «Creation date».
- Review «Document path» to find out the folder.
- Contact the creator to confirm that the protocol is valid.
Result: A quick check of the document's source without opening logs or asking several people.
Scenario: A trading company extends a price quote
Situation: A price quote for a client has expired, and management decided to extend it by two weeks.
What you do in Mstnd:
- Open the quote, and click «Edit» in the expiry date section.
- Change the date, and edit the comment to «Quote validity extended by management decision».
Result: The expiry date reflects reality, and the comment explains the reason for the change.
How it relates to other features
- Document viewer: appears next to the «Details» tab, so you read the document and review its information together.
- Reminders, tags and categories: added from the action bar, they appear at the bottom of the «Details» tab.
- Moving, archiving and renaming: moving changes the «Document path», and renaming is also available from the pencil icon at the top of the tab.
- Metadata: the neighboring tab, which adds structured fields specific to the document type.
- Document numbering: sets the format of the numbers given to files automatically when they are uploaded.
- Calendar: shows expiring documents among your dates.
- Smart document agent: suggests a status and an expiry date based on the document's content, and you apply them with one click.
Tips and best practices
- Set the expiry date as soon as you upload any document that has a validity period; do not postpone it.
- Write the expiry-date comment so that it explains what ends, rather than repeating the date.
- Write the reason for a status change clearly: it is the reference for whoever reviews the document's life cycle later.
- Review the confidentiality level with every substantial change in the document's content.
- Use the system number in correspondence and meetings instead of file names.
- Use «Created by» to know whom to ask about the document before editing it.
- Collapse the side panel during long reading, and open it when you need the information.
Warnings and common mistakes
FAQ
What does the «Details» tab on the document page show?
It shows the expiry date, the document path, type, size, number of pages, who created it and when, the confidentiality level, the status, the reminder, the categories, the tags and the system number.
How do I set an expiry date for a document?
In the «Details» tab, click «Set» in the expiry date section, choose the date, write a comment and save. To edit it later, click «Edit».
How do I change the document's status?
In the «Status» section of the «Details» tab, choose the new status, then write the reason for the change in the field that appears and click «Confirm».
Why does the system ask for a reason when the status changes?
To document every transition in the document's life cycle, so whoever reviews it later knows why the document moved from one stage to another.
How do I change a document's confidentiality level?
In the «Confidentiality level» section of the «Details» tab, choose the suitable level, and the level appears as a badge next to the document name.
What is the document's system number?
A unique number the system assigns to every document. It appears at the bottom of the «Details» tab with a button to copy it, and it helps you refer to the document without confusion.
How do I copy the document's link for my colleague?
Click the link icon next to the document name at the top of the «Details» tab. Make sure that your colleague has access to the document.
Summary
- The «Details» tab gathers the document's complete identity next to its viewer.
- The expiry date with its comment explains when the document stops being in effect and why.
- The file information (path, type, size, pages, creator and date) is updated by the system automatically.
- The confidentiality level and the status are changed from the same place, and the status requires stating a reason.
- The reminder, categories, tags and system number are at the bottom of the tab, and the link and the name are at the top.
Try it free: Create your organization's account in Mstnd
Was this article helpful?
Related articles
 0:51
The document viewer in Mstnd: view any document without downloading it
Learn the Mstnd document viewer: view a file in the system without downloading it, zoom or go full screen, and use the actions bar and side panel in one place.
 0:47
Reminders, tags and categories: organize your document and never miss a date
Learn how to set a document reminder in Mstnd with a date, time and advance alert, and add tags and categories from the action bar to ease search and filtering.
 0:42
Moving, archiving and renaming: organize your documents in seconds
Learn to rename a document in Mstnd, move it between folders and archive it without deleting it from the file's three-dot menu, and restore it from the Archive.
 1:02
Metadata: structured fields for every document, powered by AI
Learn the «Metadata» tab in Mstnd: create a field template with AI or link an existing one, auto-extract the values with a confidence level, then confirm them.
 0:55
Document numbering in Mstnd: consistent automatic numbering for every folder
Set up automatic document numbering in Mstnd for each folder: prefix, suffix, year, month, separator, counter digits and starting number, with a live preview.
 0:44
The Mstnd Calendar: your full schedule and your team's in one place
Learn the Mstnd Calendar: tasks, circulars, reminders, document expiry, correspondence and invitations in Hijri and Gregorian, with five views and a day panel.