


Metadata templates in Mstnd: design the fields you need
In this article
«Metadata templates» in Mstnd are field templates that you design once and link to folders, so that they collect structured data about every document, such as the date, the amount, the entity and the type. You can make a field required, or turn on AI auto-fill for it with a hint that guides the extraction, and you can reuse ready-made fields from the «Field library». The result is documents you can search, filter and report on by their values, not only by their names.
Quick overview
| Item | Details |
|---|---|
| Module | Settings |
| Where it is in the interface | Side menu → «Settings» → «Data templates», which has two tabs: «Templates» and «Field library» |
| Direct link | https://app.mstnd.sa/settings/metadata |
| Goal | Standardize the data collected about documents across the organization, and make it easier to extract and to search by |
| Who it is for | Organization settings administrators, and managers of departments that handle recurring document types such as contracts, invoices and posts |
| Video length | Less than a minute |
| What you will learn | Reading the template cards, creating a new template, defining fields and their types, required fields, auto-fill, the AI hint and the field library |
Watch the video
In less than a minute, the video shows how to create a «Marketing post» template from scratch: naming it, adding a «Publish date» field, turning on AI auto-fill, then browsing the «Field library».
Why this feature?
A single document carries important information inside its text: the contract date, the invoice amount, the supplier's name and the license expiry date. When this information stays only inside the text, it is hard to ask "which contracts expire this quarter?" or "what are this particular supplier's invoices?" without opening the files one by one.
Metadata templates solve this problem. You define the fields that matter to you for each type of document, and AI takes care of extracting their values from the document itself. These values then become structured data that you can search, filter and build reports on.
| Before metadata templates | After metadata templates |
|---|---|
| Important information is buried inside the document text | Clear, structured fields for every document |
| Each department records data its own way | A unified template applies the same fields to all the documents in the folder |
| Values are entered manually from the document | AI auto-fill, with a hint that guides the extraction |
| The same field is redefined in every template | The «Field library» lets you reuse ready-made fields |
| Search by name or keyword only | Search by the extracted values, for example a given field that «Contains» a specific value |
Value for the organization: unified data that can be measured and relied on for decisions. Value for the individual: less time spent on data entry, and more accurate search results.
Where to find it
- From the side menu, open «Settings».
- Choose «Data templates».
- The «Metadata templates» page appears with two tabs: «Templates» and «Field library».
Direct link: https://app.mstnd.sa/settings/metadata
Concepts and terms
| Term | Meaning in Mstnd |
|---|---|
| Metadata | Structured information about the document, such as the publish date or the entity's name, saved in fields alongside it |
| Metadata template | A reusable set of fields that you link to folders to collect structured data about documents |
| Field | A single item in the template with a name and a type, such as «Publish date» of type «Date» |
| Field type | The form of value the field accepts: text, number, date, list and others |
| Required | An option that makes filling in the field mandatory |
| AI auto-fill | An option that has AI extract the field's value from the document |
| AI hint | A sentence that tells AI where to find the value in the document and how to recognize it |
| Field library | The list of all the fields defined in the organization, ready to be reused in other templates |
Step by step
Step 1: Understand the role of «Metadata templates»
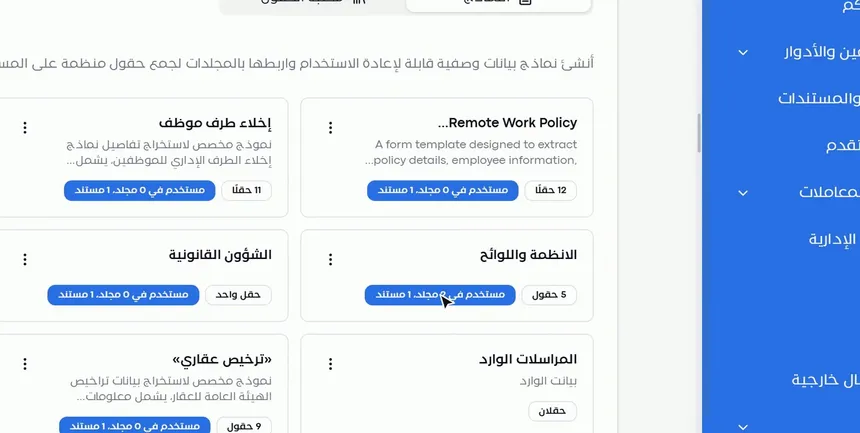
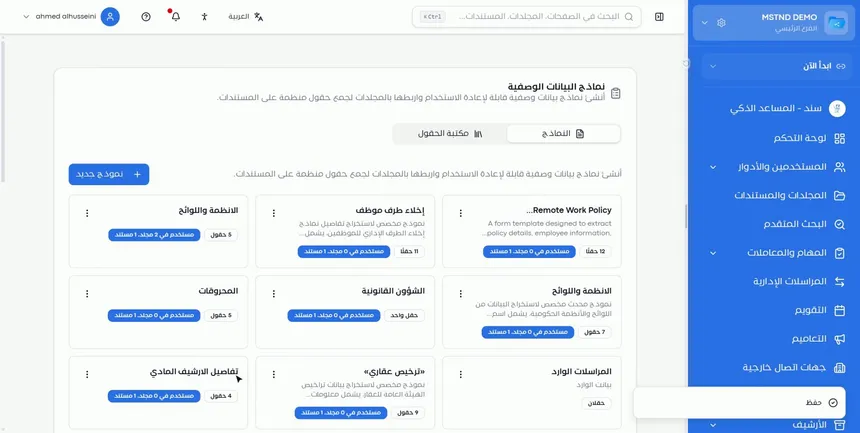
The page shows the templates that exist in your organization. Its description in the interface reads: Create reusable metadata templates and link them to folders to collect structured fields on documents.
The key idea is that a template is not designed for a single document but for a type of document. A «Supply contract» template serves all supply contracts, and an «Invoice» template serves all invoices. When you link it to a folder, its fields become the data required for every document in that folder.
Step 2: Read each template's card and start from «New template»
Each template card shows:
- The template's name and description.
- The number of its fields, such as «4 fields».
- How widely it is used, such as «Used in 0 folders, 1 document».
These numbers help you see which templates are actually active. A template used in many folders is central to the organization's work, and any change to it touches many documents. An unused template may be an old trial or a template waiting to be linked.
To create a new template, click «New template».
Step 3: Name the template and add the fields
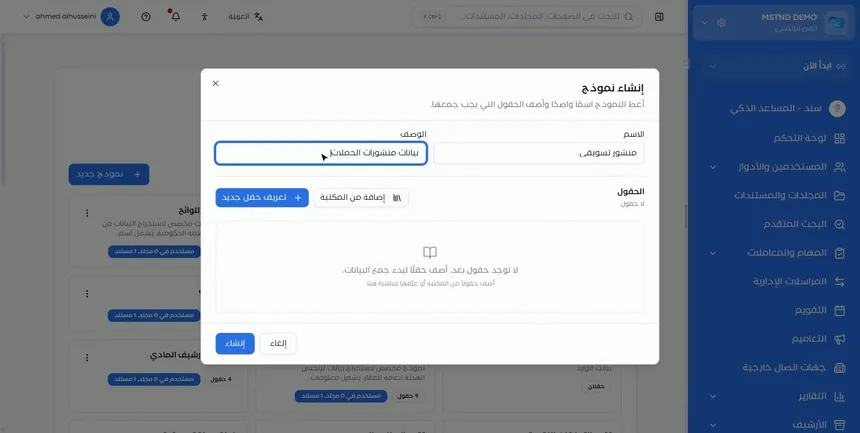
The «Create template» window opens and asks you to give the template a clear name and to add the fields that must be collected:
- «Name»: such as «Marketing post».
- «Description»: such as «Campaign post data». The description tells your colleagues when this template should be used.
- «Fields»: add them in one of two ways:
- «Add from library»: to pick a field that was defined earlier.
- «Define new field»: to create a new field and choose its type: text, number, date, list and others.
Choosing the right type matters. A date is saved as a date that can be sorted and compared, a number can be added up, and a list enforces set values, which prevents the same value from being written in different ways.
Step 4: Set each field's properties
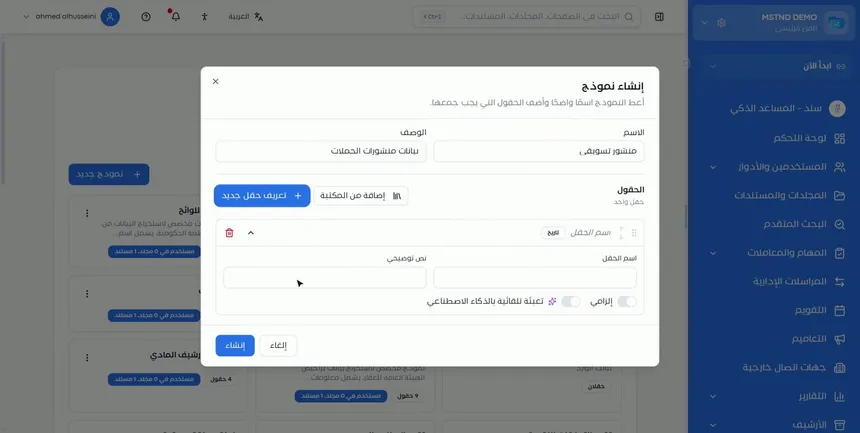
Each field has the following properties:
- «Field name»: such as «Publish date».
- «Help text»: a sentence that explains what the field means to whoever fills it in, such as «When the post is published».
- «Required»: turn it on if the document is incomplete without this value.
- «AI auto-fill»: turn it on so that AI extracts the value from the document.
The field's header shows its type, such as «Date», with tools to reorder the field, collapse it or delete it.
Step 5: Write an AI hint, then click «Create»
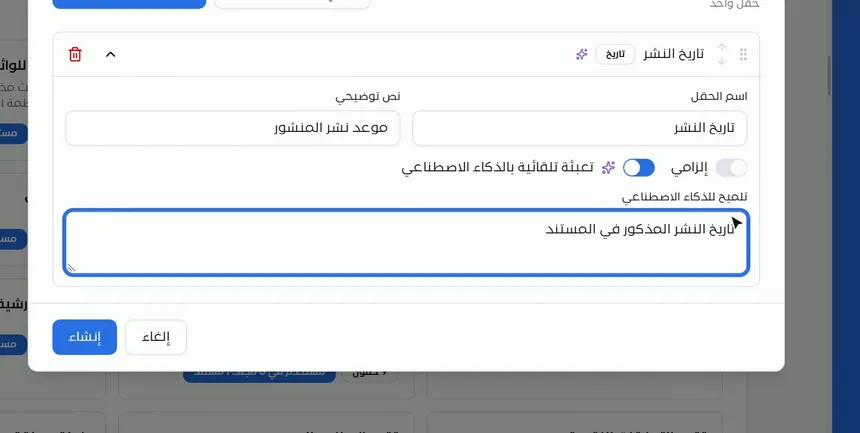
When you turn on auto-fill, an «AI hint» box appears. Write a sentence in it that helps AI extract the right value, such as «The publish date stated in the document».
A good hint shortens the way for AI when the document contains more than one value of the same type. A document may include a writing date, an approval date and a publish date, and the hint specifies which one is meant.
After adding all the fields, click «Create».
Step 6: Check the template and explore the «Field library»
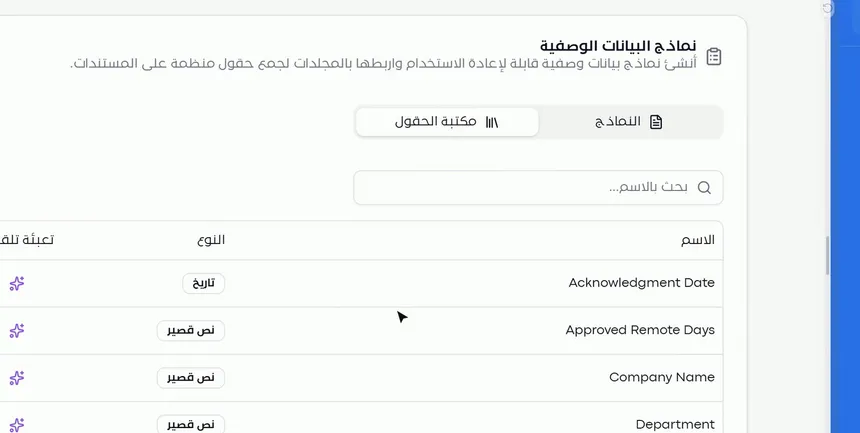
After creation, the template appears under «Templates». In the «Field library» tab you find all the fields defined in your organization, in a table that shows:
- «Name».
- «Type», such as «Date» or «Short text».
- Whether the field is enabled for auto-fill.
You can also search by name. The library is what keeps templates consistent: instead of defining an «Entity name» field from scratch in every template, you add it from the library, and it carries the same name and type everywhere.
Options and their effect
| Option or setting | What it does | When to use it |
|---|---|---|
| «New template» | Opens the template creation window | When a type of document needs its own fields |
| «Name» and «Description» | Introduce the template to users | Always, with a name that reflects the document type |
| «Add from library» | Adds a field that was defined earlier | When a suitable field exists in the «Field library» |
| «Define new field» | Creates a new field with a type you choose | When no suitable field exists in the library |
| Field type (text, number, date, list…) | Sets the form of value the field accepts | According to the nature of the information |
| «Help text» | Explains what the field means | When the field name could mean more than one thing |
| «Required» | Makes filling in the field mandatory | For information without which the document is incomplete |
| «AI auto-fill» | Extracts the value from the document | For values written explicitly inside the document |
| «AI hint» | Guides the extraction to the right value | When the document contains several similar values |
| «Field library» | Shows the ready-made fields for reuse | To review the existing fields before creating new ones |
Practical scenarios
Scenario: A contracting company organizes supplier contracts
Situation: The procurement department of a contracting company keeps dozens of supply contracts and needs to know each contract's value, supplier and expiry date quickly.
What you do in Mstnd:
- Create a template named «Supply contract».
- Add the fields «Supplier name» (text), «Contract value» (number) and «Expiry date» (date).
- Turn on auto-fill for each field, and write a hint such as «The total contract value in riyals».
- Link the template to the contracts folder.
Result: Every new contract has its data extracted automatically, and you can search for a specific supplier's contracts by the extracted value.
Scenario: A marketing department documents its posts
Situation: The marketing team publishes content every week and wants to know each post's publish date and the campaign it belongs to.
What you do in Mstnd:
- Create a «Marketing post» template with the description «Campaign post data».
- Add a «Publish date» field of type date, with the hint «The publish date stated in the document».
- Add a «Campaign» field of type list, with the campaign names.
- Click «Create» and link the template to the posts folder.
Result: An archive of posts organized by campaign and publish date.
Scenario: A hospital classifies incoming reports
Situation: The records section of a hospital receives reports from different entities and needs to record the sending entity, the report type and the report date.
What you do in Mstnd:
- From the «Field library», add a ready-made field for the entity name, if one exists.
- Define a «Report type» field as a list, and a «Report date» field as a required date.
- Turn on auto-fill to extract the date and the entity.
Result: Unified data for all reports, without repeated manual entry.
Scenario: A government entity tracks its laws and regulations
Situation: The legal affairs department keeps regulations and regulatory circulars, and wants to search them by issuing authority and decision number.
What you do in Mstnd:
- Create a template with the fields «Issuing authority», «Decision number» and «Effective date».
- Make «Decision number» required.
- For each field, write a precise hint that states where it usually appears in the document.
Result: A library of regulations you can search by decision number or by authority, directly from «Search by extracted values».
How it relates to other features
- Metadata: this is where templates are applied to a specific document. From the «Metadata» tab you link an existing template or create one with AI, then review the extracted values and their confidence score and confirm them.
- Smart search agent: the «Search by extracted values» tab uses your templates directly; you choose the template, the field and an operator such as «Contains», then type the value.
- Folder content: the folder's side panel has a «Template» tab that shows the template linked to the folder.
- Smart document agent: it analyzes the document and extracts the text and the entities, which are the basis that auto-fill relies on.
- Folders: templates are linked to folders, so designing the folder tree around document types makes it easier to link each type to its template.
- Report page: structured data makes reports more accurate, and the metadata guide notes that it helps you in search and in reports.
Tips and best practices
- Design a template for each recurring type of document, not for each individual document.
- Start with a few essential fields, and add others when there is a real need for them.
- Search the «Field library» before using «Define new field», to avoid duplicate fields under different names.
- Choose the right type: date for dates, number for amounts and list for limited values.
- Write a clear hint for every field that has auto-fill turned on, stating where the value appears or what format it takes.
- Make a field required only if its absence really leaves the document incomplete.
- Use «Help text» to remove confusion between similar fields, such as «Issue date» and «Effective date».
- Before editing a template, review the number of folders and documents that use it, so you know how far the change will reach.
Warnings and common mistakes
FAQ
What are metadata templates in Mstnd?
They are reusable field templates that you link to folders to collect structured data about each document, such as dates, amounts and entities.
How do I create a new metadata template?
Open «Settings», then «Data templates», and click «New template». Enter the name and description, add fields from the library or with «Define new field», then click «Create».
What field types are available?
The available types include text, number, date, list and others. The «Field library» shows types such as «Short text» and «Date».
How does AI extract field values automatically?
Turn on «AI auto-fill» for the field, and write an «AI hint» that explains the value you need. When the template is applied to a document, the smart agent extracts the values for you to review.
What is the «Field library» for?
It shows all the fields defined in the organization with their names and types, so you can reuse them in new templates instead of defining them again.
Can a field be required and auto-filled at the same time?
Yes. The two options are independent, and you can turn both on for the same field.
What is the difference between creating a template from settings and creating it from a document?
In settings you design the template and its fields manually. From the «Metadata» tab of a document, you can click «Create template with AI» so that it analyzes the document and suggests fields, which you then edit and save.
How do I know whether a template is in use before editing it?
Each template card shows the number of folders and documents that use it, such as «Used in 0 folders, 1 document».
Summary
- Metadata templates turn information buried in document text into structured fields.
- Each template is built from fields of set types, and is linked to folders so that it applies to their documents.
- «Required», «AI auto-fill» and «AI hint» control how each value is collected.
- The «Field library» ensures that fields are reused and that data stays consistent across templates.
- Structured data helps you in search by extracted values and in reports.
Try it free: Create your organization's account in Mstnd
Was this article helpful?
Related articles
 1:02
Metadata: structured fields for every document, powered by AI
Learn the «Metadata» tab in Mstnd: create a field template with AI or link an existing one, auto-extract the values with a confidence level, then confirm them.
 0:54
The smart search agent in Mstnd: describe what you want and find it
Learn the Mstnd smart search agent: describe a document in your words to find it by meaning, with a match percentage and reason, or search AI-extracted values.
 1:05
Folder content in Mstnd: find your file and manage it in seconds
The Mstnd folder content screen explained: file cards and status changes, multi-select and bulk actions, the folder side panel, and AI chat about the files.
 0:59
The Mstnd smart document agent: understand your document before you read it
Mstnd's smart document agent analyzes each file: text, summary and entities, plus suggested status, categories, tags, tasks and access with a confidence score.
 1:26
Folders in Mstnd: organize your organization's documents from day one
Learn the Mstnd Folders page: Personal space, structure folders, Shared with me, new folders with a confidentiality level, color and icon, views and actions.
 0:56
The report page in Mstnd: filter, export and schedule your report
Learn the Mstnd report page: indicators and charts, filters, the data table, export to Excel, CSV and PDF, scheduling, and saving as a document in the system.