

Auto-archiving and retention: the document lifecycle in Mstnd
In this article
«Auto-archiving» in Mstnd is a feature that lets the system manage the lifecycle of your documents and folders on its own, following a retention policy that your organization sets. You set a default policy for the whole organization with three consecutive stages: archiving, then moving to the trash, then permanent destruction, with advance alerts for owners and supervisors. You can also add specific rules for particular folders, place legal holds that exclude items from every stage, and require a supervisor's approval before any deletion.
Quick overview
| Item | Details |
|---|---|
| Module | Settings |
| Where it is in the interface | Side menu → «Settings» → «Auto-archiving», which has the tabs «Default policy», «Folder rules», «Legal holds» and «Pending approval» |
| Direct link | https://app.mstnd.sa/settings/auto-archive |
| Goal | Apply a unified retention policy that moves documents between the stages of their lifecycle automatically, with safeguards that prevent unintended deletion |
| Who it is for | The system administrator, the records and archive officer, the legal department and compliance officers |
| Video length | About a minute and a half |
| What you will learn | Setting the default policy and its stages, advance alerts, creating a folder rule, placing a legal hold and reviewing pending deletion requests |
Watch the video
In about a minute and a half, the video shows the four tabs in order and applies a practical example: a rule for the marketing campaigns folder that archives its documents automatically after 730 days, that is, two years.
Why this feature?
Every organization builds up documents whose daily use has ended, but that it must keep for a certain period and then dispose of in a controlled way. When this cycle is managed by hand, three problems appear: the active workspace gets crowded with old files, documents that have passed their retention period stay without a decision, and sometimes something is deleted that should have been kept because it was needed in a dispute or a review.
Auto-archiving turns the retention schedule from a document on paper into rules that the system carries out. You set the stages and periods once, and the system counts the days, alerts people before each stage, waits for approval before deletion and excludes anything under a legal hold.
| Manual management | Auto-archiving |
|---|---|
| Old files crowd the active folders | They move to the archive automatically after the set period |
| Nobody knows when a document is due for disposal | The system counts the days from the date you choose |
| Sudden deletion without the document owners knowing | Advance alerts to owners and supervisors before each stage |
| A document needed for a case or a review gets deleted | A legal hold excludes it from every stage |
| The deletion decision rests only with whoever has the permission | «Require approval before deletion» makes deletion wait for a supervisor's approval |
Value for the organization: disciplined compliance with retention policies, a clean workspace and protection for documents that are legally required. Value for the individual: employees do not need to remember to archive their old files, and they receive an alert before any stage that affects their documents.
Where to find it
- From the side menu, open «Settings».
- Choose «Auto-archiving».
- The «Auto-archiving settings for documents and folders» page opens with the description «Turn on automatic retention so the system keeps your documents and folders organized throughout their lifecycle».
- Move between the tabs: «Default policy», «Folder rules», «Legal holds» and «Pending approval».
Direct link: https://app.mstnd.sa/settings/auto-archive
Concepts and terms
| Term | Meaning in Mstnd |
|---|---|
| Document lifecycle | The stages a document goes through after its active use ends: archiving, then trash, then permanent destruction |
| Default policy | The rule applied at the organization level wherever no folder rule is set |
| Count days from | The date from which the system starts counting the days of each stage, such as «Last modified date» |
| Auto-archiving (the stage) | Moving items to the archive to keep the active workspace organized |
| Move to trash | Moving archived items to the trash, where they can still be restored |
| Permanent destruction | The permanent destruction of items according to your retention schedule |
| Folder rule | A policy specific to a particular folder, which takes priority over the default policy |
| Legal hold | A hold on a folder or document under which it is preserved and excluded from all retention stages until the hold is released |
Step by step
Step 1: Open the «Auto-archiving» page
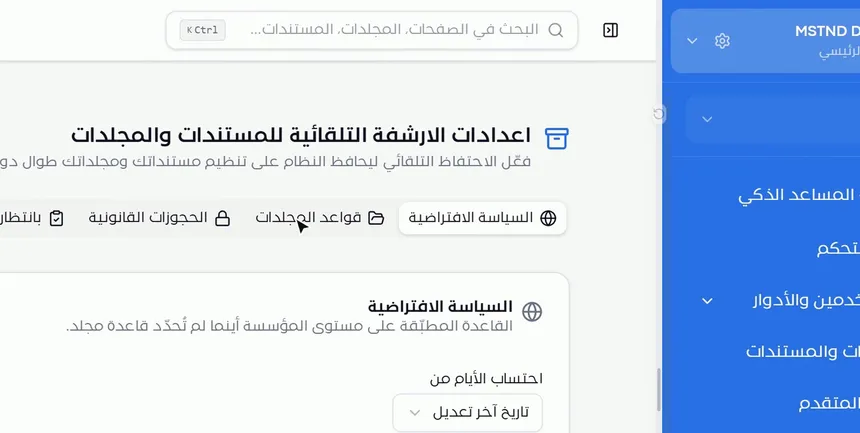
From this page you let the system manage the lifecycle of your documents and folders on its own. At the top are four tabs that represent four parts of the policy: the general rule, the exceptions for each folder, the legal protections and the pending requests. Always start with the default policy, because it is the foundation the other parts are built on.
Step 2: Set the date the days are counted from
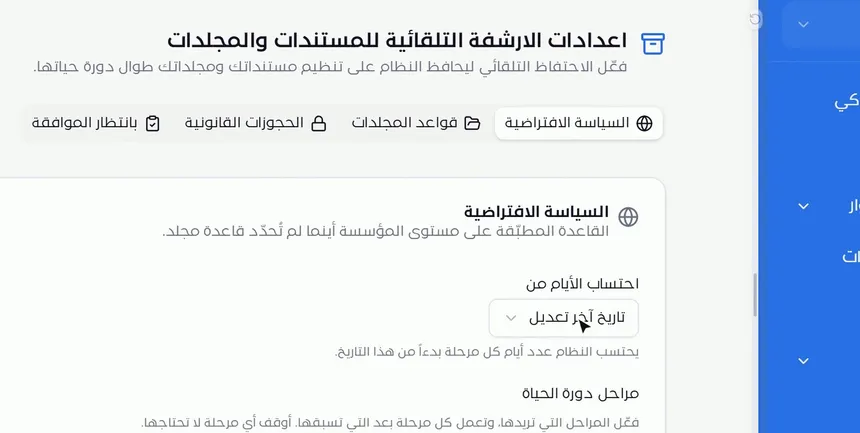
In the «Default policy» tab you find its description: «The rule applied at the organization level wherever no folder rule is set». Its first setting is «Count days from», the date from which the system counts the number of days for each stage, such as «Last modified date».
Choosing this date is an important decision. Counting from the last modified date means that a document that is still being edited will not enter the archive, because the counter starts again with every edit. This fits the logic of "archive what nobody is working on anymore".
Step 3: Turn on the lifecycle stages and set their days
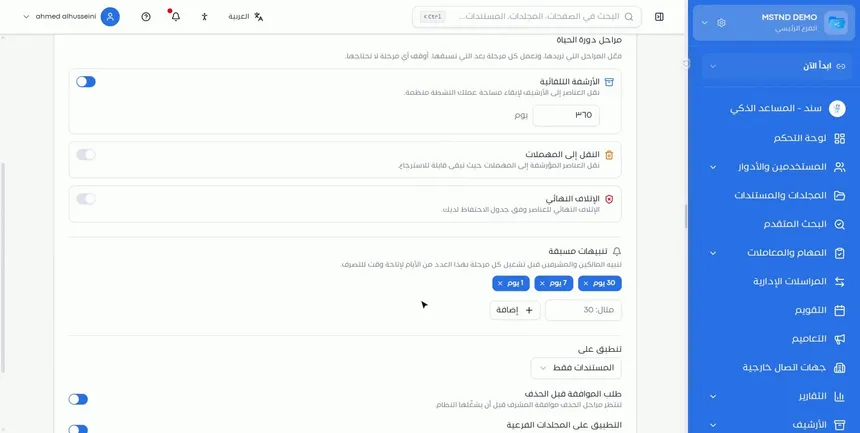
Under «Lifecycle stages», the interface explains: «Turn on the stages you want. Each stage runs after the one before it. Turn off any stage you do not need». The three stages are:
- «Auto-archiving»: moves items to the archive to keep your active workspace organized.
- «Move to trash»: moves archived items to the trash, where they can still be restored.
- «Permanent destruction»: permanently destroys items according to your retention schedule.
Each stage has an on switch, and when you turn a stage on, you set after how many days it runs. You can turn on archiving alone, archiving and trash, or all three stages.
Step 4: Add «Advance alerts»
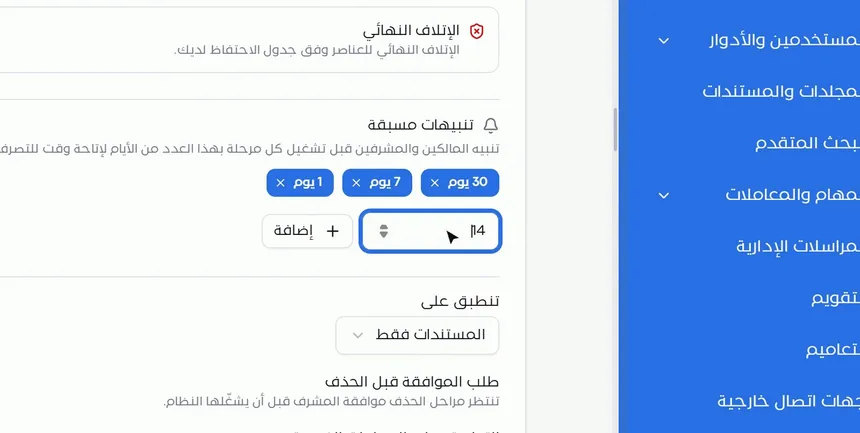
The «Advance alerts» section makes the system alert owners and supervisors the number of days you set before each stage runs, to give them time to act. The periods appear as tags, any of which you can delete, and you add a new period by typing the number of days in the field and then clicking «Add».
Multiple alerts give document owners more than one chance. An early alert lets them review calmly, and a later one reminds anyone who missed the first.
Step 5: Set «Applies to» and turn on «Require approval before deletion»
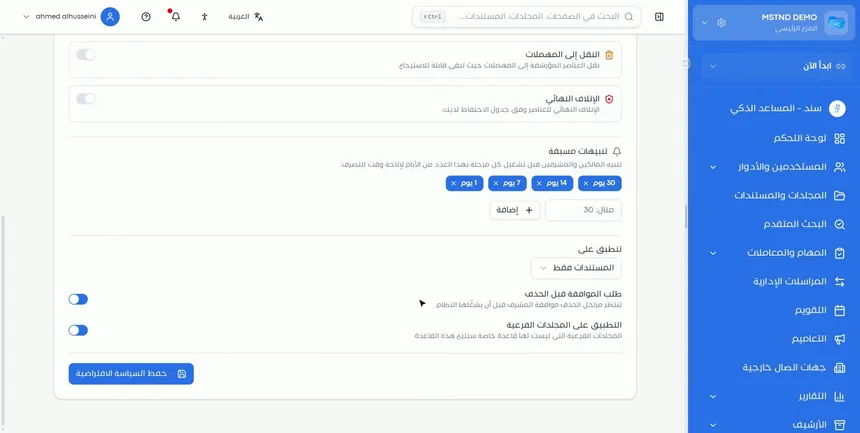
The last part of the default policy has three settings:
- «Applies to»: sets what the policy covers, such as «Documents only».
- «Require approval before deletion»: the deletion stages wait for a supervisor's approval before the system runs them, so nothing is deleted without that approval.
- «Apply to subfolders»: subfolders that have no rule of their own will follow this rule.
When you are done, click «Save default policy».
Step 6: Go to «Folder rules»
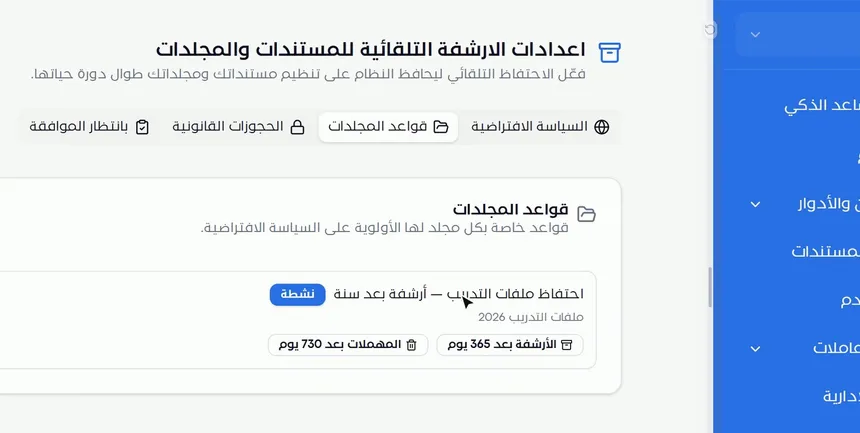
Not all documents have the same retention period. Employee contracts differ from marketing campaign materials, and invoices differ from drafts. In «Folder rules» you create a specific rule for a particular folder, and it takes priority over the default policy. This way the general policy stays simple, and you handle the exceptions with clear rules.
Step 7: Click «Add rule» and choose the folder
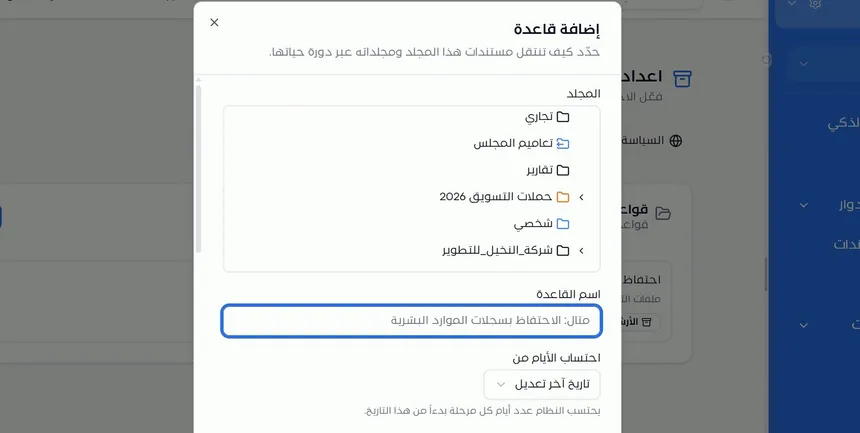
Click «Add rule», then choose the folder it applies to. In the example shown, the marketing campaigns folder is chosen, because campaign materials lose their operational value after a while, but it is advisable to keep them for some time for reference.
Step 8: Name the rule and set the stages and periods
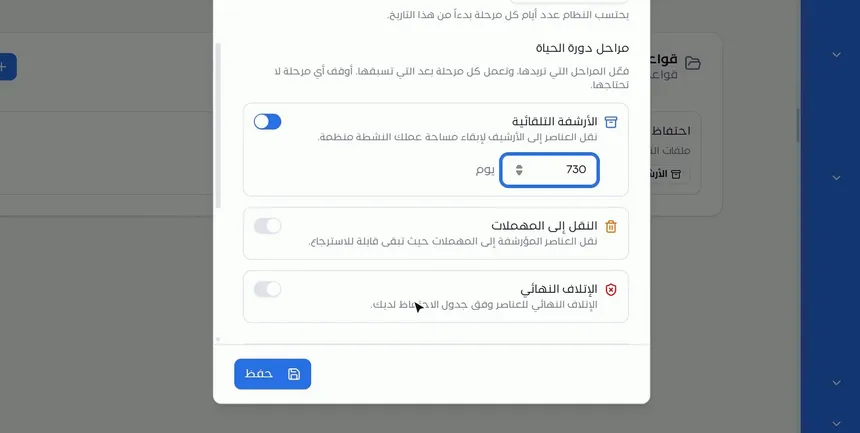
Write a clear name for the rule that describes its purpose, then set the date the days are counted from, and turn on the stages you need with the period for each one. In the example, «Auto-archiving» is turned on after 730 days, that is, two years, while «Move to trash» and «Permanent destruction» stay off. Then click «Save».
Step 9: Make sure the rule is saved
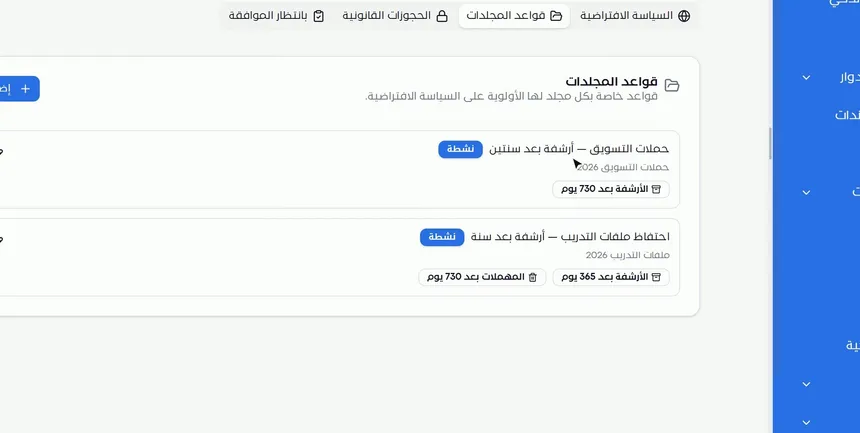
After saving, the rule appears in the «Folder rules» list. From now on, the documents in the campaigns folder are archived automatically after two years, regardless of the default policy settings.
Step 10: Use «Legal holds»
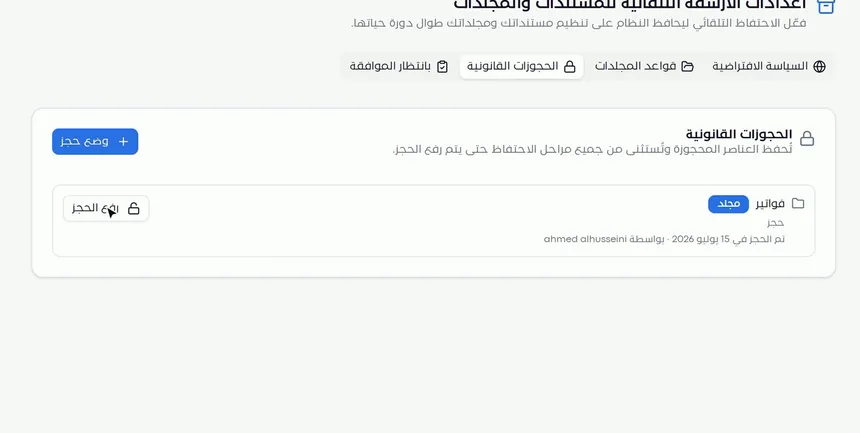
The «Legal holds» tab is described as: «Items on hold are preserved and excluded from all retention stages until the hold is released». You click «Place hold» to put any folder or document on hold, and it appears in the list with its type, the hold date and who placed it. When the need ends, you click «Release hold».
The legal hold is the safety valve of the whole policy. If there is a case, a review or an audit that requires certain documents to remain, the hold ensures that archiving and deletion do not touch them, whatever the rules are.
Step 11: Review «Pending approval»

If you turned on «Require approval before deletion», deletion requests collect in the «Pending approval» tab, and the system does not carry them out before you approve them. Review this tab regularly, because pending requests mean the lifecycle is paused for those items until you make a decision.
Options and their effect
| Option or setting | What it does | When to use it |
|---|---|---|
| «Count days from» | Sets the date from which the days of each stage are counted, such as «Last modified date» | When setting up any policy or rule |
| «Auto-archiving» | Moves items to the archive after the set period | To keep the active workspace organized |
| «Move to trash» | Moves archived items to the trash, where they can still be restored | When you want an intermediate stage before destruction |
| «Permanent destruction» | Permanently destroys items according to the retention schedule | Only when the retention schedule is approved and allows destruction |
| «Advance alerts» | Alerts owners and supervisors a number of days you set before each stage | Always, to give time to act |
| «Applies to» | Sets what the policy covers, such as «Documents only» | Depending on what you want to put through the lifecycle |
| «Require approval before deletion» | The deletion stages wait for a supervisor's approval | To add a human review before deletion |
| «Apply to subfolders» | Subfolders without a rule of their own follow this rule | To extend the policy to the whole tree |
| «Add rule» | Creates a specific rule for a folder that takes priority over the default policy | For folders with different retention periods |
| «Place hold» / «Release hold» | Excludes a folder or document from every stage, or returns it to them | When there is a case, a review or an audit |
| «Pending approval» | Shows the pending deletion requests | For the supervisor's regular review |
Practical scenarios
Scenario: A government entity applies its approved retention schedule
Situation: A government entity has an approved retention schedule and wants it applied to its documents without manual follow-up.
What you do in Mstnd:
- In «Default policy», choose «Count days from» and turn on archiving with the general period in the schedule.
- Add «Advance alerts» with staggered periods before each stage.
- Turn on «Require approval before deletion» and «Apply to subfolders», then save.
- Create «Folder rules» for the categories that have different periods in the schedule.
Result: The retention schedule becomes rules that the system carries out, with a review before any deletion.
Scenario: A law firm protects the files of an ongoing case
Situation: A law firm has a general archiving policy, but an ongoing case requires the client's folder to stay as it is until the case ends.
What you do in Mstnd:
- Open «Legal holds».
- Click «Place hold» and choose the case folder.
- When the case ends, click «Release hold».
Result: Archiving and deletion do not touch the case documents for as long as the hold lasts, and then the documents return to their normal cycle.
Scenario: A marketing department organizes campaign materials
Situation: The marketing campaigns folder keeps growing with old designs and plans, and the team wants a clean workspace without losing the materials.
What you do in Mstnd:
- In «Folder rules», click «Add rule» and choose the campaigns folder.
- Name the rule, and turn on only «Auto-archiving», after 730 days.
- Save.
Result: Campaign materials that are two years old move to the archive automatically, and they can still be restored from it.
Scenario: A trading company manages its invoices
Situation: A trading company keeps invoices for a set period, and then wants to move them to the trash after a review.
What you do in Mstnd:
- Create a rule for the invoices folder that turns on archiving and then moving to the trash, with suitable periods.
- Make sure «Require approval before deletion» is turned on in the policy.
- Review «Pending approval» periodically and approve the requests after checking them.
- Place a legal hold on any invoice or folder that is needed for an audit.
Result: A controlled lifecycle for invoices, with protection for whatever the audit needs.
How it relates to other features
- Digital archive: the destination of the archiving stage, and where you restore any archived item to its folder.
- Trash: whatever moves to the trash can still be restored from it until it is permanently deleted.
- Folders: folder rules and holds are built on the folder tree itself, so a well-organized tree makes the policy easier to set up.
- Moving, archiving and renaming: manual archiving of a specific document, which complements auto-archiving when you need an immediate decision.
- Document details: this is where you set the document's expiry date, useful information for understanding where the document stands in its lifecycle.
- Activity: the activity log records the movements in the system, which helps when reviewing what was done to items.
- Important documents: the organization's official documents have their own tracking of expiry and renewal dates, so do not mix them up with the general archiving policy.
Tips and best practices
- Start by turning on «Auto-archiving» alone, and watch its effect before turning on trash or destruction.
- Always turn on «Require approval before deletion» in the first phase of the rollout.
- Add more than one advance alert with staggered periods, so that document owners do not depend on a single alert that they might miss.
- Keep the default policy conservative, and handle the exceptions with folder rules.
- Give every rule a name that describes the folder and the period, so anyone who reviews it later understands it.
- Use legal holds as soon as any case or audit comes up, and do not wait for a deletion stage to approach.
- Review the «Legal holds» and «Pending approval» tabs regularly, and set a recurring time for it.
- Coordinate with the legal department before setting any period related to permanent destruction.
Warnings and common mistakes
FAQ
What is auto-archiving in Mstnd?
It is a feature that lets the system manage the lifecycle of documents and folders automatically, following a retention policy that you set, in stages: archiving, then moving to the trash, then permanent destruction.
How do I set how long documents are kept before they are archived?
In the «Default policy» tab, set «Count days from», then turn on the «Auto-archiving» stage, enter the number of days and click «Save default policy».
Can I set a different policy for a particular folder?
Yes. In «Folder rules», click «Add rule», choose the folder and set its stages and periods. This rule takes priority over the default policy.
What is a legal hold in Mstnd?
It is a hold that you place on a folder or document from the «Legal holds» tab, so it is preserved and excluded from all retention stages until the hold is released.
Can I prevent any document from being deleted without a supervisor's approval?
Yes. Turn on «Require approval before deletion»: the deletion stages then wait for a supervisor's approval, and the requests appear in the «Pending approval» tab.
What is the difference between moving to the trash and permanent destruction?
Moving to the trash keeps archived items restorable, while permanent destruction destroys them permanently according to the retention schedule.
Are document owners alerted before their documents are archived?
Yes. The «Advance alerts» section makes the system alert owners and supervisors the number of days you set before each stage, and you can add more than one period.
Can I restore a document that was archived automatically?
Yes. Archived documents appear in the digital archive, and from there you restore them to their folder.
Summary
- Auto-archiving turns the retention schedule into rules that the system carries out.
- The default policy sets the counting date, the three stages, the alerts and the scope of application.
- Folder rules handle the exceptions and take priority over the general policy.
- Legal holds exclude whatever cases and audits need from every stage.
- «Require approval before deletion» and the «Pending approval» tab put the deletion decision in the supervisor's hands.
Try it free: Create your organization's account in Mstnd
Was this article helpful?
Related articles
 0:35
The digital archive in Mstnd: keep finished work and restore it whenever you need it
Learn the digital archive in Mstnd: archived documents and folders, when and by whom they were archived, search, sort, restore with a reason or move to trash.
 0:28
The trash in Mstnd: restore what you deleted or delete it permanently
Learn the trash in Mstnd: everything deleted stays there with its deletion date and original folder, to be restored or deleted permanently, singly or in bulk.
 1:26
Folders in Mstnd: organize your organization's documents from day one
Learn the Mstnd Folders page: Personal space, structure folders, Shared with me, new folders with a confidentiality level, color and icon, views and actions.
 0:42
Moving, archiving and renaming: organize your documents in seconds
Learn to rename a document in Mstnd, move it between folders and archive it without deleting it from the file's three-dot menu, and restore it from the Archive.
 0:44
Document details: everything about your document in one place
Learn the «Details» tab in Mstnd: expiry date, path, type, size, creator, confidentiality and status changes with a reason, reminder, tags and system number.
 0:23
The activity log in Mstnd: who did what, and when
The Mstnd activity log shows every operation in the system with who did it and when; search by keyword or user name and pick a date range to review events.