

Creating from a template in Mstnd: a ready document in one click
In this article
Creating from a template in Mstnd lets you start any document from a ready-made form instead of a blank page. You choose the template from a library sorted by department and type of activity and preview it; the document is then created with all of its formatting, and you fill in its fields directly in the editor. It helps every department that wants its minutes, presentations and reports to be standardized in format and content across the whole organization.
Quick overview
| Item | Details |
|---|---|
| Module | Folders and documents |
| Where it is in the interface | Inside any folder → «New file» → the «Advanced» section → «From template» |
| Direct link | https://app.mstnd.sa/folders?folderId=<folder ID> |
| Goal | Create documents with a standard format quickly from ready-made forms |
| Who it is for | All departments, and especially sales, human resources, finance, and administration and governance, as well as quality officers who standardize forms |
| Video length | About 37 seconds |
| What you will learn | Opening the template library, moving between categories, searching and filtering by position, previewing a template, using it, filling it in, and saving or saving as a new version |
Watch the video
In under 40 seconds, the video shows how to create «Client meeting minutes» from the template library, from opening the library until the document is saved after it is filled in.
Why this feature?
When every employee creates their documents from scratch, a single type of document ends up in many formats. One set of meeting minutes uses a table, another uses paragraphs, and a third has no date or document number. The result is documents that are hard to compare, missing basic data, and time lost on formatting instead of content.
Templates solve this. The organization defines once the format of each type of document and its basic fields, and then every employee starts from it. The effort goes into filling in the content, and the documents stay consistent.
| Without templates | With creating from a template |
|---|---|
| Each employee formats the document in their own way | All documents of the same type share one format |
| You forget basic fields such as the document number or the status | The template includes the basic fields, ready to fill in |
| You look for an old file to copy its format | You choose the template from a categorized library |
| A new employee does not know the approved format | The library shows the approved forms of each department |
| Editing a copied file may change the original by mistake | The template stays as it is, and the new document is separate from it |
Where to find it
- From the side menu, choose «Folders and documents».
- Open the folder you want to save the document in.
- Click «New file».
- In the «Advanced» section, choose «From template».
Direct link: https://app.mstnd.sa/folders?folderId=<folder ID>
Concepts and terms
| Term | Meaning in Mstnd |
|---|---|
| Template | A document form with ready formatting and fields, from which a new document is created |
| Template library | A window that shows all the available templates, sorted by department and type of activity |
| Categories | Groups of templates, such as «Administration and governance», «Human resources», «Finance and accounting» and «Sales and business development» |
| Position filter | The «All positions» list, for showing the templates suited to a specific position |
| «Selected template» | A preview panel that shows the template you chose before you use it |
| «Use template» | Creating a new document from the selected template |
| «Save changes as a new version» | Saving the edits as a new version while the previous version stays saved |
Step by step
Step 1: Choose «From template» from «New file»
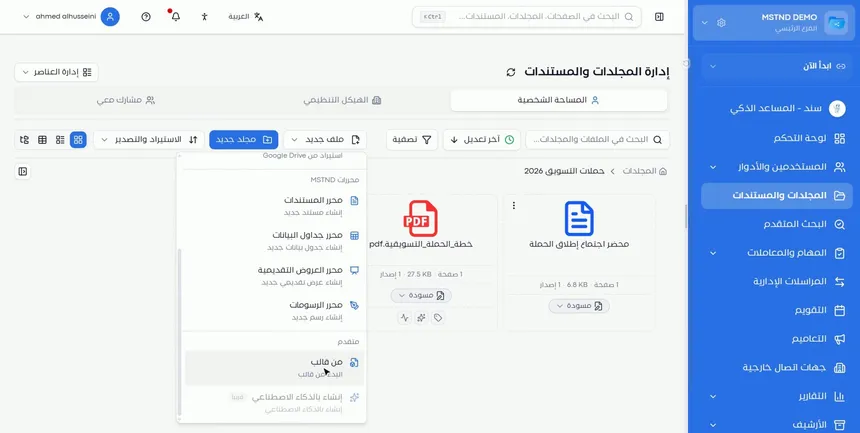
Inside the folder, click «New file», scroll down the menu to the «Advanced» section, then choose «From template», described as «Start from a template». The template library opens.
As with uploading and the editors, the top of the window shows «Uploading to» with the folder's name, and a «Change» button in case you want to save the document in another folder.
Step 2: Browse the library by category
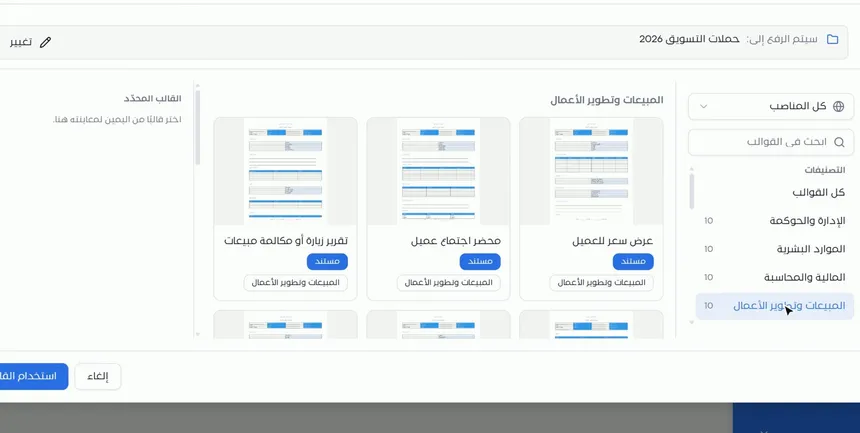
The library is split into two parts:
- The «Categories» list on the side: «All templates», then categories by department and type of activity, such as «Administration and governance», «Human resources», «Finance and accounting» and «Sales and business development», with the number of templates next to each category.
- Template cards in the middle: each template has a thumbnail, its name, its type, such as «Document», and its category.
Choose the category that relates to your work. For example, in «Sales and business development» you will find templates such as «Client price quote», «Client meeting minutes» and «Sales visit or call report».
Step 3: Search for a template or filter by position
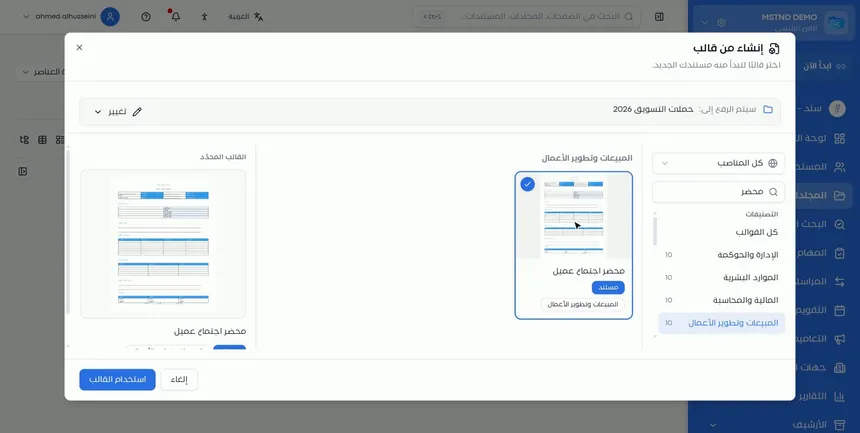
If you know what you want, type its name in the «Search templates» field. If you want to see the templates suited to a specific role, use the «All positions» list and choose the position.
Filtering by position is useful for a new employee. It shows them the forms they are expected to use in their work, without having to browse the whole library.
Step 4: Select the template and preview it before using it
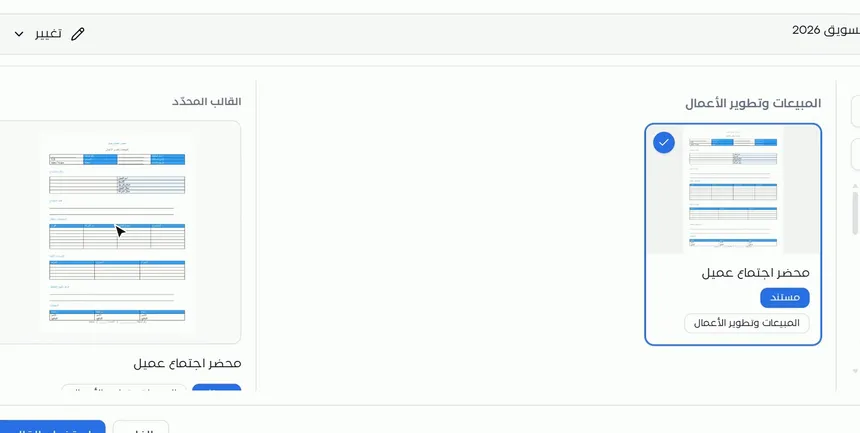
Click the template's card: a selection mark appears on it, and the «Selected template» panel shows a larger preview of it. Before you select anything, the panel shows the text «Choose a template on the right to preview it here».
The preview lets you make sure the template contains what you need: the tables, the sections and the fields. If it does not suit you, choose another one without creating any document.
Step 5: Click «Use template»
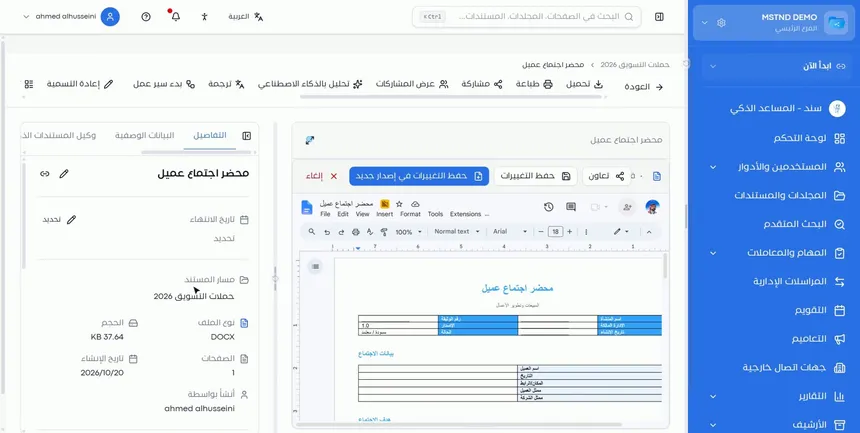
Once you are sure about the template, click «Use template». A new document is created in the selected folder with the template's full formatting: the headings, the tables, the colors and the fields. If you want to back out, click «Cancel».
The new document is separate from the template. What you write in it does not change the template, and the template stays available to others as it is.
Step 6: Fill in the fields inside the editor
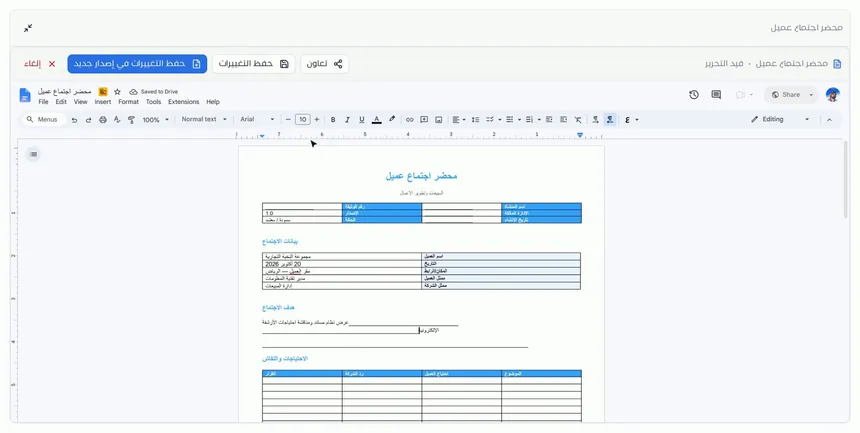
The document opens in the editor inside the system. Fill in the fields directly. In the «Client meeting minutes» example, you will find:
- The document table: document number, version, status, organization name, owning department and creation date.
- «Meeting details»: client name, date, place or link, client representative and company representative.
- «Meeting objective»: a short description of the purpose.
- «Needs and discussion»: a table with the topic, the client's need, the company's response and the decision.
The top of the editor shows the document's name and its status, «Being edited».
Step 7: «Save changes», or save them as a new version
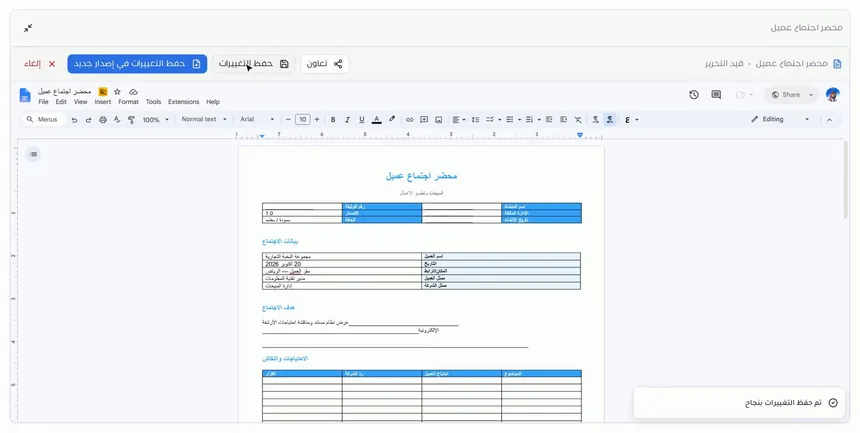
At the top of the editor there are two save options:
| Save option | What it does | When to choose it |
|---|---|---|
| «Save changes» | Saves the edits to the current version | While working on the same draft |
| «Save changes as a new version» | Saves the edits as a new version, and the previous version stays saved | For a substantial edit when you want to keep what came before it |
After saving, the message «Changes saved successfully» appears. Next to the save buttons are a «Collaborate» button for working with your colleagues and «Cancel» for leaving.
Options and their effect
| Option or setting | What it does | When to use it |
|---|---|---|
| «From template» | Opens the template library | When there is an approved form for the document |
| «Change» | Changes the destination folder | If you are not in the right folder |
| «All templates» | Shows all templates | For browsing the whole library |
| A department category | Shows the templates of a specific department or activity | For quick access to the templates of your work |
| «Search templates» | Searches by name | When you know the template's name |
| «All positions» | Filters templates by position | For new employees, or to show the templates of a specific role |
| Template card | Selects the template and shows its preview | For choosing the template and reviewing it |
| «Selected template» | Shows the template's preview | To check it before using it |
| «Use template» | Creates the document from the template | After the preview |
| «Cancel» | Closes the library without creating anything | To back out |
| «Save changes» | Saves to the current version | While filling in the document |
| «Save changes as a new version» | Saves a new version and keeps the previous one | For substantial edits |
| «Collaborate» | Enables working together | When more than one person takes part in filling in the document |
Practical scenarios
Scenario: A sales team in a trading company documents a client meeting
Situation: A sales representative has returned from a meeting with a prospective client and wants to document the needs and decisions in the approved format.
What you do in Mstnd:
- Open the client's folder.
- «New file» → «From template».
- Choose the «Sales and business development» category → «Client meeting minutes».
- Preview the template, then click «Use template».
- Fill in the meeting details, the needs and the decisions, then click «Save changes».
Result: Minutes in the same format as all of the team's minutes, saved in the client's folder.
Scenario: The HR department of a hospital prepares a job description
Situation: The hospital is creating a new job and needs a job description in the approved form.
What you do in Mstnd:
- Open the «Job descriptions» folder.
- «New file» → «From template».
- Choose the «Human resources» category and search for the job description template.
- Click «Use template», then fill in the duties and qualifications.
- Save, then send it for approval through a workflow.
Result: A job description in the approved format, ready for approval in a short time.
Scenario: A contracting company updates approved minutes
Situation: The minutes of a meeting with the project consultant were approved, and then the consultant asked for an item to be added.
What you do in Mstnd:
- Open the minutes from the project folder.
- Add the requested item in the editor.
- Choose «Save changes as a new version».
Result: The amended minutes are a new version, and the first approved copy is kept for reference.
Scenario: The finance department of a government entity onboards a new employee
Situation: A new accountant has joined the department and does not know the forms in use.
What you do in Mstnd:
- The accountant opens «New file» → «From template».
- They choose their position from «All positions».
- They browse the templates shown and preview each of them.
Result: The new employee gets to know the forms of their work in minutes, and starts with the right format from the very first document.
How it relates to other features
- Creating a document with the Mstnd editor: the template opens in the same editor; the difference is that you start from a ready-made form, not from a blank page.
- Folders: the template library is managed from «Manage items» → «Templates».
- Versions and operations log: «Save changes as a new version» creates a version that you will find there along with the earlier versions.
- Folder content: the document created from the template appears in the folder as a card with its status and version.
- Starting a workflow on the document: after filling in the template, send the document through a review and approval path.
- Signing: for signing the filled-in document electronically.
- Uploading files: if the document was already written outside the system, upload it instead of rewriting it in a template.
Tips and best practices
- Look for a template before you start any recurring document. If a template exists, it is the approved format.
- Always preview the template before using it, especially when template names are similar.
- Fill in the document table (number, version and status) first.
- Do not delete sections from the template because they are empty. Write «Not applicable» so the reader knows the section was reviewed.
- Use «Save changes» while you work, and «Save changes as a new version» for edits made after review or approval.
- Open the library from the right folder to avoid moving the document later.
- If you notice that a template needs updating, tell the person responsible for templates instead of editing every document separately.
Warnings and common mistakes
FAQ
How do I create a document from a template in Mstnd?
Open the folder, click «New file» and then «From template». Choose the template and preview it, then click «Use template», fill in its fields in the editor and save it.
How are templates categorized in the library?
They are categorized by department and type of activity, such as «Administration and governance», «Human resources», «Finance and accounting» and «Sales and business development», with an «All templates» option.
Can I search for a specific template?
Yes. Type the template's name in the «Search templates» field, or filter the templates by position from the «All positions» list.
Can I preview a template before using it?
Yes. When you click a template's card, its preview appears in the «Selected template» panel, and no document is created until you click «Use template».
Does the original template change when I edit the document?
No. The created document is independent of the template, and its edits do not affect the template, which stays available as it is.
What is the difference between «Save changes» and «Save changes as a new version»?
«Save changes» saves to the current version, while «Save changes as a new version» creates a new version and keeps the previous version saved for reference.
Where do I manage the template library?
From the folders page, through the «Manage items» button → «Templates».
Can I fill in a template with my colleagues?
Yes. At the top of the editor there is a «Collaborate» button for working on the document together.
Summary
- «From template» in the «New file» menu opens a template library sorted by department and type of activity.
- Searching and filtering by position get you to the right template quickly.
- The preview in «Selected template» confirms that the template fits before any document is created.
- «Use template» creates a document with the template's full formatting, and you fill in its fields in the editor.
- «Save changes as a new version» saves your edits and keeps the original saved.
Try it free: Create your organization's account in Mstnd
Was this article helpful?
Related articles
 0:38
The Mstnd editors: create your documents and spreadsheets inside the system
The Mstnd editors let you create text documents, spreadsheets, presentations and drawings inside the system, save them to the folder and keep editing anytime.
 1:26
Folders in Mstnd: organize your organization's documents from day one
Learn the Mstnd Folders page: Personal space, structure folders, Shared with me, new folders with a confidentiality level, color and icon, views and actions.
 0:38
Versions and the operations log in Mstnd: a complete history for every document
Mstnd versions and the operations log: save edits as a new version and keep the old one, view, download or translate any copy, and track who did what and when.
 1:05
Folder content in Mstnd: find your file and manage it in seconds
The Mstnd folder content screen explained: file cards and status changes, multi-select and bulk actions, the folder side panel, and AI chat about the files.
 1:14
Starting a workflow on a document in Mstnd: launch the approval from the document
Learn to start a workflow from a Mstnd document: pick a template, set priority and due date, assign steps and launch the transaction with the document attached.
 0:49
Uploading files to Mstnd: drag and drop, and the system does the rest
Mstnd file upload: drag and drop several files at once, change the destination folder, set status, category and tags, automatic analysis and import from a link.