

Scanning in Mstnd: turn paper into a digital PDF file
In this article
Scanning in Mstnd lets you turn paper documents into a digital PDF file using the camera of your phone or device, without needing a separate scanner. You capture one page or more, put them in order, retake or delete whatever is not usable, and then a single PDF file is created directly inside the folder. It helps every organization that still receives paper contracts, letters or forms and wants to save them in its digital system the moment they arrive.
Quick overview
| Item | Details |
|---|---|
| Module | Folders and documents |
| Where it is in the interface | Inside any folder → «New file» → «Scan» |
| Direct link | https://app.mstnd.sa/folders?folderId=<folder ID> |
| Goal | Turn paper into a PDF file saved in the right folder, with no extra equipment |
| Who it is for | Reception staff, outgoing and incoming correspondence staff, contracts officers, field site teams and anyone who deals with paper |
| Video length | About one minute and two seconds |
| What you will learn | Opening the camera, capturing one page or several, finishing the capture, ordering the pages, retaking, deleting or adding a page, and creating a PDF file |
Watch the video
In about a minute, the video shows how to scan a two-page paper contract, from opening the camera until the PDF file appears inside the folder.
Why this feature?
Despite digital transformation, paper is still part of daily work: a signed contract arriving from a supplier, an official letter, a form filled in by hand, or an invoice. When paper stays in drawers, it is exposed to loss and damage, and it cannot be searched or shared quickly.
The traditional way of digitizing paper requires a scanner, then saving the file on the computer, then uploading it. Scanning in Mstnd shortens this to a few steps inside the system itself, using a camera that is already in your phone.
| Before scanning in Mstnd | With scanning |
|---|---|
| You need a scanner in the office | You use the camera of your phone or device |
| You save the images on the device, then upload them | The file is created directly in the folder |
| Separate images for each page | One PDF file that combines the pages in order |
| A blurry page means scanning everything again | You retake that page only |
| Papers in drawers cannot be searched | The file is analyzed so it becomes searchable |
Value for the organization: paper is digitized the moment it arrives, and reliance on the paper archive is reduced. Value for the individual: no waiting for a scanner, and no moving between devices.
Where to find it
- From the side menu, choose «Folders and documents».
- Open the folder you want to save the scanned document in.
- Click «New file».
- From the «Via» section, choose «Scan», described as «Scan using the camera».
Direct link: https://app.mstnd.sa/folders?folderId=<folder ID>
Concepts and terms
| Term | Meaning in Mstnd |
|---|---|
| Scanning | Turning a sheet of paper into a digital image with the camera, then combining the images into a PDF file |
| «Open camera» | A button that turns on your device's camera inside the system |
| «Capture page» | A window that shows the camera view for capturing an image of the page |
| Capture button | The round button that captures the current page |
| Page order | Moving the pages with the arrows to set their order in the final file |
| Retake | Replacing a page's image with a new shot |
| «Create file» | Turning the captured pages into a PDF file and saving it in the folder |
Step by step
Step 1: Choose «Scan» from «New file»
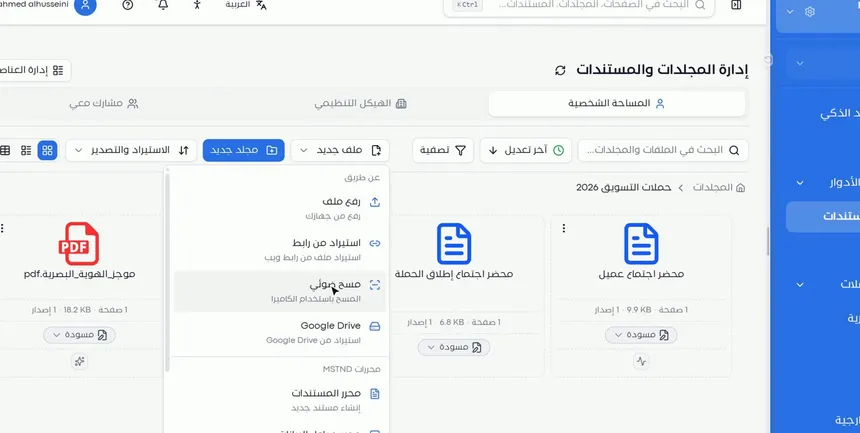
Inside the folder, click «New file» and then «Scan». The «Create new file» window opens, showing «Uploading to» with the folder's name and a «Change» button for choosing another folder, followed by the text «Use your device's camera».
Confirm the destination folder before you start. Scanned documents are often contracts or official letters, and their correct location matters for who can access them.
Step 2: Click «Open camera» and point it at the paper
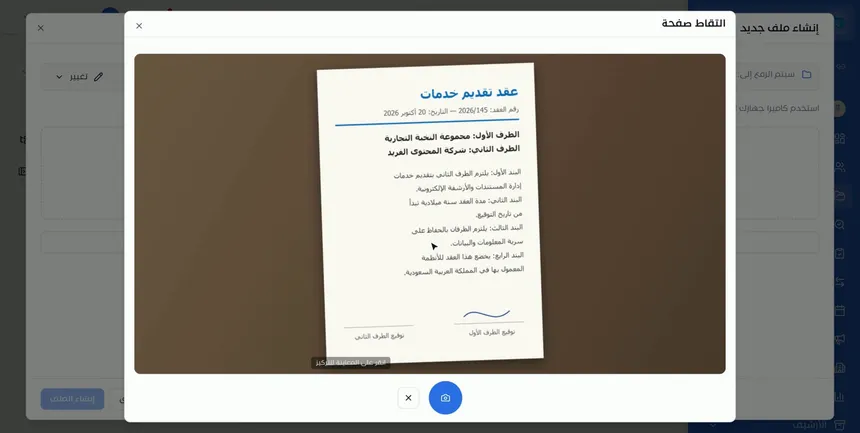
Click «Open camera». The browser may ask for your permission to use the camera the first time; allow it. The «Capture page» window opens and shows what the camera sees.
Point the camera at the paper so that the whole page is visible. If the image looks unclear, tap the preview to focus, as the hint «Tap the preview to focus» indicates.
Step 3: Press the capture button for each page
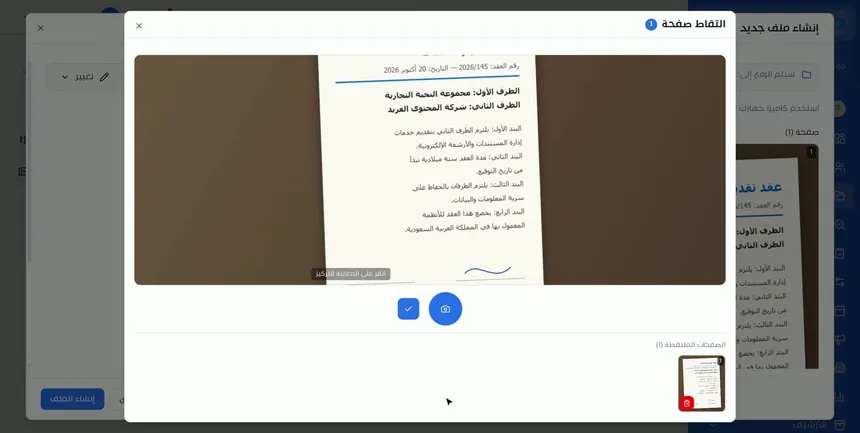
When the page is clear in the preview, press the round capture button at the bottom of the window. The page is saved, and the camera stays open for the next page.
Keep your hand steady at the moment of capture. A blurry image makes the text hard to read, and it affects content analysis and text extraction later.
Step 4: Capture more than one page
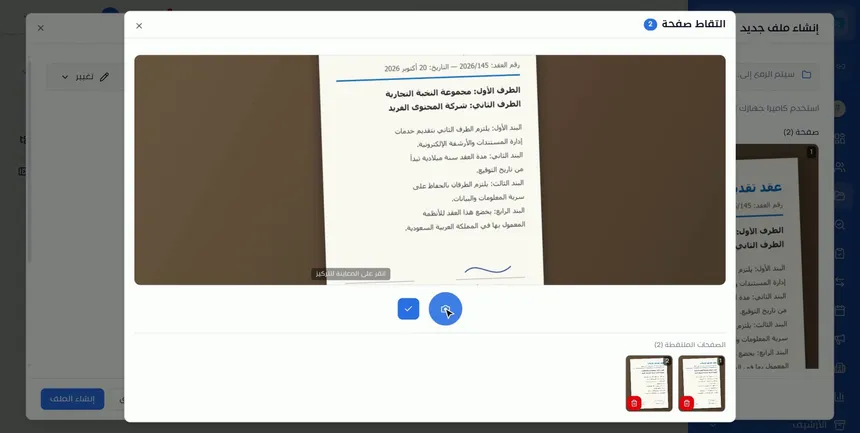
Turn the sheet over or put the next page in place, and capture it the same way. The captured pages appear as thumbnails at the bottom, so you can see what you have captured so far.
This way you scan a multi-page document, such as a five-page contract, in a single session, and you end up with one file instead of five.
Step 5: Press ✔ to finish capturing
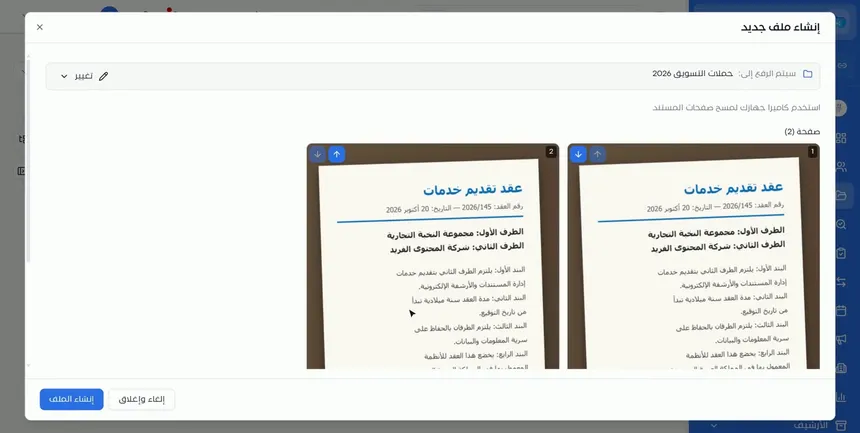
After capturing all the pages, press the check mark ✔. The camera closes, and you return to the «Create new file» window, where the captured pages are shown in a larger size for review.
Step 6: Order the pages with the arrows before saving
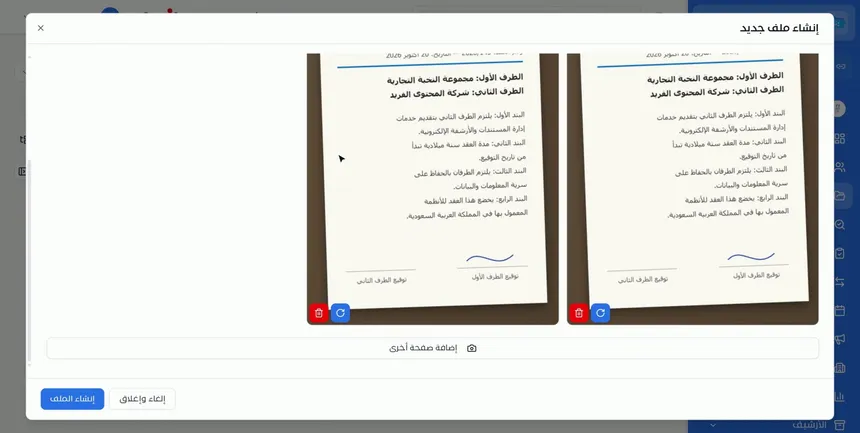
Review the order of the pages. If you captured the pages in a different order from the original, use the arrows to move each page to its correct position.
The correct order matters especially for contracts and minutes, where the clauses depend on their sequence and the signatures are usually on the last page.
Step 7: Retake a page, delete it or add another page
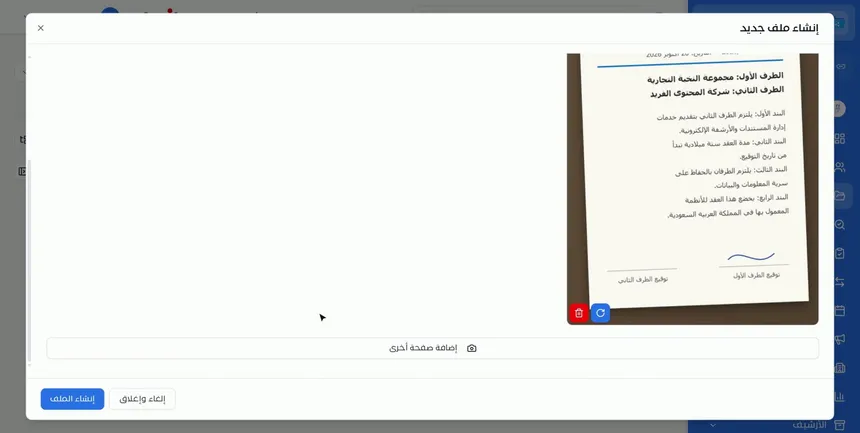
Each page has two buttons:
- Retake: opens the camera to replace this page with a new shot, while the rest of the pages stay as they are.
- Delete: removes the page from the file.
Below the pages is an «Add another page» button for capturing a page you forgot.
These tools save time. If one page out of ten is unclear, you retake only that page instead of starting over.
Step 8: Click «Create file» to turn it into a PDF
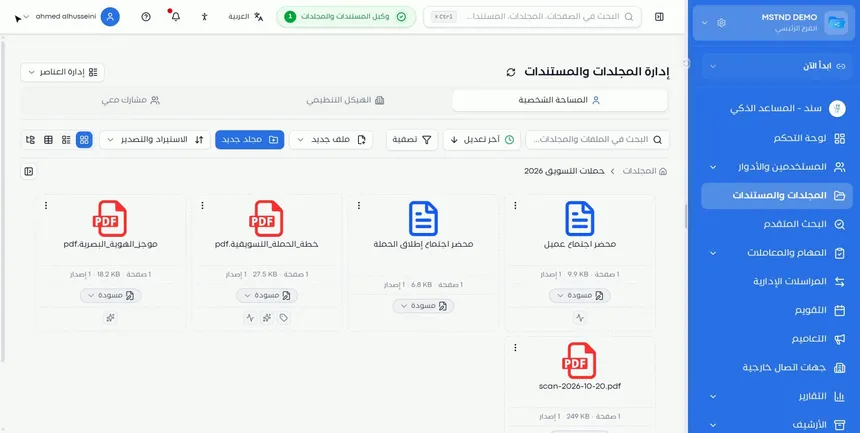
Click «Create file». The pages are turned into a single PDF file, which is saved in the folder. It appears as a card with a name that includes the word scan and the scan date, such as «scan-2026-10-20.pdf», along with its number of pages, size, version and status.
As with uploading, the «Documents and folders agent» indicator appears at the top, because the system starts processing the file. If you want to back out before the file is created, click «Cancel and close».
Options and their effect
| Option or setting | What it does | When to use it |
|---|---|---|
| «Scan» | Opens the scanning window | For paper documents |
| «Change» | Changes the destination folder | If you are not in the right folder |
| «Open camera» | Turns on the camera | To start capturing |
| Tapping the preview | Adjusts the focus | When the image looks unclear |
| Capture button | Captures the current page | For each page |
| × in the camera window | Closes the camera | To exit capturing |
| ✔ | Finishes capturing | After capturing all the pages |
| The arrows | Reorder the pages | If they were captured in a different order |
| Retake | Replaces a page with a new shot | For a blurry or cut-off page |
| Delete | Removes a page | For a page captured by mistake or a duplicate |
| «Add another page» | Opens the camera for an extra page | For a forgotten page |
| «Create file» | Creates a PDF file in the folder | After the review |
| «Cancel and close» | Cancels the scan | To back out |
Practical scenarios
Scenario: A contracting company documents a receiving report on site
Situation: The site engineer signed a paper material receiving report with the supplier and wants to send it to management right away.
What you do in Mstnd:
- Open Mstnd from the phone's browser, and go to the project folder → «Receiving reports».
- «New file» → «Scan» → «Open camera».
- Capture the report's pages, then press ✔.
- Check that the signatures are clear, then click «Create file».
Result: The report is in the project folder within minutes of being signed, and management sees it without waiting for the paper to arrive.
Scenario: A government entity digitizes its incoming paper correspondence
Situation: An incoming correspondence clerk receives paper letters from different entities every day.
What you do in Mstnd:
- Open the «Incoming» folder for the current month.
- Scan each letter, with all of its pages, into a separate file.
- Rename each file with the letter's number and the sending entity.
- Refer the letter to the relevant department through administrative correspondence.
Result: Every piece of incoming paper correspondence has an organized digital copy that can be searched and referred.
Scenario: A hospital saves consent forms filled in by hand
Situation: The administrative affairs department receives forms filled in by hand and needs to save them digitally.
What you do in Mstnd:
- Open the folder dedicated to the forms, with a suitable confidentiality level.
- Scan each form, and retake any page that is unclear.
- Create the file and add a tag with the section.
Result: Forms saved digitally in a protected folder, instead of paper files in drawers.
Scenario: A law firm digitizes an old contract
Situation: A client brought a paper copy of an old ten-page contract, and the firm needs a digital copy to work on.
What you do in Mstnd:
- Open the case folder.
- Scan the ten pages, and reorder them with the arrows if needed.
- Create the file, then use text search to get to the clauses.
Result: An ordered digital copy of the contract, whose clauses can be searched and shared with the case team.
How it relates to other features
- Uploading files: if the document is already digital, upload it instead of scanning it.
- Text search: lets you search by word inside the content of files, even if they were scanned.
- Folder content: the scanned file appears there as a card, and from there you change its status and add its tags.
- Smart document agent: reads the scanned document and extracts its text, its summary, the amounts and the parties.
- Folders: choose a destination folder with a confidentiality level suited to the nature of the scanned document.
- Document numbering: if numbering is set up for the folder, the scanned file gets its number automatically.
- Moving, archiving and renaming: for renaming the scanned file with a name that describes its content.
Tips and best practices
- Scan the document the moment it arrives, before it goes into a drawer.
- Place the paper on a flat, dark surface, in even lighting with no shadows.
- Take the picture from directly above the paper, not at an angle, so the text is not distorted.
- Keep each document in a separate file. Do not scan two contracts into one file.
- Check that the signatures and stamps are clear before «Create file».
- Rename the file as soon as it is created, with a name that describes its content.
- Add the expiry date for scanned contracts and licenses, just as you do with uploaded files.
- Keep the paper original according to the organization's policy if it has legal value.
Warnings and common mistakes
FAQ
How do I scan a paper document in Mstnd?
Open the folder, click «New file» and then «Scan», then «Open camera». Capture the pages and press ✔, then click «Create file» to save it as a PDF file.
Do I need a scanner?
No. Scanning is done with the camera of your phone or device, directly from inside the system.
Can I scan a multi-page document into one file?
Yes. Capture all the pages in the same session; they appear as thumbnails at the bottom and are then combined into a single PDF file when you click «Create file».
How do I change the order of the scanned pages?
After you finish capturing with the ✔ mark, use the arrows to move each page to its correct position before creating the file.
What do I do if a page is unclear?
Press the retake button on that page to replace it with a new shot, without affecting the rest of the pages.
In what format is the scanned file saved?
It is saved as a PDF file in the folder you chose, with a name that includes the scan date.
Can the text of a scanned document be searched?
Yes. The system processes the file after it is created, and full-text search lets you search inside the content of files, even if they were scanned.
Can I add a page I forgot before saving?
Yes. Click «Add another page» below the captured pages to capture an extra page.
Summary
- Scanning turns paper into a PDF file with the camera of your phone or device, without a separate scanner.
- You capture several pages in one session, then finish with the ✔ mark.
- You order the pages with the arrows, retake or delete any page, and add a forgotten page.
- «Create file» saves a PDF file directly in the folder, and the system starts processing it.
- The quality of the capture, and naming the file afterwards, matter most in making a scanned document useful later.
Try it free: Create your organization's account in Mstnd
Was this article helpful?
Related articles
 0:49
Uploading files to Mstnd: drag and drop, and the system does the rest
Mstnd file upload: drag and drop several files at once, change the destination folder, set status, category and tags, automatic analysis and import from a link.
 1:16
Text search in Mstnd: search inside the content of your files
Learn Mstnd text search: find a word, number or date inside file names, content and extracted values, with highlighted matches, filters and saved searches.
 1:05
Folder content in Mstnd: find your file and manage it in seconds
The Mstnd folder content screen explained: file cards and status changes, multi-select and bulk actions, the folder side panel, and AI chat about the files.
 0:59
The Mstnd smart document agent: understand your document before you read it
Mstnd's smart document agent analyzes each file: text, summary and entities, plus suggested status, categories, tags, tasks and access with a confidence score.
 1:26
Folders in Mstnd: organize your organization's documents from day one
Learn the Mstnd Folders page: Personal space, structure folders, Shared with me, new folders with a confidentiality level, color and icon, views and actions.
 0:55
Document numbering in Mstnd: consistent automatic numbering for every folder
Set up automatic document numbering in Mstnd for each folder: prefix, suffix, year, month, separator, counter digits and starting number, with a live preview.